中級チュートリアル: セマンティック セグメンテーションテクスチャ
このチュートリアルでは、セマンティックシステムからマスクを取得する方法について説明します。これらのマスクを使用してOnRenderImageを呼び出し、シンプルなオーバーレイ効果を適用します。
注釈
動画で使用しているモッキングシステムはARDK 1.3で更新されています。モックモードの変更点の詳細については、その他の モックモードの動画 <https://www.youtube.com/watch?v=HkPfxBZPE_Q> をご参照ください。
準備
このチュートリアルは、ARDKとARDK使用例のパッケージをインポートし、デバイス上でプロジェクトを実行するように設定された、動作中のUnityシーンがあることを前提としています。まだパッケージをインポートしていない場合は、プロジェクトビューで次の操作を行います。
アセットフォルダを右クリック > Import Package(パッケージのインポート) > Custom Package(カスタムパッケージ) > ダウンロードしたARDKパッケージを選択 > Import All(すべてインポート) の順に選択
アセットフォルダを右クリック > Import Package(パッケージのインポート) > Custom Package(カスタムパッケージ) > ダウンロードしたARDK使用例パッケージを選択 > Import All(すべてインポート) の順に選択
AndroidまたはiOSをビルドするためのビルドとプレイヤーの設定を更新します。
詳細については、 ARDKを使い始める ページをご参照ください。
手順
新しいシーンを作成する。
プロジェクト ビューの シーン セクションで、フォルダを作成(右クリックして、Create(作成) > Folder(フォルダ) の順に移動)し、
SemanticTexturesと名前を付けます。そのフォルダに新しいシーンを作成(右クリックして、Create(作成) > Scene(シーン) の順に選択)し、
SemanticTexturesTutorialと名前を付けます。アプリの起動時に追加されるように、プロジェクトのビルド設定にシーンを追加してください。
カメラをセットアップする。
ARCameraPositionHelperコンポーネントをカメラに追加します。
カメラにARRenderingManagerを追加します。
両方のヘルパーのカメラ変数がメインカメラに設定されていることを確認します。
カメラの背景を無色にして黒に設定します。

ARDKマネージャーを追加する。
このチュートリアルでは、カメラオブジェクトにマネージャーを追加しますが、シーンに特定のレイアウトが必要な場合は、空のゲームオブジェクトに追加することもできます。
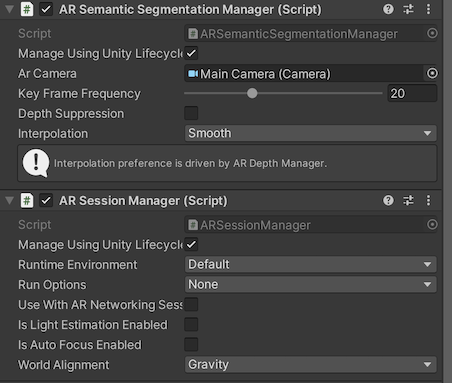
カメラに セッションマネージャー を追加します。
カメラに セマンティック セグメンテーションマネージャー を追加します。
スクリプトを作成する。
新しいスクリプトを作成(右クリックして、Create(作成) > Script(スクリプト) の順に選択)し、
SemanticTutorialと名前を付けます。コンポーネントとしてカメラに追加します(カメラにドラッグするか、カメラ上で Add Component(コンポーネントを追加) をクリックし、
SemanticTutorialを検索)。
SemanticTutorialスクリプトでは、セマンティックマネージャーを取り込み、新しいバッファのためのコールバックを追加します:
using System.Collections;
using System.Collections.Generic;

using Niantic.ARDK;
using Niantic.ARDK.AR;
using Niantic.ARDK.Extensions;
using Niantic.ARDK.AR.ARSessionEventArgs;
using Niantic.ARDK.AR.Configuration;
using Niantic.ARDK.AR.Awareness;
using Niantic.ARDK.AR.Awareness.Semantics;

using UnityEngine;
using UnityEngine.UI;

public class SemanticTutorial : MonoBehaviour
{
    //pass in our semantic manager
    public ARSemanticSegmentationManager _semanticManager;

    void Start()
    {
        //add a callback for catching the updated semantic buffer
        _semanticManager.SemanticBufferUpdated += OnSemanticsBufferUpdated;
    }

    //will be called when there is a new buffer
    private void OnSemanticsBufferUpdated(ContextAwarenessStreamUpdatedArgs<ISemanticBuffer> args)
    {

    }
}
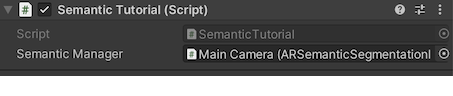
スクリプトを追加したら、 セマンティックマネージャー変数 に、先ほど追加した ARセマンティック セグメンテーションマネージャー を設定します。後で、いくつかの関数を呼び出して、セマンティックバッファからテクスチャを作成し、テクスチャを表示するためのUIイメージにリンクアウトするための変数を追加します。
Unityエディター内でシーンを構築して実行する
ネームスペースの欠落やタイプミスによるビルドエラーがある場合は修正します。
この時点でシーンを実行すると、Unityでスカイドームに真っ白な画面が表示されます。

Unityでセマンティックをテストできるようにモッキングをセットアップする。
ARDKのダウンロードページ からARDKのモック環境パッケージをダウンロードします。
パッケージをUnityプロジェクトにインポートします。
Lightship > ARDK > バーチャルスタジオ ウィンドウの順に移動してMockタブを開き、 Mock Scene(モックシーン) のドロップダウンから、
ParkPondプレハブを選択します。Unityエディターで実行すると、このプレハブは自動的にシーンにインスタンス化されます。
Unityで実行する。
現時点では、セマンティックにオーバーレイが適用されていないモック環境が表示されます。
バッファをマスキングテクスチャに処理するようにコールバックを更新する。
CreateOrUpdateTextureARGB32を使用して、バッファから直接テクスチャを作成します。この場合、シーンのクロッピングや調整が行われることはありませんが、ARDKには、このバッファをサンプリングする際に使用するマトリックスが付属しています。SamplerTransformでは、頂上シェーダーでUV座標と変換を掛け合わせることで、画面に合わせて調整することができます。
テクスチャを作成するには、次のように行います。
OnSemanticBufferUpdated関数を更新し、CreateOrUpdateTextureARGB32を呼び出します。シェーダーで画面に転送するために、
OnRenderFuntionをスクリプトに追加します。(Lightshipのシェーダーで)レンダリングするマテリアルを追加するための変数を追加します。
OnRenderImageを使用中は、チュートリアルのスクリプトがカメラオブジェクトにあることを確認してください。
SemanticTutorialのOnSemanticBufferUpdatedメソッドが、CreateOrUpdateTextureARGB32を使用するように更新されました:
Texture2D _semanticTexture;

private void OnSemanticsBufferUpdated(ContextAwarenessArgs<ISemanticBuffer> args)
{
    //get the buffer that has been surfaced.
    ISemanticBuffer semanticBuffer = args.Sender.AwarenessBuffer;
    //ask for a mask of the sky channel
    int channel = semanticBuffer.GetChannelIndex("sky");

    //get the channel from the buffer we would like to use using create or update.
    semanticBuffer.CreateOrUpdateTextureARGB32(
        ref _semanticTexture, channel
    );
}
SemanticTutorialのOnRenderImage関数:
public class SemanticTutorial : MonoBehaviour
{
    public Material _shaderMaterial;

    void OnRenderImage(RenderTexture source, RenderTexture destination)
    {
        //pass in our texture
        //Our Depth Buffer
        _shaderMaterial.SetTexture("_SemanticTex", _semanticTexture);

        //pass in our transform
        _shaderMaterial.SetMatrix("_semanticTransform", _semanticManager.SemanticBufferProcessor.SamplerTransform);

        //blit everything with our shader
        Graphics.Blit(source, destination, _shaderMaterial);
    }
}
マテリアルとシェーダーを作成する
プロジェクトビューで右クリックし、Create(作成) > Material(マテリアル) の順に移動します。
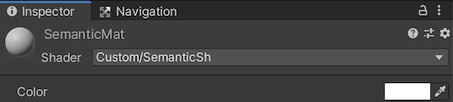
SemanticMatと名前を付けます。右クリックし、 Create (作成) > Shader (シェーダー) (任意のタイプを選択。中のコードはすべて置き換えられるため、Standard Surface Shaderで問題ありません)の順に移動します。
SemanticShと名前を付けます。シェーダーでマテリアルを指定し、
SemanticTutorialスクリプトにマテリアルを設定し、渡します。
テクスチャと変換を取り込み、表示するようにシェーダーを更新する。
シェーダーに、
_SemanticTexと_semanticTransformが取り込まれます。頂上シェーダーでは、UVにsemanticTransformを掛け、Fragシェーダーで使用できるように保存します。
Fragシェーダーでは、テクスチャのポイントを探す際、変換されたUVを使用します。
Shader "Custom/SemanticSh"
{
    Properties
    {
        _MainTex ("Texture", 2D) = "white" {}
        _SemanticTex("_SemanticTex", 2D) = "red" {}
    }
    SubShader
    {
        // No culling or depth
        Cull Off ZWrite Off ZTest Always

        Pass
        {
            CGPROGRAM
            #pragma vertex vert
            #pragma fragment frag

            #include "UnityCG.cginc"

            struct appdata
            {
                float4 vertex : POSITION;
                float2 uv : TEXCOORD0;
            };

            struct v2f
            {
                float2 uv : TEXCOORD0;
                float4 vertex : SV_POSITION;
                //storage for our transformed depth uv
                float3 semantic_uv : TEXCOORD1;
            };

            // Transforms used to sample the context awareness textures
            float4x4 _semanticTransform;

            v2f vert (appdata v)
            {
                v2f o;
                o.vertex = UnityObjectToClipPos(v.vertex);
                o.uv = v.uv;

                //multiply the uv's by the depth transform to roate them correctly.
                o.semantic_uv = mul(_semanticTransform, float4(v.uv, 1.0f, 1.0f)).xyz;
                return o;
            }

            //our texture samplers
            sampler2D _MainTex;
            sampler2D _SemanticTex;


            fixed4 frag (v2f i) : SV_Target
            {
                //unity scene
                float4 mainCol = tex2D(_MainTex, i.uv);
                //our semantic texture, we need to normalise the uv coords before using.
                float2 semanticUV = float2(i.semantic_uv.x / i.semantic_uv.z, i.semantic_uv.y / i.semantic_uv.z);
                //read the semantic texture pixel
                float4 semanticCol = tex2D(_SemanticTex, semanticUV);

                return mainCol+semanticCol;
            }
            ENDCG
        }
    }
}
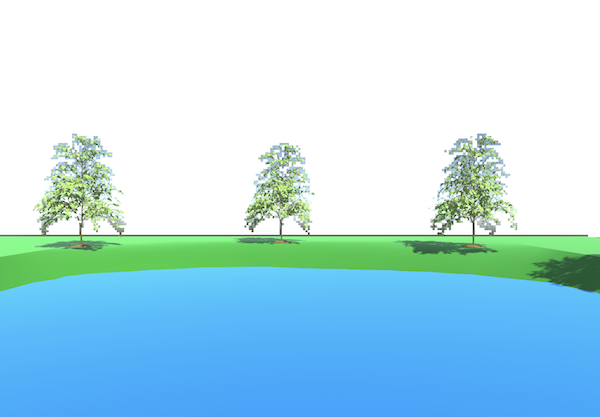
Unityで実行する。
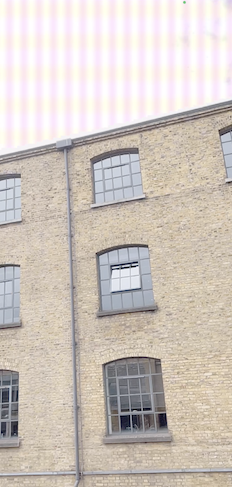
これで、skyとマークされたオブジェクトの上に白いマスクが表示されます。
シェーダーにエフェクトを追加する。
skyチャンネルに色付けしてみましょう。
シェーダーのフラグメントセクションを次のコードに置き換えます。この例では、サインとコサインを使用して単純なパターンを作成し、それを背景に合わせます。
fixed4 frag (v2f i) : SV_Target
{
    //unity scene
    float4 mainCol = tex2D(_MainTex, i.uv);
    //our semantic texture, we need to normalise the uv coords before using.
    float2 semanticUV = float2(i.semantic_uv.x / i.semantic_uv.z, i.semantic_uv.y / i.semantic_uv.z);
    //read the semantic texture pixel
    float4 semanticCol = tex2D(_SemanticTex, semanticUV);


    //add some grid lines to the sky
    semanticCol.g *= sin(i.uv.x* 100.0);
    semanticCol.b *= cos(i.uv.y* 100.0);
    //set alpha to blend rather than overight
    semanticCol.a *= 0.1f;

    //mix the main color and the semantic layer
    return lerp(mainCol,semanticCol, semanticCol.a);
}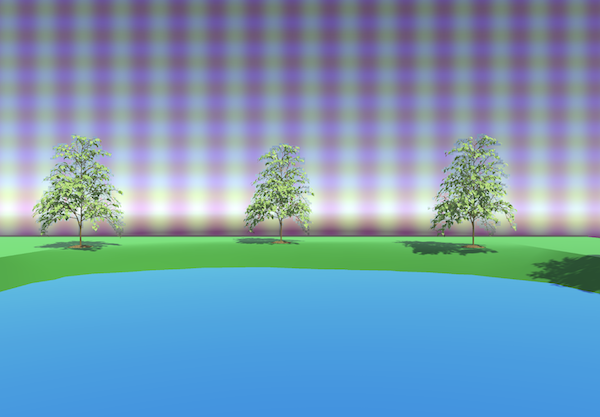
スマートフォンで実行し、skyのシェーダー効果を確認する。
File(ファイル) > Build & Run(ビルドと実行) の順に選択します。
Xcodeでビルドし、スマートフォンで実行します。
必ずデバッグを停止し、手動で再実行してください。デバッガーを接続すると出力パフォーマンスが低下します。
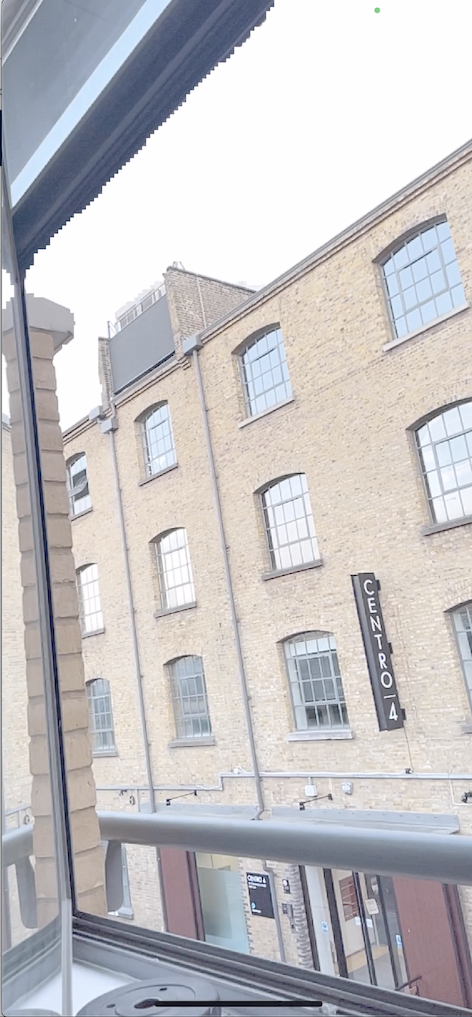
これで、空に縞模様がオーバーレイ適用されたのが分かります。
その他の方法を試す:
使用するチャンネルは変更することができます(空、建物、葉、地面)。
複数のチャンネルを使用し、チャンネルごとにエフェクトを変更します。
たとえば、マスクのある場所に何か別のもの(ゲームの世界への眺めなど)をレンダリングします。
完成したソース
SemanticTutorial.cs
using System.Collections;
using System.Collections.Generic;

using Niantic.ARDK;
using Niantic.ARDK.AR;
using Niantic.ARDK.Extensions;
using Niantic.ARDK.AR.ARSessionEventArgs;
using Niantic.ARDK.AR.Configuration;
using Niantic.ARDK.AR.Awareness;
using Niantic.ARDK.AR.Awareness.Semantics;

using UnityEngine;
using UnityEngine.UI;

public class SemanticTutorial : MonoBehaviour
{
    public Material _shaderMaterial;

    Texture2D _semanticTexture;

    public ARSemanticSegmentationManager _semanticManager;

    void Start()
    {
        //add a callback for catching the updated semantic buffer
        _semanticManager.SemanticBufferUpdated += OnSemanticsBufferUpdated;
        //on initialisation
        ARSessionFactory.SessionInitialized += OnSessionInitialized;
    }

    private void OnSessionInitialized(AnyARSessionInitializedArgs args)
    {
        Resolution resolution = new Resolution();
        resolution.width = Screen.width;
        resolution.height = Screen.height;
        ARSessionFactory.SessionInitialized -= OnSessionInitialized;
    }

    private void OnSemanticsBufferUpdated(ContextAwarenessStreamUpdatedArgs<ISemanticBuffer> args)
    {

        //get the current buffer
        ISemanticBuffer semanticBuffer = args.Sender.AwarenessBuffer;
        //get the index for sky
        int channel = semanticBuffer.GetChannelIndex("sky");

        semanticBuffer.CreateOrUpdateTextureARGB32(
                ref _semanticTexture, channel
            );
    }

    void OnRenderImage(RenderTexture source, RenderTexture destination)
    {
        //pass in our texture
        //Our Depth Buffer
        _shaderMaterial.SetTexture("_SemanticTex", _semanticTexture);

        //pass in our transform
        _shaderMaterial.SetMatrix("_semanticTransform", _semanticManager.SemanticBufferProcessor.SamplerTransform);

        //blit everything with our shader
        Graphics.Blit(source, destination, _shaderMaterial);
    }
}
SemanticShシェーダー
Shader "Custom/SemanticSh"
{
    Properties
    {
        _MainTex ("Texture", 2D) = "white" {}
        _DepthTex("_SemanticTex", 2D) = "red" {}
    }
    SubShader
    {
        // No culling or depth
        Cull Off ZWrite Off ZTest Always

        Pass
        {
            CGPROGRAM
            #pragma vertex vert
            #pragma fragment frag

            #include "UnityCG.cginc"

            struct appdata
            {
                float4 vertex : POSITION;
                float2 uv : TEXCOORD0;
            };

            struct v2f
            {
                float2 uv : TEXCOORD0;
                float4 vertex : SV_POSITION;
                //storage for our transformed depth uv
                float3 semantic_uv : TEXCOORD1;
            };

            // Transforms used to sample the context awareness textures
            float4x4 _semanticTransform;

            v2f vert (appdata v)
            {
                v2f o;
                o.vertex = UnityObjectToClipPos(v.vertex);
                o.uv = v.uv;

                //multiply the uv's by the depth transform to roate them correctly.
                o.semantic_uv = mul(_semanticTransform, float4(v.uv, 1.0f, 1.0f)).xyz;
                return o;
            }

            //our texture samplers
            sampler2D _MainTex;
            sampler2D _SemanticTex;


            fixed4 frag (v2f i) : SV_Target
            {
                //unity scene
                float4 mainCol = tex2D(_MainTex, i.uv);
                //our semantic texture, we need to normalise the uv coords before using.
                float2 semanticUV = float2(i.semantic_uv.x / i.semantic_uv.z, i.semantic_uv.y / i.semantic_uv.z);
                //read the semantic texture pixel
                float4 semanticCol = tex2D(_SemanticTex, semanticUV);


                //add some grid lines to the sky
                semanticCol.g *= sin(i.uv.x* 100.0);
                semanticCol.b *= cos(i.uv.y* 100.0);
                //set alpha to blend rather than overight
                semanticCol.a *= 0.1f;

                //mix the main color and the semantic layer
                return lerp(mainCol,semanticCol, semanticCol.a);
            }
            ENDCG
        }
    }
}