初級チュートリアル: 深度テクスチャ
ARDKでは、カメラ映像から 深度バッファ を生成できます。
深度バッファには、カメラからオブジェクトまでの距離が格納されています。これはグレースケールのテクスチャとして表現され、オブジェクトが他のオブジェクトの前面または背面にあることを判断するために使用されます。また、深度バッファを使用して、距離によるぼかしや、シーンを通過する脈波などのpostFXを作成することができます。
このチュートリアルでは、ARDKから深度バッファをテクスチャに変換して、全画面シェーダーを使って画面にオーバーレイ表示させる方法を説明します。
注釈
動画で使用しているモッキングシステムはARDK 1.3で更新されています。モックモードの変更点の詳細については、その他の モックモードの動画 をご参照ください。
準備
このチュートリアルでは、ARDKがインポートされ、Unityのシーンが動作していることを前提としています。ARDKパッケージの詳細なインポート方法については、 ARDKを使い始める のページをご参照ください。
手順
新しいシーンを作成する。
Assetツリーに新しいフォルダを作成し、DepthTexturesと名前を付けます。作成したフォルダに新しいシーンを作成します。フォルダ内を右クリックし、Create(作成) > Scene(シーン) の順に選択し、
DepthTexturesTutorialと名前を付けます。
マネージャーを追加し、カメラをセットアップする。
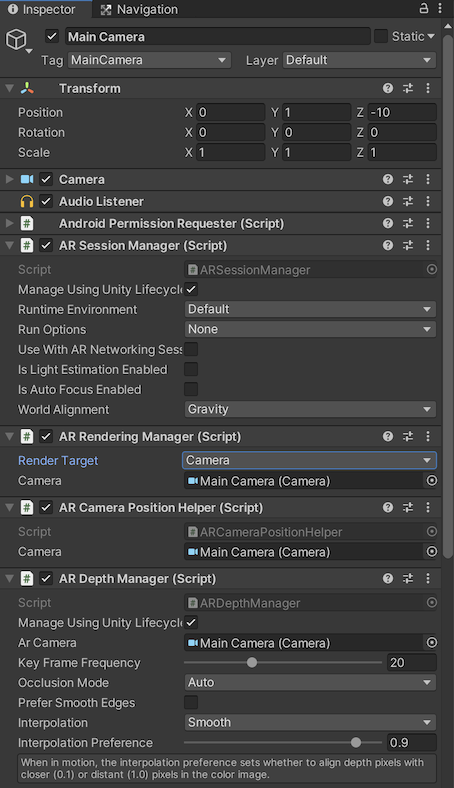
必要なARDKマネージャーを追加します。このチュートリアルでは、分かりやすくするためにカメラオブジェクトに追加しますが、空のゲームオブジェクトのように、シーンの他のオブジェクトに追加することもできます。以下のコンポーネントを追加します。
AR Session ManagerARセッションマネージャー
AR Depth Manager
AR CameraPositionHelper
AR Rendering Manager
マネージャーやヘルパーで、カメラ 変数がすべて メインカメラ に設定されていることを確認します。
カメラの背景を無色にして黒に設定します。
スクリプトを作成する。
新しいスクリプトを作成(プロジェクトビューで Create Script(スクリプトの作成) を右クリック)し、
DepthTutorialと名前を付けます。メインカメラにスクリプトを追加します(この手順を行うことで後のステップが省略できます)。
すべてのマネージャーを渡すパブリック変数を追加し、深度バッファの更新イベントを取り込むためのコールバックをセットアップします。
using System.Collections;
using System.Collections.Generic;

using UnityEngine;
using UnityEngine.UI;

using Niantic.ARDK.AR.ARSessionEventArgs;
using Niantic.ARDK.AR;
using Niantic.ARDK.AR.Awareness;
using Niantic.ARDK.AR.Awareness.Depth;
using Niantic.ARDK.AR.Configuration;

using Niantic.ARDK.Extensions;

public class DepthTutorial : MonoBehaviour
{

    [Header("ARDK Managers")]
    //All of the ardk managers we need for this Tutorial
    //depth manager to get the depth buffer
    public ARDepthManager _depthManager;

    // Start is called before the first frame update
    void Start()
    {
        //hook the depth and semantic managers update functions
        //in order to capture the buffers we need for our shader
        _depthManager.DepthBufferUpdated += OnDepthBufferUpdated;

    }

   //Depth callback
    private void OnDepthBufferUpdated(ContextAwarenessArgs<IDepthBuffer> args)
    {

    }

    // Update is called once per frame
    void Update()
    {

    }
}
Unityエディタでビルドして実行する。
ネームスペースの欠落やタイプミスによるビルドエラーがある場合は修正します。
この時点でシーンを実行すると、Unityでスカイドームに真っ白な画面が表示されます。

Unityでテストできるようにモックオブジェクトをセットアップする。
MockSceneConfigurationコンポーネントでプレハブに追加されたジオメトリオブジェクトは、デバイスのカメラフィードから取り込まれたように扱われ、デバイス上で実行すると非表示になります。そのため、エディターで素早く繰り返すことができます。モックを追加するには、次のように行います。
MockupDepthScene という名前の空のGameObjectを作成し、モック構成プレハブを作成します。続いて、GameObjectに
MockSceneConfigurationコンポーネントを追加します。シーンに立方体を追加する:
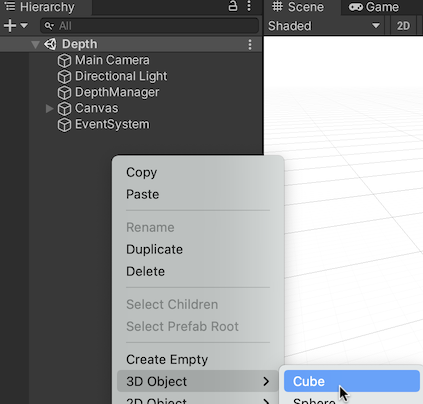
立方体を選択します。
MockupDepthScene オブジェクトの子オブジェクトとして立方体を作成します。
立方体をZ方向に+1移動し、0.5,0.5,0.5にスケールして画面に表示できるようにします。
MockupDepthScene オブジェクトを プロジェクト 階層にドラッグ(プレハブフォルダがある場合はそこにドラッグ)して、シーンオブジェクトをプレハブに変換します。元の MockupDepthScene は、シーンから削除します。
Lightship > ARDK > バーチャルスタジオ ウィンドウの順に移動して Mock タブを開き、 Mock Scene(モックシーン) のドロップダウンから、 MockupDepthScene プレハブを選択します。プレハブがドロップダウンで見つからない場合は、ドロップダウンの右側にある更新アイコンをクリックし、プレハブを探します。
UnityエディターでUnityをプレイモードで実行している場合は、プレハブのインスタンスがARDKのモックモードで自動的に作成されるようになりました。
Unityで実行すると、立方体が表示される
ToggleDebugVisualisationを使用して深度バッファを確認する。
この時点で、深度のみを確認する場合は、深度マネージャーで
ToggleDebugVisualisationを呼び出すことができます。これで深度バッファが表示されます。ただし、表示するだけでなく、他の用途に使用するためにテクスチャとしてバッファを取得する場合は、
CreateOrUpdate関数を呼び出す必要があります。この操作は次のステップで行います。ToggleDebugVisualizationの呼び出しのみと出力の例:
public class DepthTutorial : MonoBehaviour
{
    public ARDepthManager _depthManager;

    void Start()
    {
        _depthManager.ToggleDebugVisualization(true);
    }
}
バッファを取得し、テクスチャに変換する。
深度バッファからテクスチャを取得するには、
CreateOrUpdateTextureARGB32またはCreateOrUpdateTextureRFloatを使用します。この際、テクスチャでrawバッファが返るため、調整やクロップは行われません。このテクスチャをサンプリングまたは表示するには、シェーダーで
SamplerTransformを使用して、頂点シェーダーでUV座標に変換を掛け、画面に合わせる必要があります。DepthTutorialスクリプトの
OnDepthBufferUpdatedメソッドを更新してCreateOrUpdateTextureRFloatを呼び出します。Texture2D _depthTexture private void OnDepthBufferUpdated(ContextAwarenessArgs<IDepthBuffer> args) { IDepthBuffer depthBuffer = args.Sender.AwarenessBuffer; //we have a choice of ARGB or RFloat for the texture depending on what your device supports. depthBuffer.CreateOrUpdateTextureRFloat( ref _depthTexture ); }
CreateOrUpdateTextureRFloatの代わりに、CreateOrUpdateTextureARGB32を使用する場合は、使用時にバッファを正規化する必要があります。次の例はCreateOrUpdateTextureARGB32の使い方を示しますが、DepthTutorialスクリプトには追加しないでください:// argb example for ref float maxDisp = depthBuffer.NearDistance; float minDisp = depthBuffer.FarDistance; depthBuffer.CreateOrUpdateTextureARGB32( ref _depthTexture, FilterMode.Point, //normalize the texture between near and far plane depth => (depth - minDisp) / (maxDisp - minDisp) );
バッファと変換をシェーダーに渡すようにOnRenderImageを設定する。
シェーダーで画面に転送するために、DepthTutorialスクリプトに
OnRenderImage関数を追加します。シェーダーに渡すマテリアル変数を追加します。
深度テクスチャと変換をマテリアルに渡し、転送します。
使用例:
public Material _shaderMaterial;

void OnRenderImage(RenderTexture source, RenderTexture destination)
{
	//pass in our texture
	//Our Depth Buffer
	_shaderMaterial.SetTexture("_DepthTex", _depthTexture);

	//pass in our transform
	_shaderMaterial.SetMatrix("_depthTransform", _depthManager.DepthBufferProcessor.SamplerTransform);

	//blit everything with our shader
	Graphics.Blit(source, destination, _shaderMaterial);
}
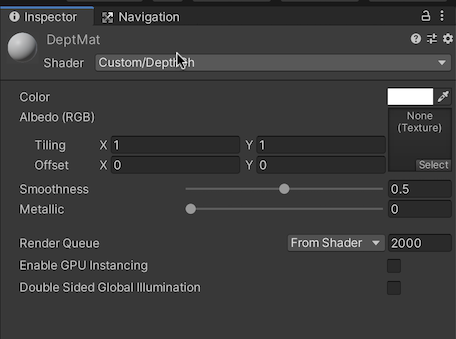
深度マテリアルと深度シェーダーを作成する
プロジェクトビューで右クリックし、Create(作成) > Material(マテリアル) の順に移動します。マテリアルに
DepthMatと名前を付けます。右クリックし、 Create (作成) > Shader (シェーダー) (任意のタイプを選択。中のコードはすべて置き換えられるため、Standard Surface Shaderで問題ありません)の順に移動します。シェーダーに
DepthShと名前を付けます。シェーダーでマテリアルを指定します。
DepthTutorialスクリプトの Shader Material(シェーダーマテリアル) フィールドを、Unity内の新しいマテリアルに設定します。
テクスチャと変換を取得するようにシェーダーを更新する。
シェーダーに、
_DepthTexと_depthTransformが取り込まれます。頂点シェーダーで、UVにdepthTransformを掛け、Fragシェーダーで使用するために格納します。続いて、Fragシェーダーで、深度テクスチャのポイントを探すときに、変換されたUVを使用します。Shader "Custom/DepthSh" { Properties { _MainTex ("Texture", 2D) = "white" {} _DepthTex("_DepthTex", 2D) = "red" {} } SubShader { // No culling or depth Cull Off ZWrite Off ZTest Always Pass { CGPROGRAM #pragma vertex vert #pragma fragment frag #include "UnityCG.cginc" struct appdata { float4 vertex : POSITION; float2 uv : TEXCOORD0; }; struct v2f { float2 uv : TEXCOORD0; float4 vertex : SV_POSITION; //storage for our transformed depth uv float3 depth_uv : TEXCOORD1; }; // Transforms used to sample the context awareness textures float4x4 _depthTransform; v2f vert (appdata v) { v2f o; o.vertex = UnityObjectToClipPos(v.vertex); o.uv = v.uv; //multiply the uv's by the depth transform to roate them correctly. o.depth_uv = mul(_depthTransform, float4(v.uv, 1.0f, 1.0f)).xyz; return o; } //our texture samplers sampler2D _DepthTex; fixed4 frag (v2f i) : SV_Target { //our depth texture, we need to normalise the uv coords before using. float2 depthUV = float2(i.depth_uv.x / i.depth_uv.z, i.depth_uv.y / i.depth_uv.z); //read the depth texture pixel float depthCol = tex2D(_DepthTex, depthUV).r; return depthCol; } ENDCG } } }
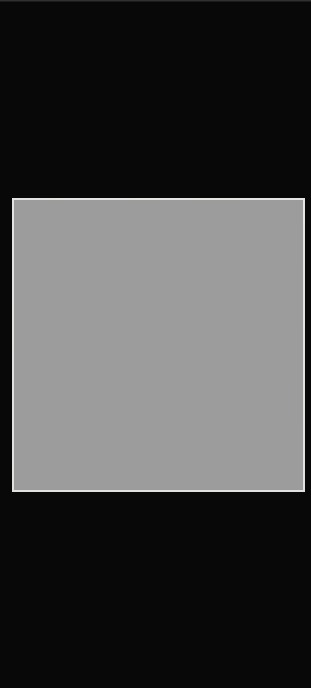
Unityで実行する。
正しく配置されたグレーのテクスチャが表示されるのが分かります。

デバイス上で実行する。
正常に動作していることと、深度テクスチャが表示されていることを確認します。
その他の方法を試す:
深度バッファを使ったエフェクトを試すことができます(この方法については後半のチュートリアルでいくつか取り上げます)。一部の簡単なエフェクトを紹介します。
深度ベースのぼやけ、DOFエフェクト
物が遠ざかると、ぼやけて見え、ピントが外れます。
これを行うには、post FXシェーダーを作成し、深度バッファを渡します。
シンプルなボックスのブラーループを作成し、テクスチャの深度をブラーの量として渡します。
スキャン効果
ソナーピンのように見えるように線をシーンに描く
シェーダーでは、0から1をループする時間変数を使用し、深度値に基づいてスキャンカラーを混ぜることができます。たとえば、深度=時間の場合は、緑色に設定します。
そうすると、カメラから脈打つように円が描かれます。
完成したソース
DepthTutorial.cs
using System.Collections; using System.Collections.Generic; using UnityEngine; using UnityEngine.UI; using Niantic.ARDK.AR.ARSessionEventArgs; using Niantic.ARDK.AR; using Niantic.ARDK.AR.Awareness; using Niantic.ARDK.AR.Awareness.Depth; using Niantic.ARDK.AR.Configuration; using Niantic.ARDK.Extensions; public class DepthTutorial : MonoBehaviour { public ARDepthManager _depthManager; public Material _shaderMaterial; Texture2D _depthTexture; // Start is called before the first frame update void Start() { //subscribe to the depth managers update in order to know when there is a new buffer. _depthManager.DepthBufferUpdated += OnDepthBufferUpdated; } //callbacks to know we have a new depth buffer available. private void OnDepthBufferUpdated(ContextAwarenessArgs<IDepthBuffer> args) { IDepthBuffer depthBuffer = args.Sender.AwarenessBuffer; //we have a choice of ARGB or RFloat for the texture depending on what your device supports. depthBuffer.CreateOrUpdateTextureRFloat(ref _depthTexture); } void OnRenderImage(RenderTexture source, RenderTexture destination) { //pass in our texture //Our Depth Buffer _shaderMaterial.SetTexture("_DepthTex", _depthTexture); //pass in our transform _shaderMaterial.SetMatrix("_depthTransform", _depthManager.DepthBufferProcessor.SamplerTransform); //blit everything with our shader Graphics.Blit(source, destination, _shaderMaterial); } }
DepthTutorialシェーダー
Shader "Custom/DepthSh"
{
  Properties
  {
    _MainTex ("Texture", 2D) = "white" {}
    _DepthTex("_DepthTex", 2D) = "red" {}
  }
  SubShader
  {
    // No culling or depth
    Cull Off ZWrite Off ZTest Always

    Pass
    {
      CGPROGRAM
      #pragma vertex vert
      #pragma fragment frag

      #include "UnityCG.cginc"

      struct appdata
      {
        float4 vertex : POSITION;
        float2 uv : TEXCOORD0;
      };

      struct v2f
      {
        float2 uv : TEXCOORD0;
        float4 vertex : SV_POSITION;
        //storage for our transformed depth uv
        float3 depth_uv : TEXCOORD1;
      };

      // Transforms used to sample the context awareness textures
      float4x4 _depthTransform;

      v2f vert (appdata v)
      {
        v2f o;
        o.vertex = UnityObjectToClipPos(v.vertex);
        o.uv = v.uv;

        //multiply the uv's by the depth transform to roate them correctly.
        o.depth_uv = mul(_depthTransform, float4(v.uv, 1.0f, 1.0f)).xyz;
        return o;
      }

      //our texture samplers
      sampler2D _DepthTex;

      fixed4 frag (v2f i) : SV_Target
      {
        //our depth texture, we need to normalise the uv coords before using.
        float2 depthUV = float2(i.depth_uv.x / i.depth_uv.z, i.depth_uv.y / i.depth_uv.z);
        //read the depth texture pixel
        float depthCol = tex2D(_DepthTex, depthUV).r;

        return depthCol;
      }
      ENDCG
    }
  }
}