Scanning Framework入門
このガイドでは、アプリにスキャンを導入する方法について説明します。基本フロー で、ユーザーがアプリを使ってスキャンする方法を確認の上、以下の ステップ に従ってアプリにスキャンを実装してください。
注釈
この機能はパブリックベータ版であり、機能性は将来のリリースで変更される可能性があります。ARDK機能のローンチタイプ(パブリックベータ版など)に関する詳細については、Lightshipのローンチタイプをご参照ください。
ロケーションをスキャンすると、画像のコレクションが作成され、テクスチャ付きの3Dメッシュに処理されます。一例をご紹介します。
現実世界のオブジェクトをスキャンし、テクスチャメッシュを移動可能なオブジェクトとしてアプリに取り込むことができます。または、ロケーションをスキャンして、ゲーム内でVPSロケーションを使用できるように VPS Wayspot として作動させることができます。
基本フロー
ユーザーがScanning Frameworkを使用してスキャンする際の基本フローは以下のとおりです。
The user presses Scan to create a scan using their device, scanning the desired object with their device camera, and pressing Stop. This triggers calls to ARScanManager.StartScanning() and StopScanning() and optionally displays scan visualizer output while the user is scanning with their device.
The user then presses Process to process the scan. This action triggers a call to ARScanManager.StartProcessing(). As the scan is processed by the Scanning Framework, your app can use ARScanManager.GetScanProgress() to check the progress and update a progress bar.
Once the Scanning Framework has finished processing the scan, the user can retrieve the resulting textured mesh. The user can also press Save to save the scan, which triggers a call from your app to ARScanManager.SaveCurrentScan() and saves the scan locally.
前提条件
Scanning Frameworkを使用するには、ARDKのAPIキーが必要になります。お持ちでない場合は、Lightshipアカウントダッシュボードに移動し、 プロジェクト の New Project(新しいプロジェクト) をクリックして新しいプロジェクトを作成し、 Create New Key(新しいキーを作成する) をクリックして、そのプロジェクトのAPIキーを作成します。
手順
1. Setup a new ARDK Unity Project
"3D Mobile" Unityプロジェクトを新規作成
ARDKパッケージをUnityプロジェクトにインポートします。手順は、 手順 を参照してください。
Unityプロジェクト内に
Assets/Resources/ARDK/ArdkAuthConfigアセットを作成し、APIキーの値を先ほど作成したARDK APIキーに設定します。詳しい手順は、 認証 の「ArdkAuthConfigの作成」を参照してください。iOS向けARDKアプリをビルドする または Android向けARDKアプリをビルドする に記載されている手順に従って、UnityプロジェクトのiOSまたはAndroid用のビルド設定を行います。
以下の必要なARDKマネージャーとコンポーネントをシーンに追加します。
ARSceneManager プレハブ:
ARSceneManager プレハブでは、ARDKと互換性のある
ARSceneCameraがシーンに追加されるため、シーン作成時にUnityで作成されるデフォルトカメラは削除する必要があります。Android向けに設計する場合、
ARSceneManagerに Android Permissions Requester ヘルパーコンポーネントを追加しましょう。 サイズ を1に設定し、ドロップダウンに カメラ があることを確認してください。これにより、実行時にアプリがユーザーに対してカメラ使用の許可を求めるようにできます。Androidの権限を有効化する詳細につきましては、権限をご覧ください。
AR Camera Position Helper と AR Rendering Manager は、ARSceneManager を追加する際に、
ARSceneCameraに自動的に追加されます。
2. Add Scanning Framework, Scanning UI, and Scanning Logic to Your Scene
空の
GameObjectをシーンに追加します。新しいスクリプトコンポーネントScanningExampleManagerをGameObjectに追加し、スキャン用のUIハンドラを指定します。ARScanManagerのシリアライズ可能なフィールドをScanningExampleManagerに追加します。using Niantic.ARDK.AR; using Niantic.ARDK.AR.Scanning; using Niantic.ARDK.Extensions; using Niantic.ARDK.Extensions.Scanning; public class ScanningExampleManager : MonoBehaviour { [SerializeField] [Tooltip("The scene's ARScanManager")] private ARScanManager _scanManager; // ... }
ARScanManager には、Scanning Frameworkで使いやすいマネージャーインターフェイスが搭載されています。
ARScanManagerコンポーネントをScanningExampleManagerに追加し、ScanningExampleManagerの Scan Manager フィールドをこのARScanManagerインスタンスに設定します。ScanningExampleManagerでスキャンやUIのイベントハンドラを処理するためのUIをシーンに追加します。シーンにUnity Canvasを作成し、Scan(スキャン)、Stop(停止) の各ボタンを追加します。
スキャンを開始するには、
ScanButtonPressed()メソッドをScanningExampleManagerに追加し、Scan ボタンのOnClick()に接続します。ScanButtonPressed()でARScanManager.StartScan()` を呼び出し、スキャンを開始します。public void ScanButtonPressed() { _scanManager.StartScanning(); }
Scanning Frameworkには、スキャン中に提供される視覚化情報を制御するオプションがあります。この情報は、 ARScanManager で
enableRaycastVisualizationを使用するか、enableVoxelVisualizationフィールドで確認できます。ユーザーは、デバイスのカメラをスキャンするオブジェクトに向け、オブジェクトの周りを移動する必要があります。スキャンの方法に関する基本的なガイダンスについては、 スキャンのベストプラクティス を参照してください。
スキャン処理では、必要に応じて、ユーザーがスキャン内容を理解しやすいように視覚化を表示できます。ビジュアライザーを追加する方法は、後半の「スキャンの視覚化を追加する」のステップをご覧ください。
スキャンを終了するには、
StopButtonPressed()メソッドをScanningExampleManagerに追加し、Stop(停止) ボタンのOnClick()に接続します。スキャンを停止するには、StopButtonPressed()で ARScanManager.StopScanning を呼び出します。public void StopButtonPressed() { _scanManager.StopScanning(); }
UIをシーンに追加してスキャン処理を行い、
ScanningExampleManagerでUIイベントハンドラを指定します。Once the user has finished scanning, the Scanning Framework needs to process and optimize the mesh. You can start processing the scan using ARScanManager.StartProcessing() as soon as ARScanManager.ScannerState is IScanner.State.ScanCompleted, but for this example we'll use a button to let the user manually start processing the scan.
Process(処理)、Cancel(キャンセル) の各ボタンをUnity Canvasに追加します。
また、Progress(進行状況) という名前のスライダーをCanvasに追加します。
スキャン完了後に処理を開始するには、
ProcessButtonPressed()メソッドをScanningExampleManagerに追加し、Process(処理) ボタンのOnClick()に接続します。ProcessButtonPressed()で、ScannerStateがScanCompletedになっていることを確認し、ARScanManager.StartProcessing()を呼び出してスキャン処理を開始します。public void ProcessButtonPressed() { IScanner.State state = _scanManager.ScannerState; if (state == IScanner.State.ScanCompleted) { // Start processing scan _scanManager.StartProcessing(); } }
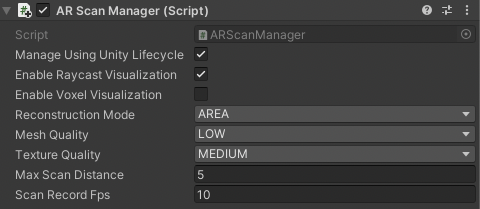
Scanning Frameworkには、スキャンの処理方法を制御するオプションがあります。この情報は、 ARScanManager で
reconstructionModeを使用するか、enableVoxelVisualizationフィールドで確認できます。この画像は、Unityの ARScanManager 設定のUIです。
To show how far along the scan process is, connect your Progress Slider to your
ScannerExampleManagerand update the slider value using ARScanManager.GetScanProgress().[SerializableField] private Slider _progressBar; private void Update() { IScanner.State state = _scanManager.ScannerState; if (state == IScanner.State.Processing) { _progressBar.gameObject.SetActive(true); _progressBar.value = _scanManager.GetScanProgress(); } else { _progressBar.gameObject.SetActive(false); } }
To let the user cancel the scan processing, add a
CancelButtonPressed()method in yourScanningExampleManagerand connect it to your Cancel button'sOnClick(). InCancelButtonPressed(), call ARScanManager.CancelProcessing() to cancel the in-progress scan processing.public void CancelProcessButtonPressed() { _scanManager.CancelProcessing(); }
3. Add Scan Visualization
このウォークスルーでは、点群ビジュアライザーを使用します。ユーザーがビジュアライザーを切り替える方法については、 ARDK-Examples のスキャンのサンプルシーンをご覧ください。
ScanningExampleManagerスクリプトに、ビジュアライザー用のフィールドを追加します。[SerializeField] private PointCloudVisualizer _pointCloudVisualizer;
Unityのシーンに
PointCloudVisualizerコンポーネントを追加し、Material(マテリアル) を、シーン内の点を描画する適切なマテリアルに設定します。ARDK/Extensions/Resources/ARDK/にあるシェーダーを例として使用できます。ビジュアライザーにアニメーションを追加する場合は、Animation Curve(アニメーションカーブ) と Update Interval(更新間隔) を調整します。ScanningExampleManagerの Point Cloud Visualizer(点群ビジュアライザー) フィールドをUnityのビジュアライザーインスタンスに設定します。注釈
See the SimplePointCloud and PulsePointCloud prefabs in the Scanning ARDK-Examples scene for more example configurations of PointCloudVisualizer.
ScanningExampleManager.Start()メソッドで、PointCloudVisualizerをデフォルトビジュアライザーとして設定します。void Start() { // Set default visualizer _scanManager.SetVisualizer(_pointCloudVisualizer); }
Now when the user starts a scan, the PointCloudVisualizer will be used to visualize what's being scanned. See Visualizing Scans for more details on Scanning Framework visualizers.
4. Handle Processed Scan Mesh Results
処理済みのスキャンのメッシュを受け取るためのイベントハンドラを追加します。
In your
ScanningExampleManageradd a ARScanManager.ScanProcessed event handler to receive the processed mesh.Create a prefab to display the result mesh and assign it to the component. The prefab should have a
MeshFilterandMeshRenderercomponent. Create aGameObjectin the scene to be the parent of this prefab. You can consult theAssets/ARDKExamples/Scanning/ScannedObjectPrefab.prefabin the ARDK Examples package for an example.Add the parent object to the script as
_scannedObjectParent. When you instantiate thescannedObject, Unity needs this parent.The following example sets the ARScanManager.ScanProcessed handler to
ScanResultHandler. InScanResultHandleran instance of_scannedObjectPrefaband_scannedObjectParentis required to initiate the scanned object.private GameObject scannedObject; [SerializeField] private GameObject _scannedObjectPrefab; [SerializeField] private GameObject _scannedObjectParent; private void Start() { // ...other init code as needed... _scanManager.ScanProcessed += ScanResultHandler; } private void ScanResultHandler(TexturedMesh texturedMesh, IScanner.State state, Vector3 centerPosition) { if (texturedMesh != null) { if (scannedObject == null) { scannedObject = Instantiate(_scannedObjectPrefab, _scannedObjectParent); } Bounds meshBoundary = texturedMesh.mesh.bounds; scannedObject.transform.localPosition = -1 * meshBoundary.center; scannedObject.transform.localScale = Vector3.one / meshBoundary.extents.magnitude; scannedObject.GetComponent<MeshFilter>().sharedMesh = texturedMesh.mesh; if (texturedMesh.texture != null) scannedObject.GetComponent<Renderer>().material.mainTexture = texturedMesh.texture; } }
ユーザーが処理済みのスキャンのメッシュをローカルデバイスに保存するためのUIを追加します。
Unity Canvasに、Save(保存) ボタンを追加します。
To let the user save the processed scan, add a
SaveButtonPressed()method in yourScanningExampleManagerand connect it to your Save button'sOnClick(). InSaveButtonPressed(), call ARScanManager.SaveCurrentScan() to save the scan on the local device.public void SaveButtonPressed() { _scanManager.SaveCurrentScan(); }
また、ユーザーが別のスキャンを開始できるように、 ARScanManager.Restart() を使用してScan Managerを再起動することもできます。
ARScanManager also provides methods to manage locally saved scans, such as getting a list of saved scans via ARScanManager.GetSavedScans(), or deleted a saved scan via ARScanManager.DeleteScan().
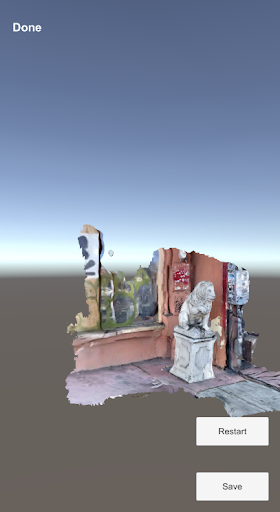
この画像は、処理済みのスキャンのメッシュがデバイスに表示されている様子です。
次の手順
次に、VPSのスキャンの実行については VPSのスキャン を、スキャンの視覚化と処理については スキャンの設定 を参照してください。