How to Set Up Real-World Occlusion
Lightship Occlusion creates depth in AR applications, rendering game objects in front of or behind objects in the real world. In ARDK 3.0, Lightship integrates seamlessly with the AR Foundation Occlusion Manager, enabling occlusion options not available in ARKit and ARCore.
Prerequisites
You will need a Unity project with ARDK installed and a set-up basic AR scene. For more information, see Installing ARDK 3 and Setting up an AR Scene.
Setting Up Occlusion
To set up Lightship occlusion:
- Add an
AROcclusionManagerto your Main CameraGameObject:- In the Hierarchy, expand the
XROriginand Camera Offset, then select the Main Camera object. Then, in the Inspector, click Add Component and add anAROcclusionManager.
- In the Hierarchy, expand the
- Add a cube as a child of your Camera, then set its position, rotation, and scale:
- In the Hierarchy, right-click the Main Camera, then mouse over 3D Object and select Cube.
- In the Inspector, under the Transform heading, set the cube's position to (0, 0, 2), its rotation to (0, 45, 45), and its scale to (0.2, 0.2, 0.2).
- When you build to device or use playback, your cube will be occluded by physical objects that are less than 2 meters away from your phone.

Improving Occlusion Quality with the Lightship Occlusion Extension
By adding the Lightship Occlusion Extension, you can improve the visual quality of occlusions by adding functionality to the standard AROcclusionManager.
To add the extension and test one of its features:
Add a
LightshipOcclusionExtensionto the Main CameraGameObject.- In the Hierarchy, expand the
XROriginand select the Main Camera. Then, in the Inspector, click Add Component and add aLightship Occlusion Extension.
- In the Hierarchy, expand the
If you are using the Universal Render Pipeline, add a
Lightship Occlusion Extension Featureto the URP renderer:- In the Project window, find the URP renderer you are using under the Assets directory.
- In the Inspector, click the Add Renderer Feature button, then select
Lightship Occlusion Extension Feature. Make sure it comes after theAR Background Renderer Feature.
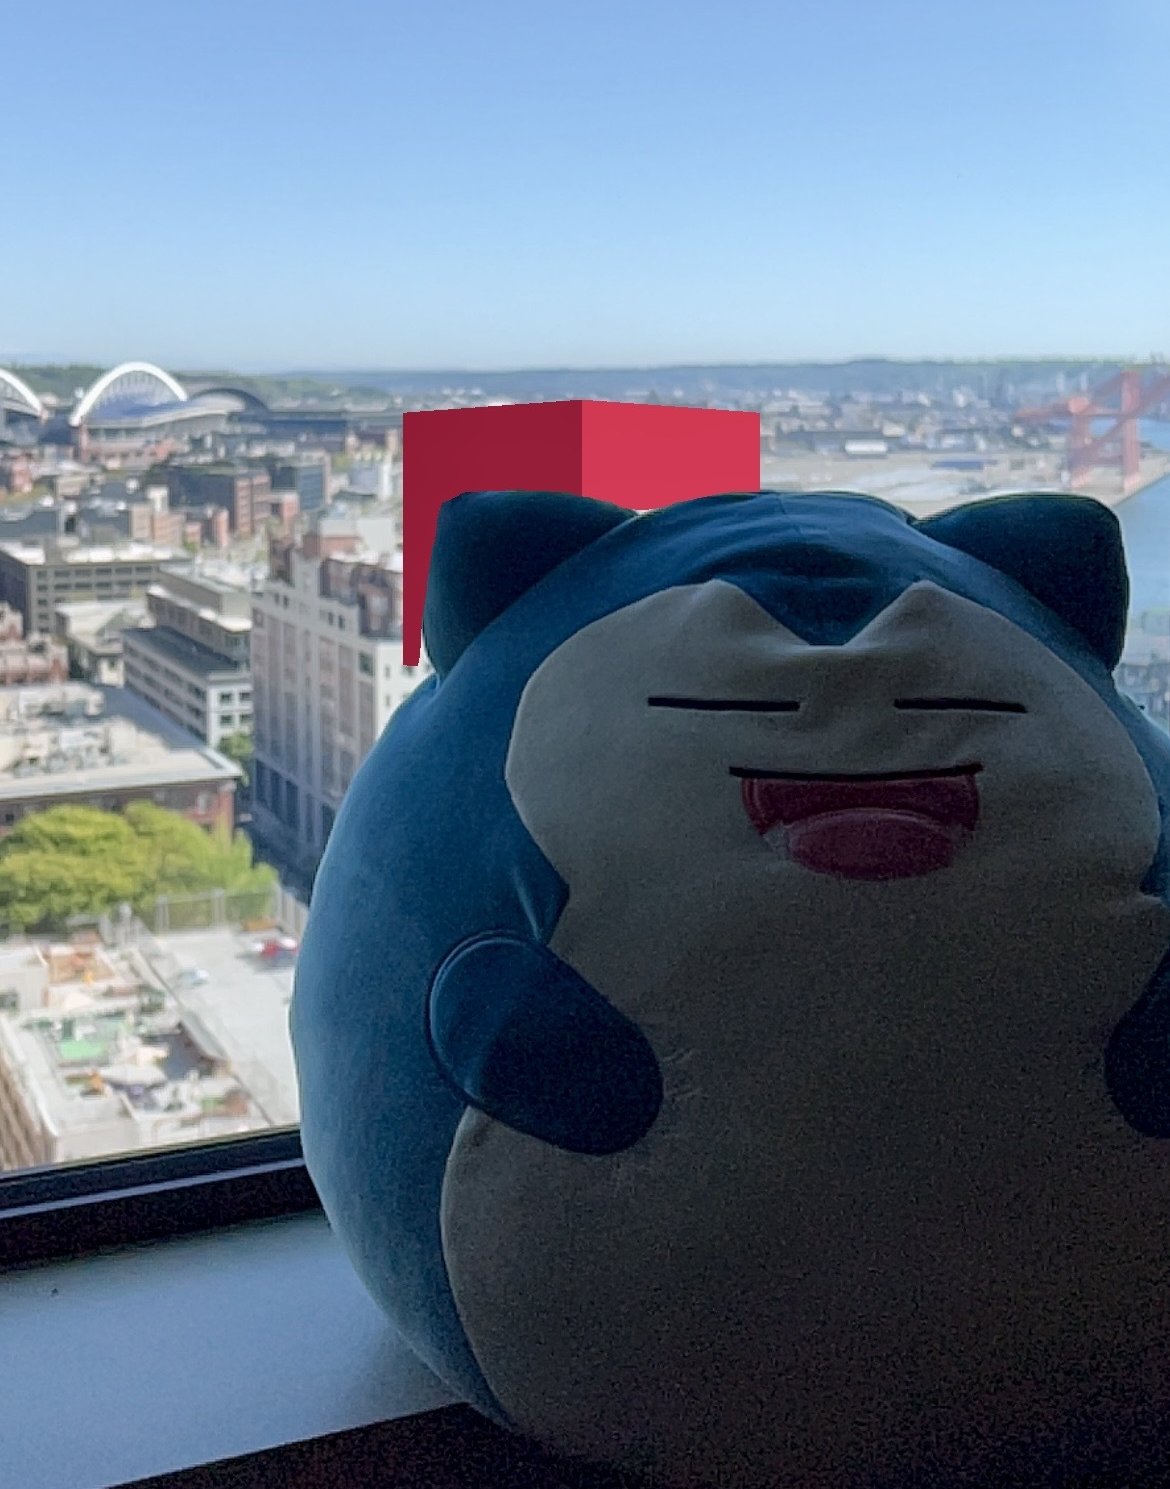
In the extension options menu, set the Optimal Occlusion Distance Mode to Specified Game Object.
Set the Cube you created earlier as the Principal Occludee.
When you build to device or run in playback, the edges of objects in the image should now line up more precisely with the occlusion boundaries of the cube.

For more information on the Lightship Occlusion Extension and its features, see the Occlusion Feature page.
Setting up Occlusion Suppression
Occlusion Suppression prevents pixels containing specified semantic information from occluding AR assets. Depth-based occlusion can be noisy and lead to inconsistencies with particular semantic channels. Enabling Occlusion Suppression can improve the visual quality of occlusions, particularly when AR characters appear to clip into the floor or disappear into the sky.
Follow the steps in Improving Occlusion Quality with the Lightship Occlusion Extension.
Add an
ARSemanticSegmentationManagerto the Main CameraGameObject.- In the Hierarchy, expand the 'XROrigin' and select the Main Camera. Then, in the Inspector, click Add Component and add an
AR Semantic Segmentation Managerto it.
- In the Hierarchy, expand the 'XROrigin' and select the Main Camera. Then, in the Inspector, click Add Component and add an
In the Inspector, open the Lightship Occlusion Extension options menu, then check the box labeled Enable Occlusion Suppression. This will make new options appear.
Drag the Main Camera
GameObjectfrom the Hierarchy to the Semantic Segmentation Manager field in the Inspector.In the Suppression Channels list, add
skyfor Element 0 andgroundfor Element 1.Done! When you test your application, pixels corresponding to the ground or sky should not occlude your virtual objects. Try using other semantic channels from the Semantics page and see what happens!

Setting up Occlusion Stabilization
Occlusion Stabilization combines information from the instantaneous depth buffer and a depth field rendered from the world mesh to stabilize occlusions between frames. This leads to higher quality, more consistent occlusions in static parts of the scene.
Follow the steps in Improving Occlusion Quality with the Lightship Occlusion Extension.
Set up Meshing in your scene:
In the Hierarchy, select the
XROriginand add an emptyGameObjectto it. Name it Meshing.Select Meshing, then, in the Inspector, click Add Component and add an ARMeshManager Component to it.
In the ARMeshManager Component, set the MeshPrefab to FusedMesh (located in
Packages/NianticLightshipARPlugin/Assets/Prefabs).- This prefab has a layer set to "Mesh". In your next project, if you add a different prefab here, make sure it is on a new layer. To create a new layer, in the Inspector, select the Layer drop-down, then create a layer and give it a unique name. (The name can be anything as long as it is not already in use.)
- [URP Only] If you are using the universal render pipeline, you will need to add the prefab directly to your Unity project before assigning it to ARMeshManager. In the Project window, scroll down to Packages, then open Niantic Lightship AR Plugin. In the Assets subfolder, select Prefabs, then drag and drop the FusedMesh prefab to your project's Assets folder. Once you have done so, set the MeshPrefab to FusedMesh.
[Optional] To configure advanced settings for meshing, add a LightshipMeshingExtension Component to the Meshing
GameObject.
change the Shader for the FusedMesh Material to
Lightship/FusedDepthChunkURP.<img src={armeshmanager} alt="The Meshing object with AR Mesh Manager" width="500px"/>Enable Occlusion Stabilization:
In the Inspector, open the Lighthsip Occlusion Extension options menu, then check the box labeled Enable Occlusion Stabilization. This will make new options appear.
Drag the Meshing
GameObjectfrom the Hierarchy to the Meshing Manager field in the Inspector.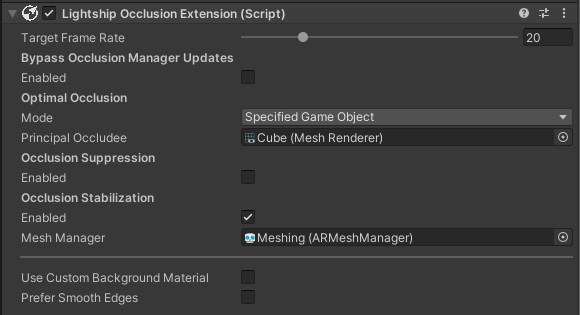
More Information
For more information, see the Occlusion Feature page.