How to Query Semantics and Highlight Semantic Channels

This how-to covers:
- Querying semantics to detect what is on-screen at a point the player touches;
- Highlighting a specific semantic channel based on the last point the player touched;
- Available APIs for querying semantic information.
Prerequisites
You will need a Unity project with ARDK installed and a set-up basic AR scene. For more information, see Installing ARDK 3 and Setting up an AR Scene.
Steps
Adding UI Elements
Before implementing the script that handles semantic querying, we need to prepare the UI elements that will display semantic information to the user. For this example, we will create a text field to display the semantic channel name and a RawImage to handle shader output.
To create the UI elements:
- In the Hierarchy, right-click in your AR scene, then mouse over UI and select Raw Image to add a
RawImageto the scene. - Repeat this process, but select Text-TextMeshPro to add a text field. If a TMP Importer pop-up appears, click Import TMP Essentials to finish adding the text field.
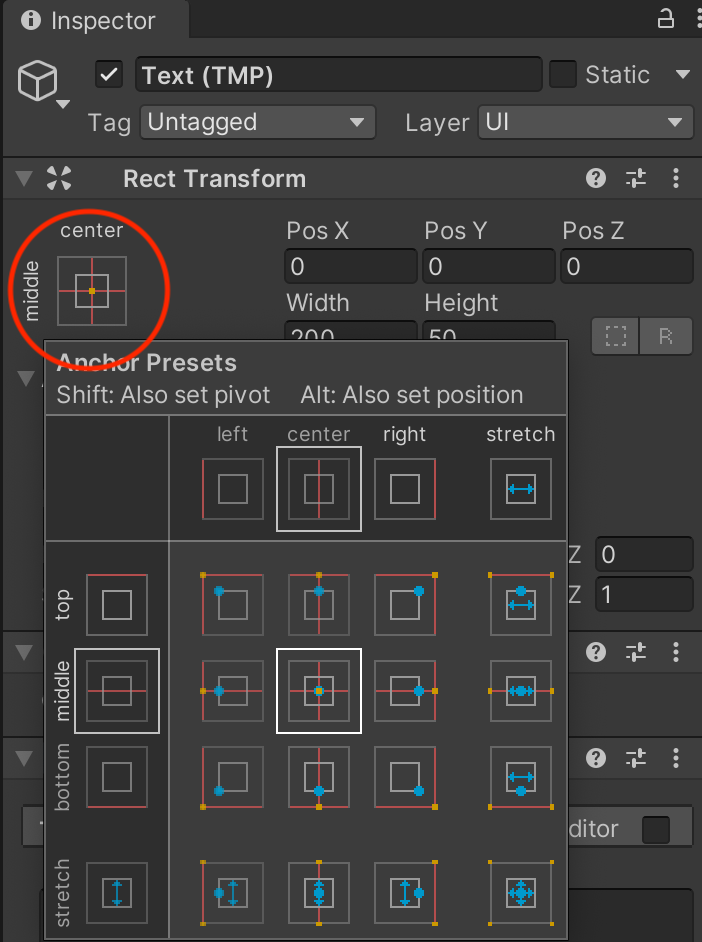
- Select the text field in the Hierarchy, then, in the Inspector, set its position to (0, 0, 0).
- In the Rect Transform menu in the Inspector, click the square in the top-left corner to open the Anchor Presets menu. Hold Shift and click the center option to anchor the text in the middle of the screen.
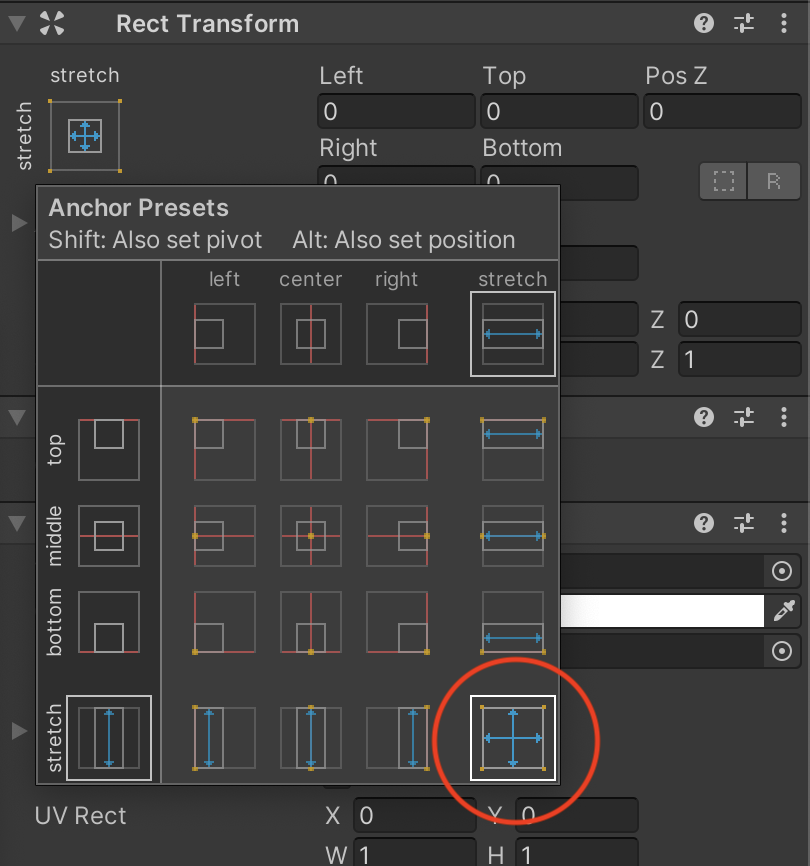
- Select the
RawImage, then open the Anchor Presets menu again. Hold the Option key (Alt on Windows) and select the bottom-right square to place theRawImagein the correct spot and stretch it to cover the entire screen.
Adding the Semantic Segmentation Manager
The Semantic Segmentation Manager provides access to the Semantics subsystem and serves semantic predictions that other parts of your code can access. (For more detailed information, see the Semantics Features page.)
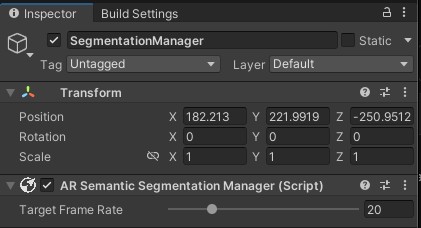
To add a Semantic Segmentation Manager to your scene:
- Right-click in the Hierarchy window, then select Create Empty to add an empty
GameObjectto the scene. Name it Segmentation Manager. - Select the new
GameObject, then, in the Inspector window, click Add Component, search for "AR Semantic Segmentation Manager", and select it to add it as a Component.
Adding the Alignment Shader
To make sure our semantic information aligns properly on-screen, we need to use the display matrix and rotate the buffer returned by the camera. Using an overlay shader, we can get the display transform from the ARCameraManager frame update event and use it to transform the UVs into the correct screen space. Then, we render the semantic information into the RawImage we made earlier and display it to the user.
To create the shader:
- Create a shader and material:
- In the Project window, open the Assets directory.
- Right-click in the Assets directory, then mouse over Create and select Unlit Shader from the Shader menu. Name it SemanticShader.
- Repeat this process, but select Material from the Create menu to create a new material. Name it SemanticMaterial, then drag and drop SemanticShader onto the new Material to associate them.
- Add the shader code:
- Select SemanticShader from the Assets directory, then, in the Inspector window, click Open to edit the shader code.
- Replace the default shader with the alignment shader code.
Click to expand the alignment shader code
Shader "Unlit/SemanticShader"
{
    Properties
    {
        _MainTex ("_MainTex", 2D) = "white" {}
        _SemanticTex ("_SemanticTex", 2D) = "red" {}
        _Color ("_Color", Color) = (1,1,1,1)
    }
    SubShader
    {
        Tags {"Queue"="Transparent" "IgnoreProjector"="True" "RenderType"="Transparent"}
        Blend SrcAlpha OneMinusSrcAlpha
        // No culling or depth
        Cull Off ZWrite Off ZTest Always
        Pass
        {
            CGPROGRAM
            #pragma vertex vert
            #pragma fragment frag

            #include "UnityCG.cginc"

            struct appdata
            {
                float4 vertex : POSITION;
                float2 uv : TEXCOORD0;
            };

            struct v2f
            {
                float2 uv : TEXCOORD0;
                float3 texcoord : TEXCOORD1;
                float4 vertex : SV_POSITION;

            };

            float4x4 _SemanticMat;

            v2f vert (appdata v)
            {
                v2f o;
                o.vertex = UnityObjectToClipPos(v.vertex);
                o.uv = v.uv;

                //we need to adjust our image to the correct rotation and aspect.
                o.texcoord = mul(_SemanticMat, float4(v.uv, 1.0f, 1.0f)).xyz;

                return o;
            }

            sampler2D _MainTex;
            sampler2D _SemanticTex;
            fixed4 _Color;

            fixed4 frag (v2f i) : SV_Target
            {
                //convert coordinate space
                float2 semanticUV = float2(i.texcoord.x / i.texcoord.z, i.texcoord.y / i.texcoord.z);

                float4 semanticCol = tex2D(_SemanticTex, semanticUV);
                return float4(_Color.r,_Color.g,_Color.b,semanticCol.r*_Color.a);
            }
            ENDCG
        }
    }
}
- Set up the material properties:
- Once you replace the shader code, the material will populate with properties. To access them, select SemanticMaterial from the Assets directory, then look in the Inspector window.
- Click the color swatch to the right of the Color property in the Inspector to set the material color and alpha. Set the alpha value to
128(roughly 50%) to make sure the semantic color filter is translucent enough to see the real-world object beneath it. The color is up to you!

Creating the Query Script
To get semantic information when the player touches the screen, we need a script that queries the Semantic Segmentation Manager and displays the information when the player touches an area.
To create the query script:
- Make the script file and add it to the Segmentation Manager:
- In the Project window, select the Assets directory, then right-click inside the window, mouse over Create, and select C# Script. Name the new script SemanticQuerying.
- In the Hierarchy, select the Segmentation Manager
GameObject, then, in the Inspector window, click Add Component. Search for "script", then select New Script and choose the SemanticQuerying script.
- Add code to the script:
- Double-click the SemanticQuerying script in the Assets directory to open it in a text editor, then copy the following script into it. (See the Appendix for details on how each part of the script works.)
Click to reveal the SemanticQuerying script
using Niantic.Lightship.AR.Semantics;
using TMPro;
using UnityEngine;
using UnityEngine.UI;
using UnityEngine.XR.ARFoundation;

public class SemanticQuerying : MonoBehaviour
{
    public ARCameraManager _cameraMan;
    public ARSemanticSegmentationManager _semanticMan;

    public TMP_Text _text;
    public RawImage _image;
    public Material _material;

    private string _channel = "ground";

    void OnEnable()
    {
        _cameraMan.frameReceived += OnCameraFrameUpdate;
    }

    private void OnDisable()
    {
        _cameraMan.frameReceived -= OnCameraFrameUpdate;
    }

    private void OnCameraFrameUpdate(ARCameraFrameEventArgs args)
    {
        if (!_semanticMan.subsystem.running)
        {
            return;
        }

        //get the semantic texture
        Matrix4x4 mat = Matrix4x4.identity;
        var texture = _semanticMan.GetSemanticChannelTexture(_channel, out mat);

        if (texture)
        {
            //the texture needs to be aligned to the screen so get the display matrix
            //and use a shader that will rotate/scale things.
            _image.material = _material;
            _image.material.SetTexture("_SemanticTex", texture);
            _image.material.SetMatrix("_SemanticMat", mat);
        }
    }

    private float _timer = 0.0f;

    void Update()
    {
        if (!_semanticMan.subsystem.running)
        {
            return;
        }

        //Unity Editor vs On Device
        if (Input.GetMouseButtonDown(0) || (Input.touches.Length > 0))
        {
            var pos = Input.mousePosition;

            if (pos.x > 0 && pos.x < Screen.width)
            {
                if (pos.y > 0 && pos.y < Screen.height)
                {
                    _timer += Time.deltaTime;
                    if (_timer > 0.05f)
                    {
                        var list = _semanticMan.GetChannelNamesAt((int)pos.x, (int)pos.y);

                        if (list.Count > 0)
                        {
                            _channel = list[0];
                            _text.text = _channel;
                        }
                        else
                        {
                            _text.text = "?";
                        }

                        _timer = 0.0f;
                    }
                }
            }
        }
    }
}
Assigning Script Variables
Before the script can run, we need to assign its variables in Unity so that the script and UI elements can talk to each other.
To assign the variables:
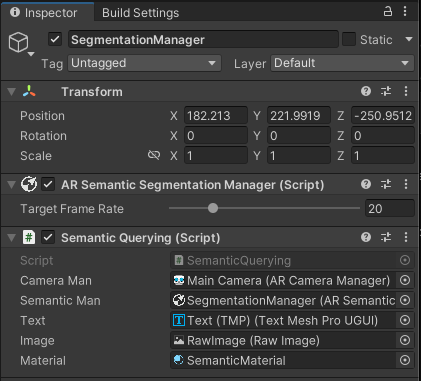
- In the Hierarchy, select the Segmentation Manager
GameObject. - In the Inspector window, assign the variables in the
SemanticQueryingscript Component by dragging and dropping each item to its respective field:- The scene's
MainCamerato the Camera Man field; - The
SegmentationManagerobject to the Segmentation Man field; - The
Text-TMPobject to the Text field; - The
RawImageobject to the Image field; SemanticMaterialfrom the Assets directory to the Material field.
- The scene's
Build and Test
Once you have added the script and populated it with code, you can now test using a playback dataset. For instructions on setting up your editor to play back a recorded dataset in the Unity editor, see How to Setup Playback. If using this Playback dataset from the Lightship Github, your output should look something like this:
You can also now build to device and test in a real-world environment:

Appendix: How Does the Query Script Work?
What's On The Screen?
The core of the querying script checks on each frame if the user is touching or clicking. After making sure the touch/click is legal by checking the position and amount of frames it took, we get the semantic channel at the point the user chose and show the result using a text box.
Click here to reveal the channel names snippet
using Niantic.Lightship.AR.ARFoundation;
using TMPro;
using UnityEngine;

public class SemanticQuerying : MonoBehaviour
{
    public ARSemanticSegmentationManager _semanticMan;
    public TMP_Text _text;

    void Update()
    {
        if (!_semanticMan.subsystem.running)
        {
            return;
        }

        //Unity Editor vs On Device
        if (Input.GetMouseButtonDown(0) || (Input.touches.Length > 0))
        {
            var pos = Input.mousePosition;

            if (pos.x > 0 && pos.x < Screen.width)
            {
                if (pos.y > 0 && pos.y < Screen.height)
                {
                    _timer += Time.deltaTime;
                    if (_timer > 0.05f)
                    {
                        var list = _semanticMan.GetChannelNamesAt((int)pos.x, (int)pos.y);

                        if (list.Count > 0)
                        {
                            _channel = list[0];
                            _text.text = _channel;
                        }
                        else
                        {
                            _text.text = "?";
                        }

                        _timer = 0.0f;
                    }
                }
            }
        }
    }
}
Highlighting the Semantic Class
Using GetSemanticChannelTexture, we can get the texture for the semantic channel we're looking at and output the results to the RawImage UI element. Because this function outputs a Matrix4x4 texture, we then transform it in the shader, as explained in Adding the Alignment Shader.
Click to reveal the texture output snippet
using Niantic.Lightship.AR.ARFoundation;
using TMPro;
using UnityEngine;

public class SemanticQuerying : MonoBehaviour
{
    public ARSemanticSegmentationManager _semanticMan;
    public TMP_Text _text;
    public RawImage _image;

    void Update()
    {
        if (!_semanticMan.subsystem.running)
        {
            return;
        }

        var list = _semanticMan.GetChannelNamesAt(Screen.width / 2, Screen.height / 2);
        _text.text="";
        foreach (var i in list)
            _text.text += i;

        //this will highlight the class it found
        if (list.Count > 0)
        {
            //just show the first one.
            _image.texture = _semanticMan.GetSemanticChannelTexture(list[0], out mat);
        }
    }
}