How to Place Content in Real-World Locations Using Location AR
The AR Location is the highest-level abstraction that allows us to "anchor" virtual objects to the real world.
This how-to covers:
- Importing a real-world location from the Geospatial Browser (GSB) into Unity;
- Placing content in a real-world location;
- Testing placed content, either using a mockup or on location.
Prerequisites
- You will need a Unity project with ARDK installed and a set-up basic AR scene. For more information, see Setup ARDK 3 and Setting up an AR Scene.
- You will need a valid API Key.
Adding a Real-World Location to Unity
To add an AR location to Unity:
- Go to the Geospatial Browser and find the location you want to build content for. The data will download as a .zip file; do not unzip it. For more information on downloading location data, see Downloading Meshes.
- Drag and drop the downloaded zip file into the Assets directory in the Project window. Once the import process completes, it will create two assets, a Mesh
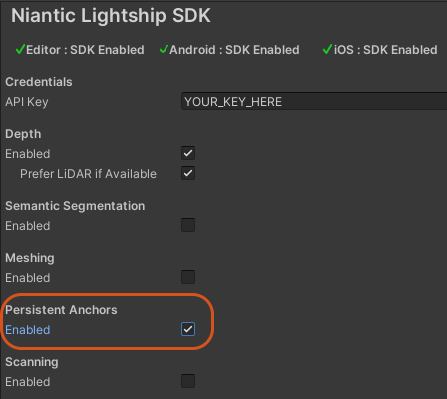
.prefabfile and a Manifest.assetfile. - Turn on Persistent Anchors in Lightship Settings:
- Click the Lightship top menu, then select Settings.
- In the Inspector window, check the Enabled box next to Persistent Anchors.
- Add an AR Location Manager component to the
XROrigin:- Select the
XROriginin the Hierarchy, then, in the Inspector window, click Add Component and search for ARLocationManager. - In the ARLocationManager Component, click Add AR Location to create a new
ARLocation.
- Select the
- In the Hierarchy, select the
ARLocationto show its Component in the Inspector. Drag and drop the Manifest from the Assets directory to the AR Location Manifest field in the Component.- This will update the name of the
ARLocationGameObject to match the manifest and set up its fields for tracking.
- This will update the name of the
Adding Real-World AR Content
When adding your AR content, remember the following:
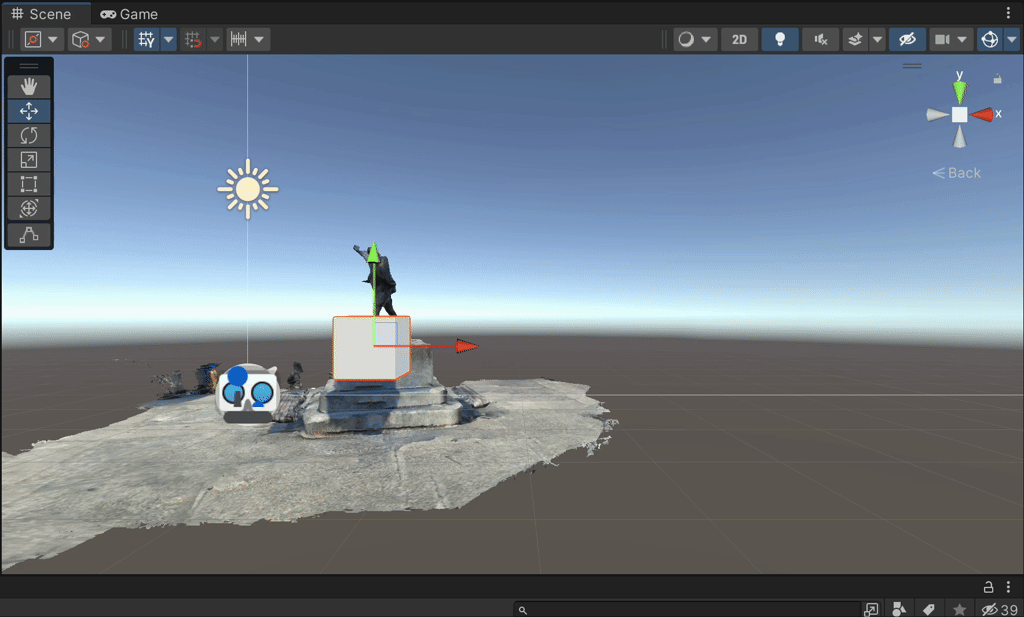
- Add your AR content as a child of the manifest (
ARLocation). For example, to add a Cube to a location:- In the Hierarchy, right-click the
ARLocation, then mouse over 3D Object and select Cube. - In the Inspector, set the cube's Scale to
0.5. Set its position so that you can see it in your test location.
- In the Hierarchy, right-click the
- Enable auto-tracking:
- In the Hierarchy, select the XROrigin, then, in the Inspector window, check the Auto-Track box in the ARLocationManager Component.
- When auto-tracking is enabled, the
ARLocationManagerwill start tracking on the currently activeARLocationwhen the component is enabled. See How to Use Location AR with Code for more options and information.

When an ARLocation is tracked during runtime, it is placed in the ARTrackable field of the ARPersistentAnchor it is associated with. This maintains the relative position of all children of the ARLocation in the scene. When placing or updating child content of the ARLocation, make your changes in local transform space to make sure the scene stays consistent.
Testing Real-World AR Content
The most accurate way to test real-world AR content is by building your Unity app to a device and physically visiting the location to test it out. Because this is not always possible, Lightship also provides a Simulation subsystem for Location AR. To enable Simulation, see the Simulation documentation
Simulated persistent anchors will have a consistent trackableId, but these trackableIds are not consistent with resolving real anchors (Playback or Live VPS).
You can also test localizations using Playback. See How to Setup Playback.