Setting Up the Niantic SDK for Unity
ARDK 3.13.0 is launching April 23, 2025. All versions before 3.13.0, including ARDK 2.x, will enter a 6-month support window starting May 1, 2025 and stop working on November 1, 2025. See 3.13.0 Release Notes. Questions? support@nianticspatial.com
To set up the SDK, you will download and install Unity, then install the ARDK Unity packages and set up Unity for the platform your AR experience will run on. After that, you will authenticate Lightship in Unity with your API key, perform any additional setup your platform device requires, and set up the basic requirements for an AR scene in Unity.
The Lightship Magic Leap 2 integration is in beta, so some features may not work as expected.
Download and Install Unity
Download Unity. We support Unity 6 (with 6000.0.36f1) and Unity 2022 LTS (with 2022.3.57f1).
Unity 2022 LTS users will need to manually upgrade Visual Scripting from 1.9.0 to 1.9.1 or higher via the Package Manager to avoid a SessionStateChangedEventUnit error.
Unity 6 uses the Universal Render Pipeline (URP) by default. In order to use the ARDK with Unity 6, you will either need to select the Built-in Render Pipeline template when creating your project or follow the instructions in How to Set Up ARDK with the Universal Render Pipeline to enable URP support for ARDK.
Create a Project and Install ARDK
- Android
- iOS
- Magic Leap 2
Create a Project and Install ARDK
- Create a new Unity project with the Universal 3D (Core) template.
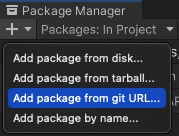
- In your Unity project, open the Window top menu, then select Package Manager.
- From the plus menu on the Package Manager tab, select Add package from git URL....
- Enter
https://github.com/niantic-lightship/ardk-upm.git.- If prompted, click Yes to activate the new Input System Package for ARFoundation 5.0. This may require a restart of the Unity Editor.
- To add the SharedAR package, repeat these steps using the following URL instead:
https://github.com/niantic-lightship/sharedar-upm.git.
To use a specific ARDK version, download its .tgz from our release pages (ardk-upm, sharedar-upm). Then, follow the installation instructions above and select "Add package from tarball" instead of the Git URL.
Create a Project and Install ARDK
- Create a new Unity project with the Universal 3D (Core) template.
- In your Unity project, open the Window top menu, then select Package Manager.
- From the plus menu on the Package Manager tab, select Add package from git URL....
- Enter
https://github.com/niantic-lightship/ardk-upm.git.- If prompted, click Yes to activate the new Input System Package for ARFoundation 5.0. This may require a restart of the Unity Editor.
- To add the SharedAR package, repeat these steps using the following URL instead:
https://github.com/niantic-lightship/sharedar-upm.git.
To use a specific ARDK version, download its .tgz from our release pages (ardk-upm, sharedar-upm). Then, follow the installation instructions above and select "Add package from tarball" instead of the Git URL.
Lightship's Magic Leap plugin is compatible with ML OS version 1.10 with the ML Unity SDK version 2.5.
In the Magic Leap Hub
- Download and install Magic Leap Hub 3 from the Magic Leap developer portal.
- Turn on your Magic Leap 2 and connect using USB. You may need to authorize the connection to your computer in an on-device prompt.
- Verify the installed Magic Leap OS version is correct.
- In the Settings app, find the About section.
- Scroll down to OS Version. If it says 1.10, you're done!
- If the version is lower than 1.10, follow these instructions to update your device using the Magic Leap 2 Updater.
- If the version is higher than 1.10, connect your device to your machine, then follow these instructions to downgrade your OS using Magic Leap Hub 3.
- Enable Developer Mode and USB Debugging on your Magic Leap 2:
- Return to the About section in the Settings app.
- Scroll down to Build Number. Click on it seven times to enable Developer Mode.
- Open the System settings menu, then scroll down to Advanced and open Developer Options.
- Under Debugging, enable USB Debugging.
- When you connect your device, select Allow USB Debugging in the prompt that opens. You can check Always allow to skip this step in the future.
- Open Unity and create a new project using the 3D (Built-In Render Pipeline) template. Lightship also supports Magic Leap applications built using URP, but it's samples are not set up to run in URP.
- Install the Magic Leap SDK and dependencies:
-
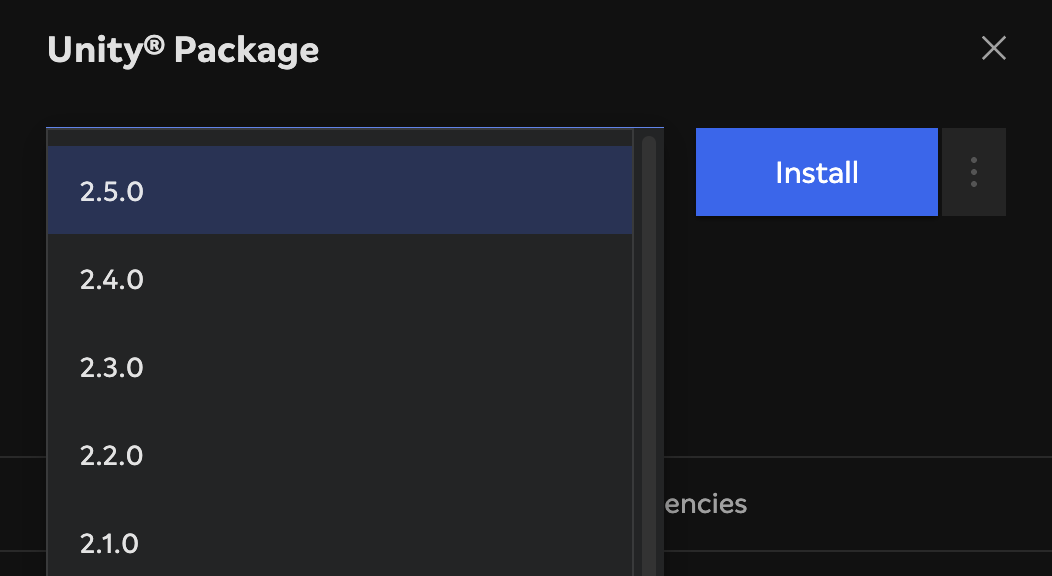
Open the Magic Leap Hub, then, in the Packages left-hand menu, scroll down and select Unity Package. From the Version drop-down menu, select 2.5.0, then install it.
-
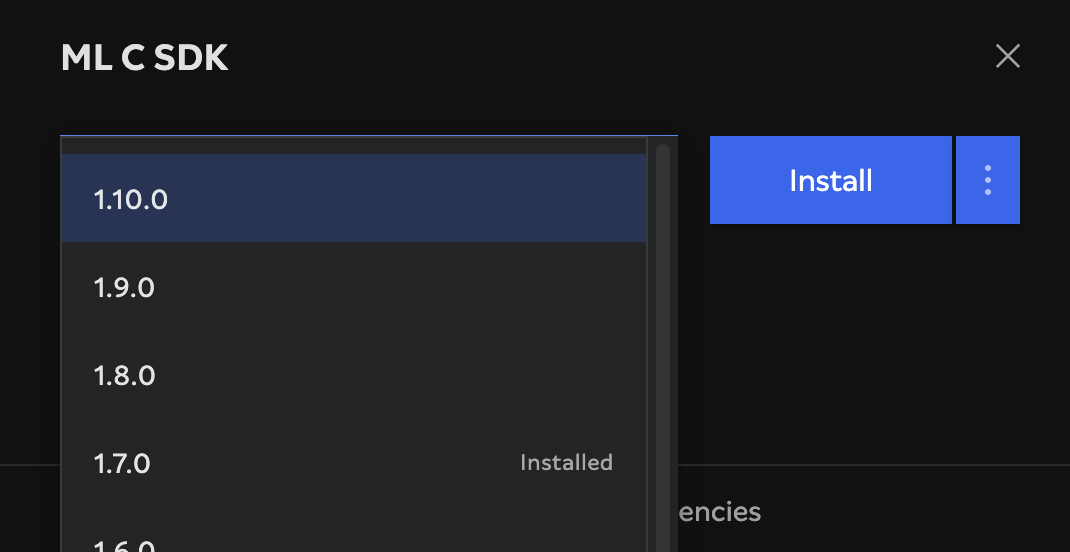
After installing the Unity package, find ML C SDK in the Packages menu. Select it, then choose 1.10.0 from the Version drop-down menu and install it.
-
In Unity
- Add the Magic Leap Setup Tool to your Unity account from the Unity Asset Store.
Unity 6 requires version 2.0.14 of the Magic Leap Setup Tool. The same version will also work with Unity 2022 and is recommended in order to follow along with the Setup Tool instructions
- Import the Magic Leap Setup Tool into your Unity project:
- In Unity, open the Window top menu and select Package Manager.
- Expand the Packages: In Project drop-down menu, then select My Assets.
- Select the Magic Leap Setup Tool, then click Import.
- Select Use OpenXR when asked.
- Once it finishes, the Magic Leap Project Setup window will open automatically.
- Troubleshooting: If the setup tool is stuck in the "Loading and Importing..." phase, try forcing the Unity Editor to recompile by changing the platform target.
- Use the Magic Leap Setup Tool to set up your project:
- Next to Set build target to Android, click Fix Setting. This first step must be complete before the setup tool allows you to proceed.
- Import the Magic Leap SDK:
- Click Import Package.
- When prompted to use the Magic Leap Registry, select Use Local Copy. (Selecting the Use Magic Leap Registry option will install the newest version available, which may not be compatible with your version of the Lightship plugin.)
- The Magic Leap
unitydirectory should open automatically. On macOS, this is located at~/MagicLeap/tools/unity. Open thev2.5.0folder, then select thecom.magicleap.unitysdk.tgzpackage. - If prompted, click Yes to activate the new Input System Package. This may require a restart of the Unity Editor.
Attention!During this process, the Unity Editor may crash or freeze. This is a bug with the Magic Leap Setup Tool. If it crashes, simply reopen the editor. If it freezes, force quit the editor then reopen it. Note that despite this issue, the SDK is still successfully imported.
- Next, Enable Magic Leap Feature. This may open the XR Plugin Management window and either automatically check OpenXR or may leave it unchecked. If it's unchecked, go ahead and manually enable it.
- Click Apply All to automate the remaining setup steps. Select Continue and Yes for any setup prompts that appear.
- Import the Niantic SDK for Unity packages:
- In Unity, open the Window top menu and select Package Manager.
- From the plus menu on the Package Manager tab, select Add package from git URL....
Attention!
The next two steps cover adding the Magic Leap 2 and Lightship Unity Packages. If you get any errors that say "Assertion failed", they are benign. You can restart the editor to get rid of them.
- To add the Niantic Lightship AR plugin, enter
https://github.com/niantic-lightship/ardk-upm.git.- If prompted, click Yes to activate the new Input System Package for ARFoundation 5.0. This may require a restart of the Unity Editor.
- To add the Magic Leap package, repeat these steps using the following URL instead:
https://github.com/niantic-lightship/ardk-ml2-upm.git.
To use a specific ARDK version, download its .tgz from our release pages (ardk-upm, ml2-upm). Then, follow the installation instructions above and select "Add package from tarball" instead of the Git URL.
If you are using or plan to use the Universal Render Pipeline (URP), refer to How to Set Up ARDK with the Universal Render Pipeline for additional setup instructions.
Create a Lightship Account and Add API Key
- Open the Lightship top menu, then select Settings to open the Lightship Settings menu. Click on Get API Key under Credentials. This should open the lightship.dev website in a browser window.
- Create a new Lightship account if you need to, then log in.
- Open the Projects page, then select an existing project or create a new one by clicking New Project.
- In your project's Overview, copy the API Key by clicking the copy icon next to it.
- Return to the Lightship Settings window in Unity and paste your API Key into the API Key field.
Activate the XR Loader for Your Mobile Platform
In Unity version 2022.3.10f1 or newer, you might see a benign error in the console after following these steps.
- Android
- iOS
- Magic Leap 2
- Open the Lightship top menu, then select XR Plug-in Management.
- In the XR Plug-in Management menu, select the Android tab, then check the box labeled Niantic Lightship SDK + Google ARCore.
- Open the Lightship top menu, then select XR Plug-in Management.
- In the XR Plug-in Management menu, select the iOS tab, then check the box labeled Niantic Lightship SDK + Apple ARKit.
- From the Lightship menu in the top toolbar, click the Set Up ML2 button.
- From the same Lightship menu, select XR Plug-in Management.
- In the XR Plug-in Management menu, select the Android tab, then check the box labeled OpenXR if it's not already enabled.
1.Check the boxes labeled Magic Leap 2 feature group and Niantic Lightship support for Magic Leap feature group.
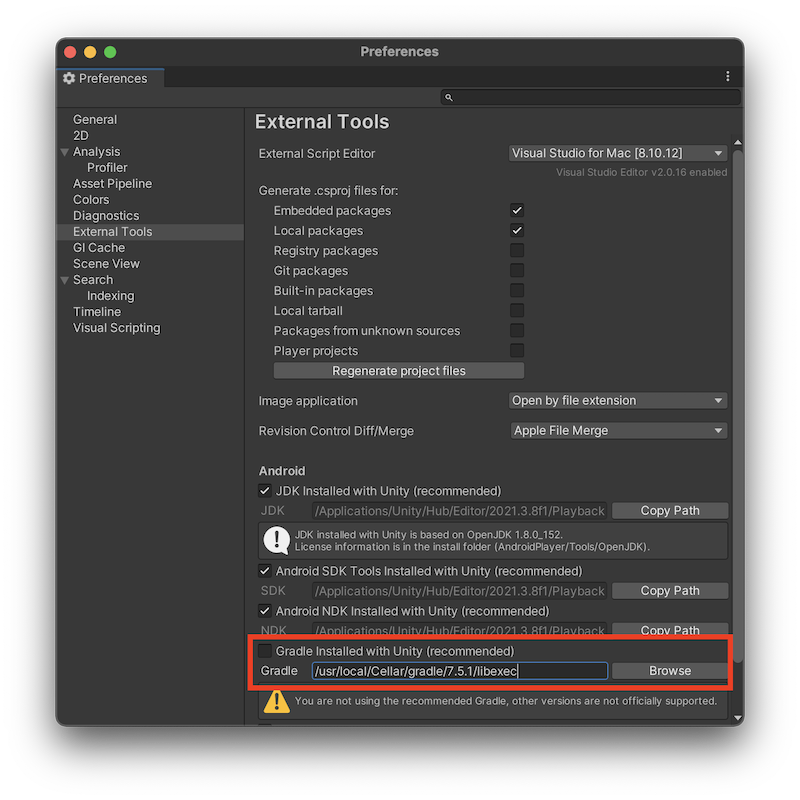
- From the top toolbar, open Unity -> Settings -> External Tools:
- Check to make sure that Gradle, the Android SDK, and the NDK are set to the Unity defaults.
- In the Project Settings menu:
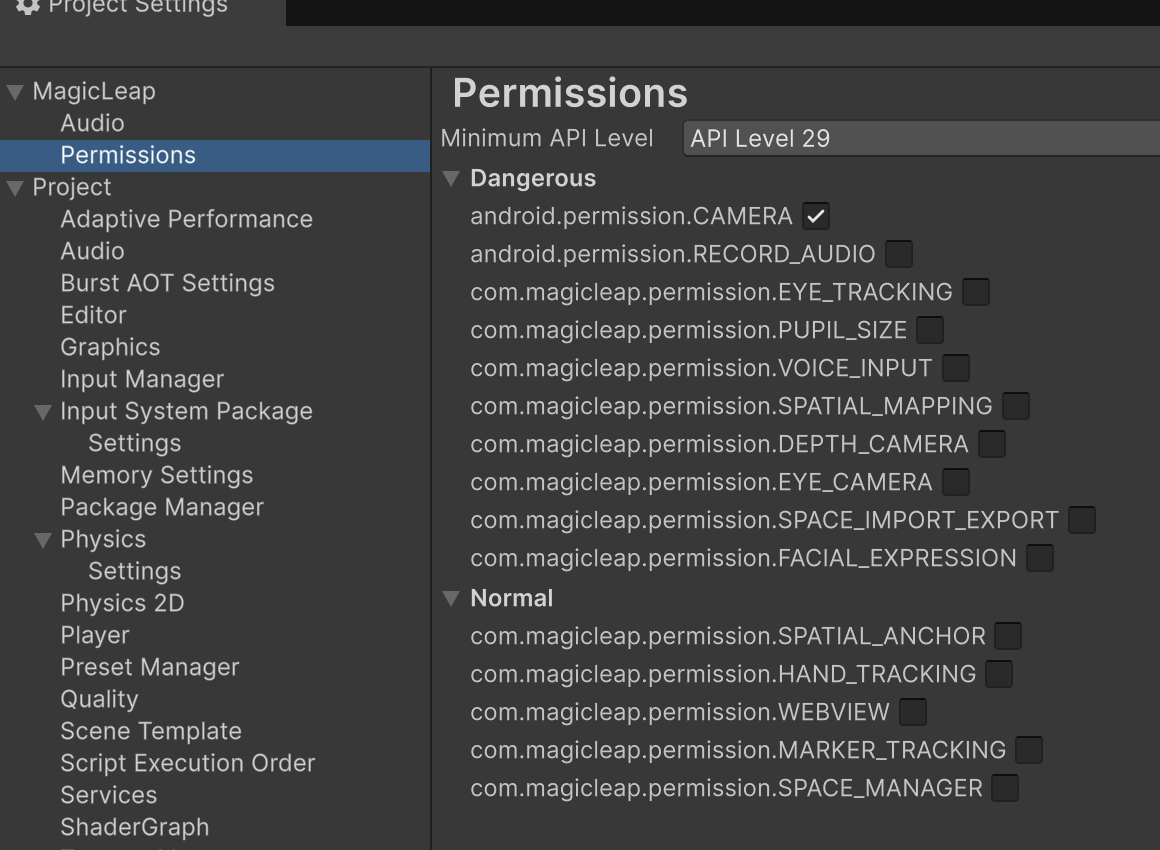
- Expand the Magic Leap menu, then select Permissions. Make sure the CAMERA permission is enabled.
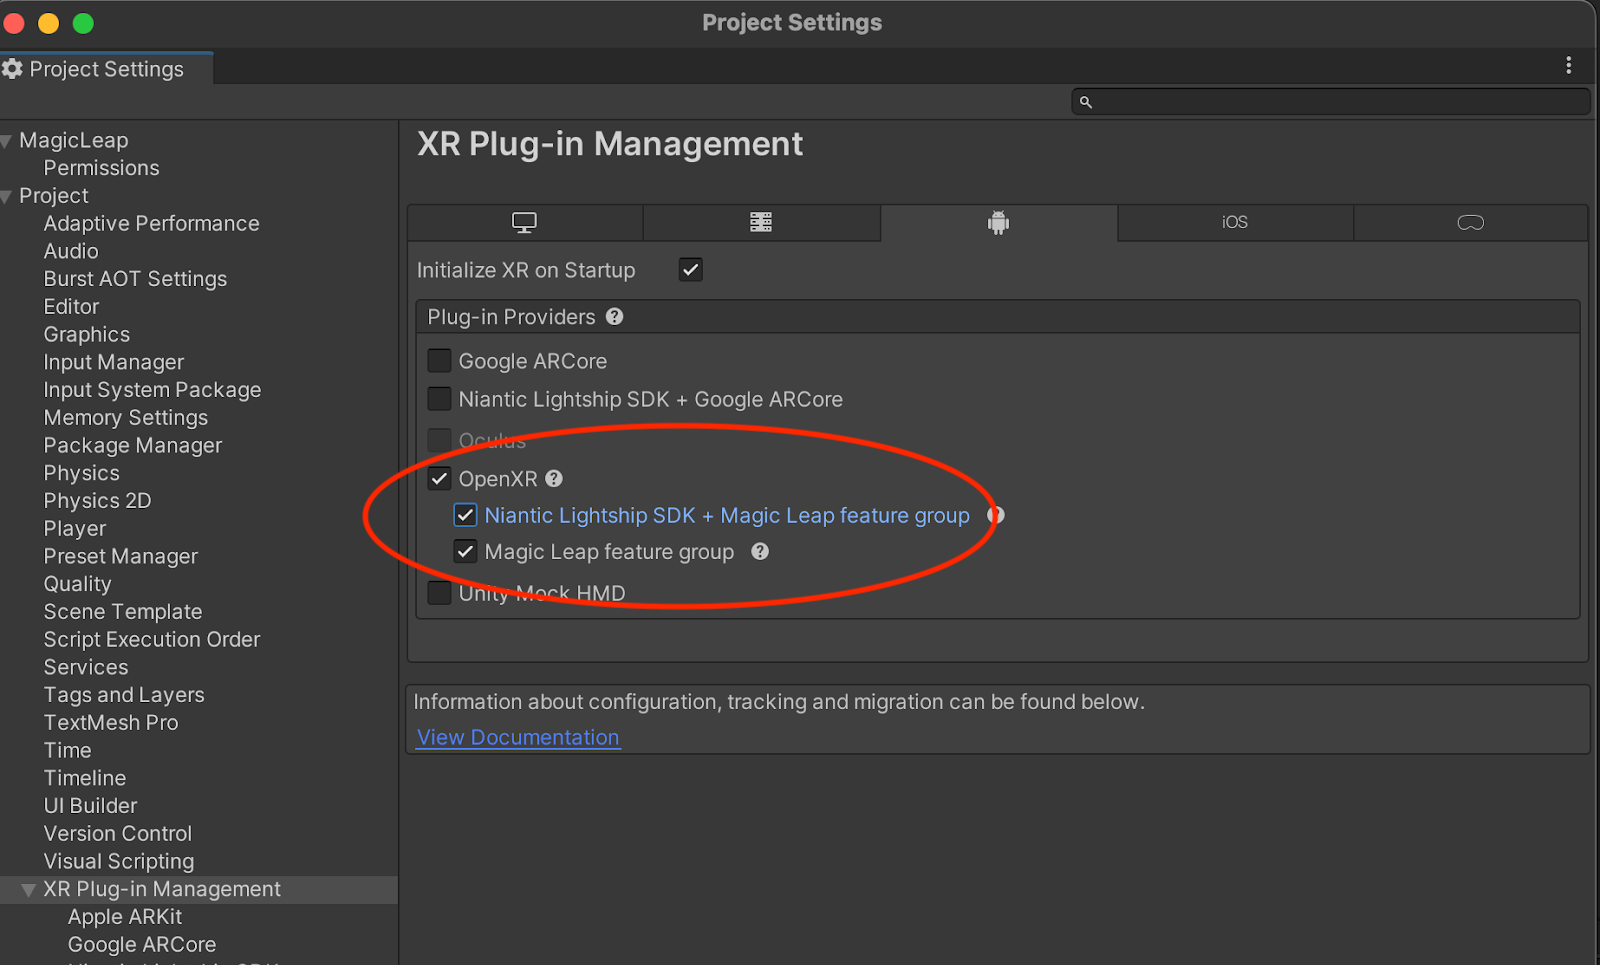
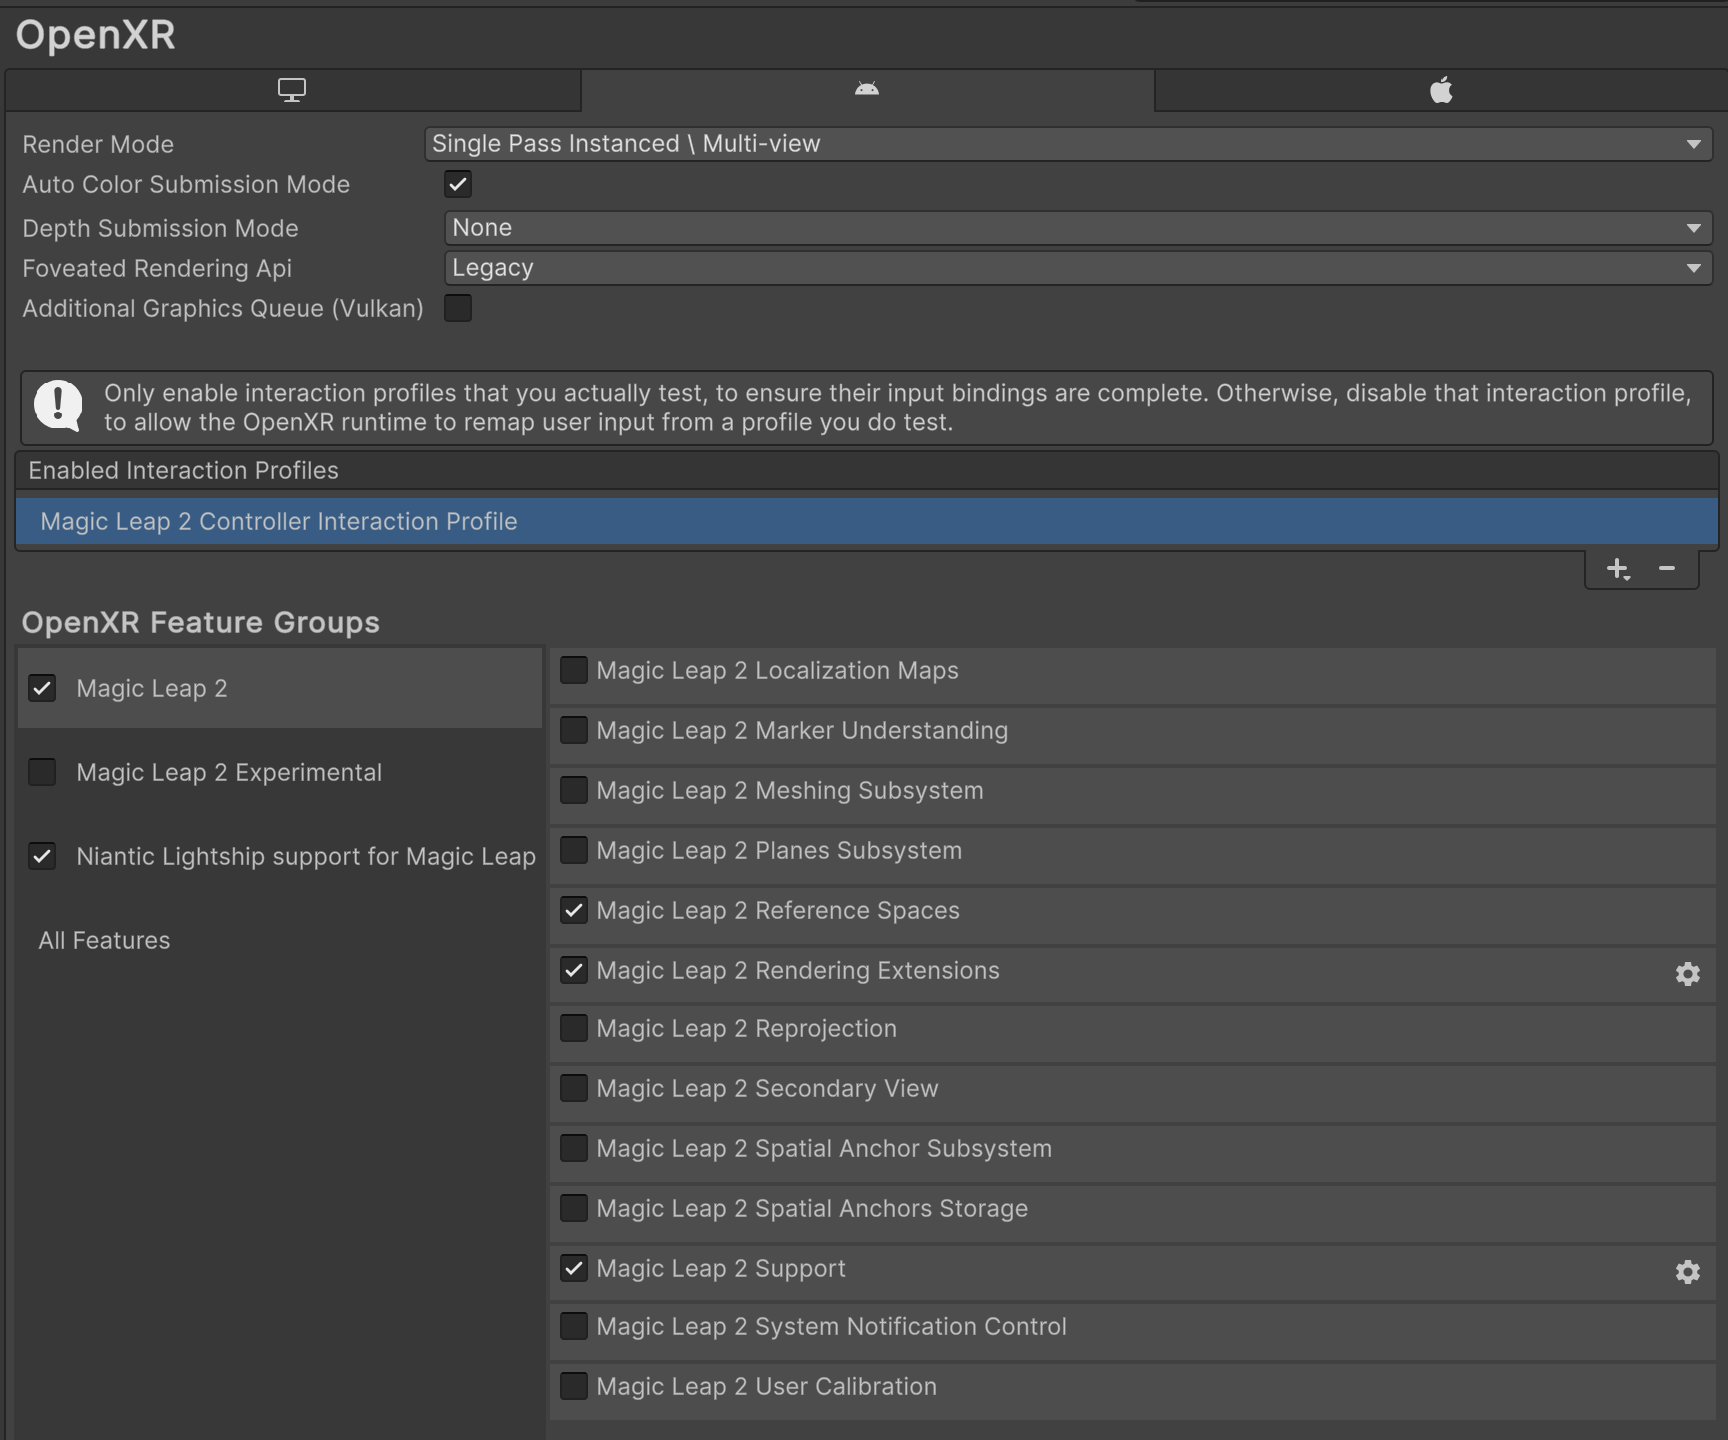
- Expand the XR Plug-in Management menu, then select OpenXR and open the Android tab. Make sure that at least the Magic Leap 2 Reference Spaces, Magic Leap 2 Support, and Lightship Magic Leap Features integration Feature Groups are enabled.
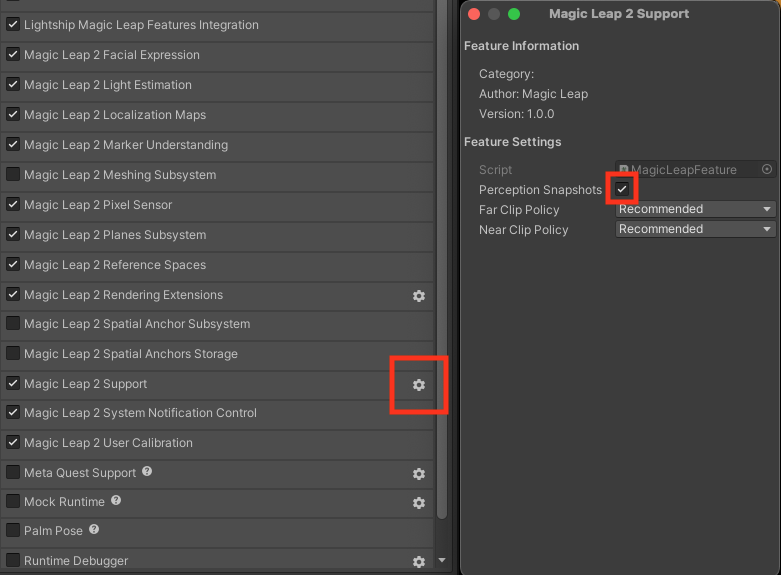
- Open the Magic Leap 2 Support settings. Check the box labeled Perception Snapshots.

- Select Project Validation from the left-hand menu. Select the Android tab, and make sure the window has no errors in it. The warning for "If using Lightship ARDK for Android..." should be ignored when building for ML2.
1.Ensure that the following Unity settings are correct. These should be properly set already, but we recommend double-checking these settings first if any issues arise.
Configure the Build Platform
- Open the Build Settings window by selecting File > Build Settings.
- Select iOS or Android, then click Switch Platform. After the progress bar finishes, click Player Settings. Select your platform from the tabs, scroll down to Other Settings, and change the following settings:
- Android
- iOS
- Magic Leap 2
- Rendering - Uncheck Auto Graphics API. If Vulkan appears in the Graphics API list, remove it.
- Identification - Set the Minimum API Level to Android 7.0 'Nougat' (API Level 24) or higher.
- Configuration - Set the Scripting Backend to IL2CPP, then enable both ARMv7 and ARM64.
If you are using Unity 2022.3.15f1 or older, building to Android requires a custom Gradle installation.
Click here to reveal the Gradle installation instructions
- Download and install Gradle 6.7.1 from the Gradle Releases page.
- Replace the default Gradle install in Unity:
- In Unity, open Preferences > External Tools > Android.
- Uncheck the box labeled Gradle installed with Unity (recommended), then replace the path with your local installation of Gradle 6.7.1.
If you are building through the command line, you can customize the Gradle path by setting AndroidExternalToolsSettings.gradlePath in your Unity build script.
- Set your Build Target to Android.
- Identification > Signing Team ID - Enter your iOS app developer key from developer.apple.com.
- Camera Use Description - Write a description for how you're using AR, such as "Lightship ARDK".
- Target Minimum iOS Version - Set to 14.0 or higher.
- Architecture - Select ARM64.
Nothing to do here. All configurations should have been taken care of by the Magic Leap Setup Tool.
Next Steps
Setting Up a Basic AR Scene
- Android
- iOS
- Magic Leap 2
To get started creating your own AR project, begin by creating an empty AR scene:
- Create a new Basic scene:
- From the main menu, choose File > New Scene.
- Select Basic (Built-in) and click Create.
- Right-click on the Main Camera and select Delete.
- Add an ARSession and XROrigin to your new scene
- Select the new scene in the Hierarchy.
- From the main menu, select Game Object > XR > AR Session.
- Repeat to add an XR Origin (Mobile AR).
- Save the scene using File > Save.
If you choose Save As Scene Template, you can select this scene in the New Scene dialog next time.
To get started creating your own AR project, beging by setting up a simple scene using the instructions located in the Magic Leap Developer Docs.
Then check out the Lightship sample scenes for Magic Leap 2 or learn more about developing in Lightship for the Magic Leap 2.
Further Reading
From here, proceed to the Sample Projects page to try out the features or to the How-To page to experiment with a guided tutorial. If you instead have a previous ARDK project you would like to convert to ARDK 3, see our Migration Guide.