How to Debug Shared AR
Debugging Shared AR can be quite cumbersome, as Shared AR brings the complexity of Multiplayer + the complexity of AR together. For example, you need multiple devices or multiple instance of the Unity editor opened in order to debug issues during development. Multiplayer can also cause race conditions or timing related issues as compared to single device application. This How-To shares some tips to debug Shared AR experiences, and serves as a guide for troubleshooting and debugging your AR Multiplayer application. There are three techniques you can use:
- Debugging on multiple Unity Editor instances with Playback and ParrelSync
- Debugging between Unity Editor and devices
- Debugging on devices
Prerequisites
This How-To requires the following:
- Completion of either How to Use VPS Colocalization with Netcode or How to Use Image Tracking Colocalization with Netcode.
- Playback ready to use.
- ParrelSync installed on your machine.
Debugging in Unity Editor using Playback and ParrelSync
ParrelSync is a Unity editor extension that allows users to test multiplayer gameplay without building the project by opening a second Unity editor window and mirroring the changes from the original project.
- From the ParrelSync menu, open Clones Manager. Click Create new clone in Clones Manager to create a clone project. This may take a while to complete.
- in Clones Manager, click Open in New Editor to open the cloned project. When the original project is modified, the cloned project will get the latest as well.
- Run the project in Play mode on multiple editors. Every instance should join the session and colocalize. Make sure both instances connect to the same Room.
Debugging between the Unity Editor and devices
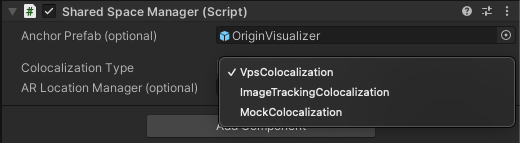
Even though AR tracking does not fully work in the Unity Editor, testing Shared AR between the Unity Editor and devices is useful to inspect states and the scene hierarchy while running AR Multiplayer on the physical devices. ARDK also supports a "Mock Colocalization" mode, to test and debug between the Unity Editor and your devices. This mode only applies to networking functionality.
Select XR Origin in the Hierarchy. In the Inspector window, find the Shared Space Manager component, select Colocalization Type and choose MockColocalization.
In your script, test for the
MockColocalizationsetting and setup the room with your own payload value. For example:if (_sharedSpaceManager.GetColocalizationType() ==
SharedSpaceManager.ColocalizationType.MockColocalization)
{
// Set room to connect
var mockTrackingArgs = ISharedSpaceTrackingOptions.CreateMockTrackingOptions();
var roomArgs = ISharedSpaceRoomOptions.CreateLightshipRoomOptions(
"TestRoom",
32,
"Test room using mock colocalization"
);
_sharedSpaceManager.StartSharedSpace(mockTrackingArgs, roomArgs);
}When you start the scene, the app should go straight to your UI for selecting Host or Client, both on the device and in the editor.
Debugging on Devices
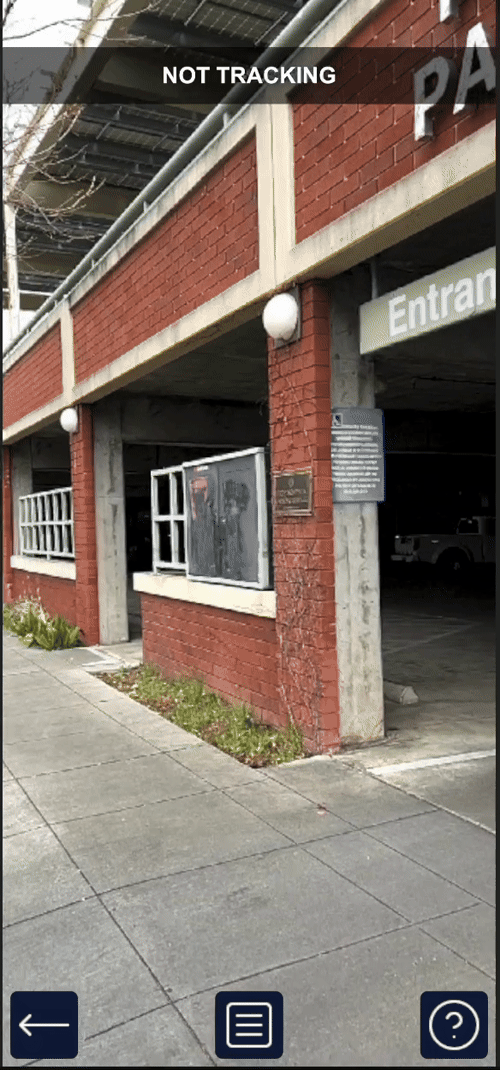
See Sample Projects for instructions on how to download and install the Shared AR sample.
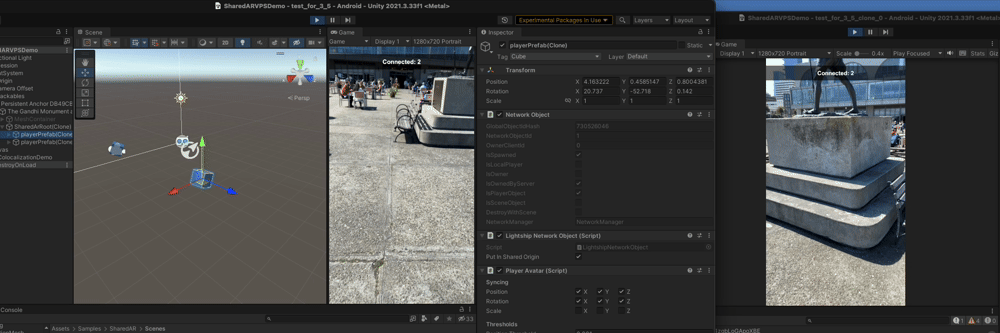
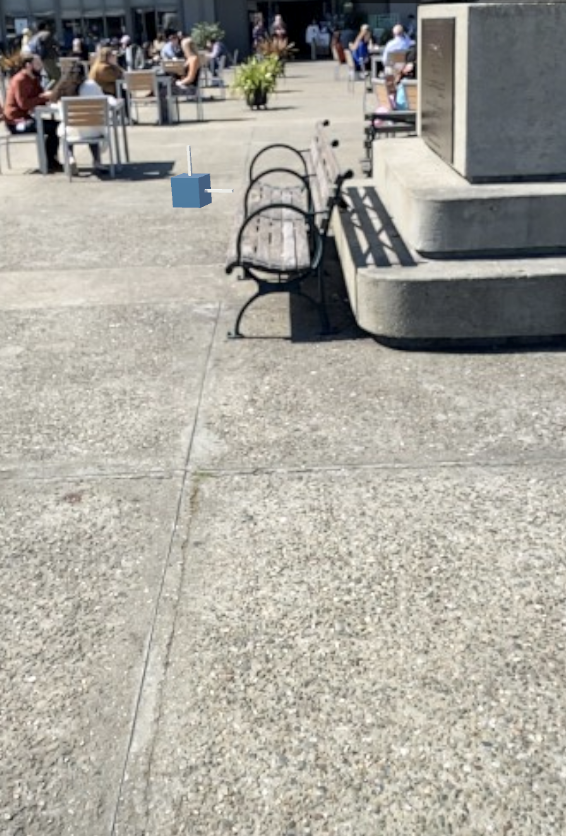
Debugging Colocalization by Showing a Shared AR Origin
Place a cube in the scene where the Shared AR Origin is located: This is a useful technique to verify the following in the colocalization flow:
- VPS and/or Image tracking is working
- Where is the Shared AR Origin in the real world
- Positional and rotational accuracy in VPS and/or Image tracking between devices
If the persistent anchor location or rotation is different between devices, you will know those devices are out of sync. If the anchor is in the right place (and orientation) but the networked objects aren't, you will know the devices are in sync but the network objects aren't being placed in sync.
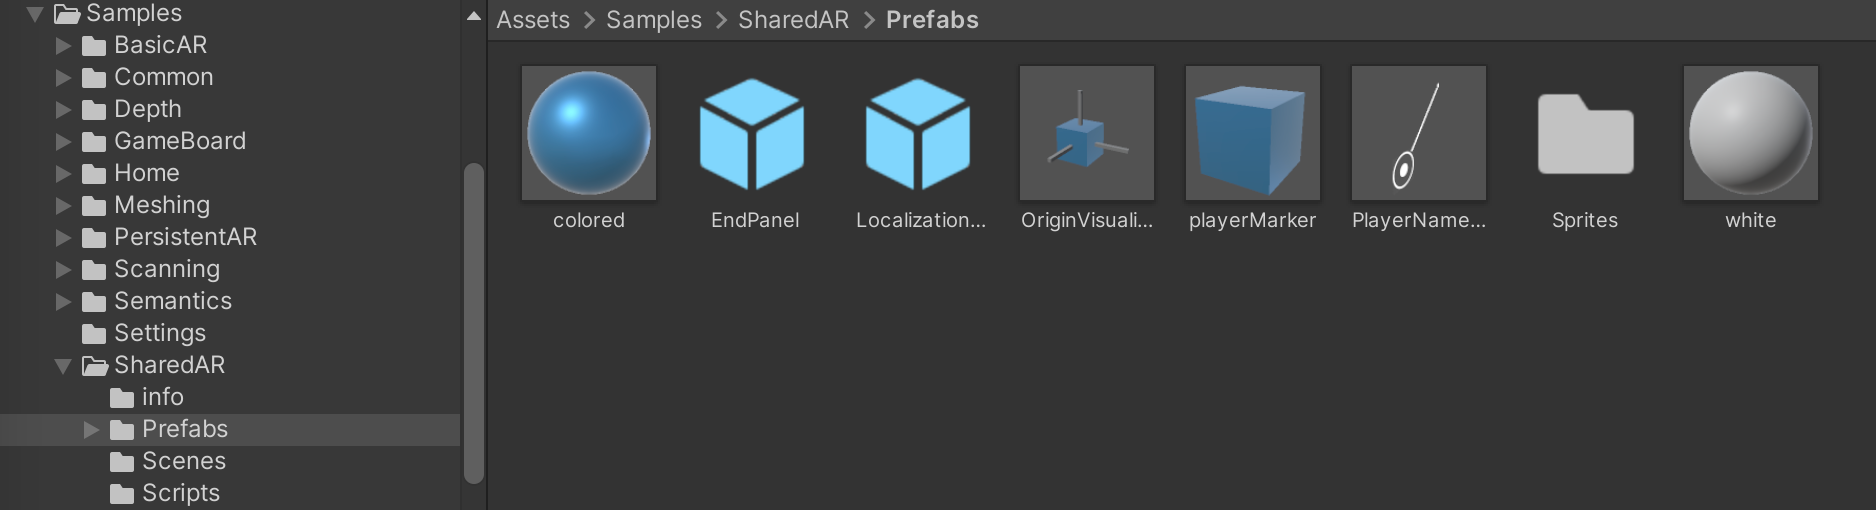
Using a cube as an anchor makes it easier to detect any rotation of the anchor. You can find a prefab called OriginVisualizer in the Shared AR sample under Assets/Samples/SharedAR/Prefabs.
To show the prefab at the anchor location, add following script in the SharedSpaceManager tracking event handler.
[SerializeField]
private SharedSpaceManager _sharedSpaceManager;

[SerializeField]
private GameObject _sharedRootMarkerPrefab;

private void OnColocalizationTrackingStateChanged(SharedSpaceManager.SharedSpaceManagerStateChangeEventArgs args)
{
    if (args.Tracking)
    {
        Instantiate(_sharedRootMarkerPrefab,
            _sharedSpaceManager.SharedArOriginObject.transform, false);
    }
}
Networking Statistics
Understanfing network statistics helps a lot to analyze Multiplayer issues such as latency, connection issues. The SharedAR package has a LightshipNetcodeTransportStatsUI prefab that provides a UI panel with networking statistics such as RTT to host, the amount of data sent, and the number of messages. The prefab is located under Packages/Niantic Lightship Shared AR Client Plugin/Assets/Prefabs.
To enable LightshipNetcodeTransportStatsUI:
Add the prefab to your Canvas object. You can start a Canvas by going to the main menu, GameObject > UI > Canvas if you don't have one.
Go to Lightship Netcode Transport Stats Display in the Inspector window for the prefab.
- Make sure the Lightship Netcode Transport is set to NetworkManager (Lightship Netcode Transport).
- Use the Text property to point to a different text object if you wish.
- Use the Bg Image property to select a new background image object. Use the Image component to modify the current image.
- Use the Button property to select a new button object. Use the Button component to modify the current button.
- To change the sample rate, update Sample Rate in Seconds. The default is 1 sample per second. Higher sample rates can degrade network performance.
- Check/uncheck Verbose Text to change the level of detail in the networking panel. Here's what regular and verbose text looks like:
Regular Text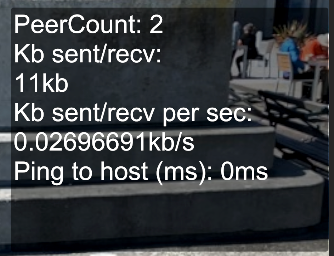 Verbose Text
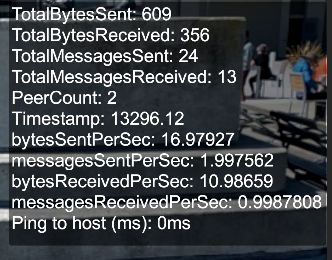
Troubleshooting
Connection Fails
- Make sure a valid API key is set.
- Make sure player count is less than the room capacity. Room capacity is set when calling
ISharedSpaceRoomOptions.CreateVpsRoomOption()orISharedSpaceRoomOptions.CreateLightshipRoomOptions() - Make sure one player started as the Host, and the rest of the players joined as Clients.
- There is currently a known issue in which a Room becomes unjoinable if a user leaves the Room without explicitly calling the
Leave()function many times. You need to delete the Room by callingRoomManagermentService.DeleteRoom()or use a different Room. When using Netcode, automatically leave from the Room when theSharedSpaceManagerandLightshipNetcodeTransportare destroyed (e.g. when leaving the scene).
Disconnect Unexpectedly
- Check device network connectivity (wifi, mobile network).
- Maximum duration time to keep connection is 30 minutes for now. Automatically disconnect after 30 minutes.
Messages are not delivered
- Maximum payload size is around 1KB for
INetworking.SendData(), and the message will not be sent if it exceeds this. When using Netcode, payload is constructed by Netcode. - The Lightship network backend has a limit of sending 2000 messages per second on a device. When it exceeds that limit, the server will slow down message delivery, and eventually drop the connection if it continuously exceeding the limit. When using Netcode, the host device sends a message to all of the other clients individually to update the states, and may be more likely to hit this limitation than client devices. Limiting network update frequency and/or number of players could help to reduce chance of hitting this issue.
Mobile network bandwidth could be limited
- If sending more data than network bandwidth allowes, players observe growing latency.
- The network bandwidth available can vary greatly due to many factors. This bandwidth often varies between players as well.
- Upstream bandwidth is often much narrower than downstream bandwidth.
- Testing in the Unity Editor with a high-speed internet connection may not reveal potential bandwidth related issues. On MacOS and iOS, the "Network Link Conditioner" can be used to simulate various network conditions.
- VPS tracking currently uses around 1.6Mbps upstream before becoming to the tracking state. Better avoid time critical messaging or massive synchronization during that time.