How to Mesh: Adding Physics
This how-to covers:
- Adding dynamic meshing to a scene with the default manager;
- How to create a prefab for meshing;
- Interacting with mesh physics;
- Making the mesh invisible.
Prerequisites
You will need a Unity project with ARDK installed and a set-up basic AR scene. For more information, see Installing ARDK 3 and Setting up an AR Scene.
Creating the Mesh
To create a mesh prefab:
Add an AR Mesh Manager to the XROrigin:
In the Hierarchy, right-click on the
XROrigin, then select Create Empty to add an emptyGameObjectto it. Name the new object MeshManager.In the Hierarchy, select MeshManager, then, in the Inspector window, click Add Component and add an ARMeshManager Component to it.
cautionBe cautious when adding the
ARMeshManagerComponent to GameObjects that parent a camera. TheARMeshManagerwill automatically increase the scale of the GameObject it's attached to. This can misalign the scale of the real and virtual worlds, breaking occlusions and the perceived distances of objects.Repeat this process, but add a Lightship Meshing Extension Component instead.

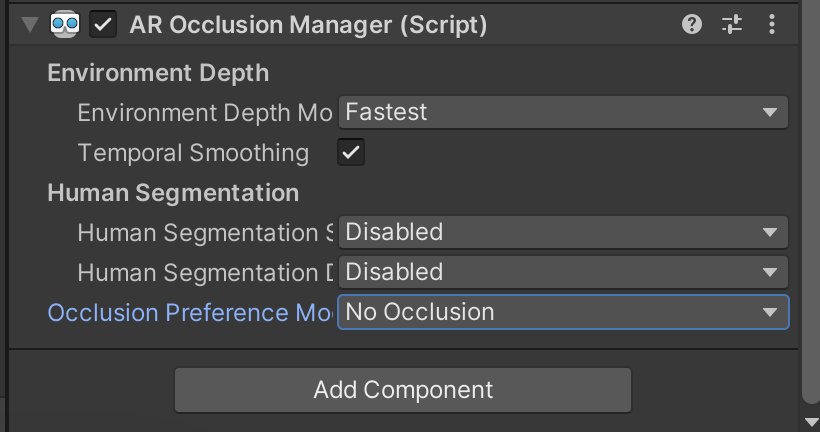
Add an AR Occlusion Manager:
In the Hierarchy, expand the
XROriginand Camera Offset, then select the Main Camera object. Then, in the Inspector, click Add Component and add anAROcclusionManager.Set the Occlusion Preference Mode to No Occlusion.
Prepare the mesh for conversion to prefab:
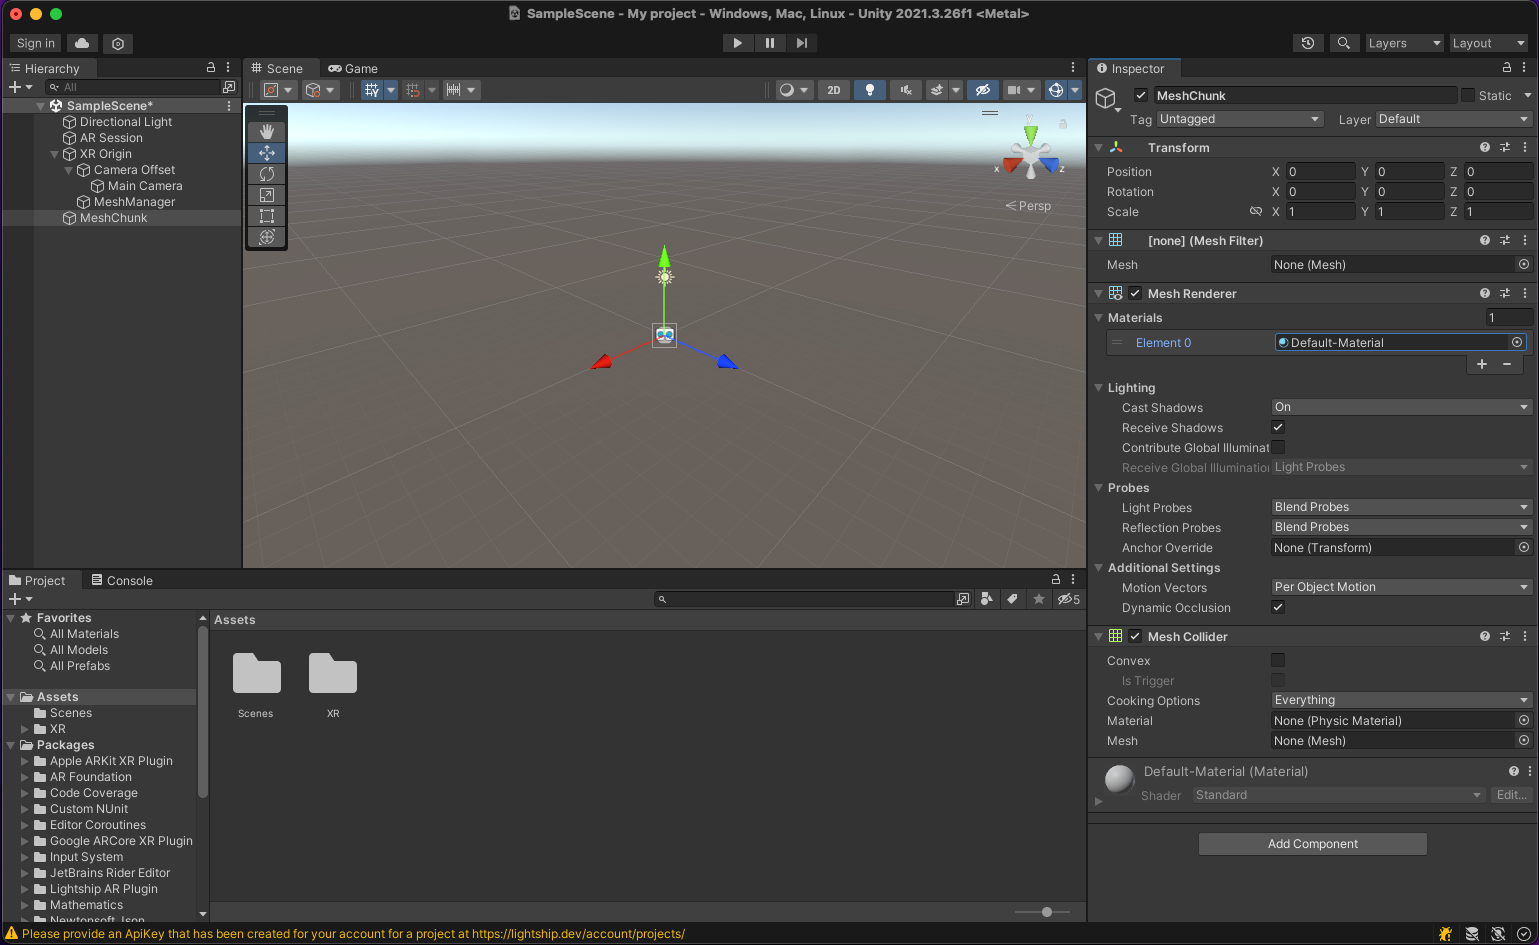
In the Hierarchy, right click and create an Empty
GameObjectin the main scene. Name it MeshChunk.In the Inspector window, add three Components to MeshChunk; a Mesh Filter to hold geographic information, a Mesh Renderer to display the mesh (if desired), and a Mesh Collider to provide physics.
In the Mesh Renderer Component, expand the Materials drop-down, then click the circle button to open the Select Material window and pick a Default Material to add to it.
Convert the mesh into a prefab and assign it:
Drag MeshChunk from the Hierarchy to the Assets window, converting it into a prefab.
Delete the MeshChunk
GameObjectfrom the scene.Select MeshManager from the Hierarchy, then drag the MeshChunk prefab to the Mesh Prefab slot in the Inspector.

Test it out:
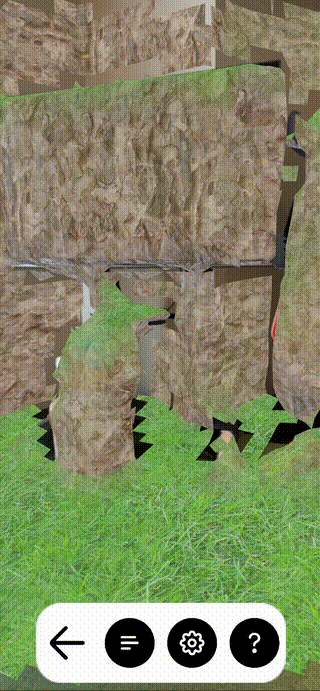
Build to device or press play in the editor. A mesh overlay should appear on screen.
Testing Mesh Physics
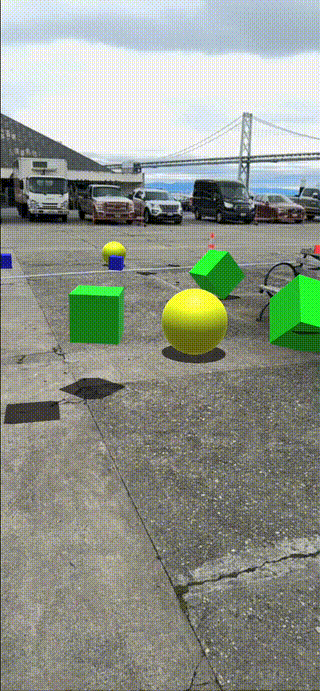
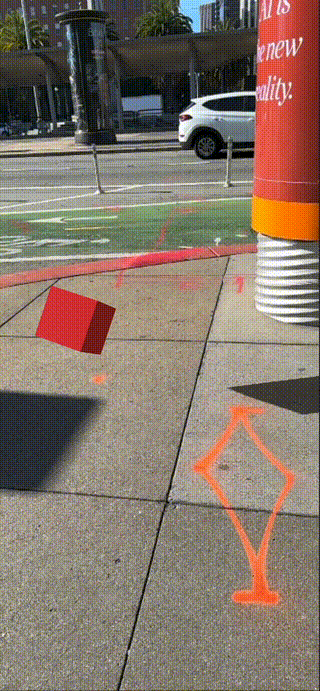
Because the mesh has a Mesh Collider, the mesh will respond to any object using standard Unity physics collision. For example, the mesh can provide collision for creatures walking on meshed surfaces or inform game entities when they have bumped into walls. This exercise demonstrates this by allowing the player to shoot spheres into the scene and see them bounce off of the mesh.
To add physics to the mesh:
- Create a physics prefab and add rigid body collision to it:
- In the Hierarchy, right click, then mouse over 3D Object and select Sphere. Name it LauncherSphere.
- Select LauncherSphere in the Hierarchy, then add a RigidBody Component to it in the Inspector.
- Still in the Inspector, make LauncherSphere smaller by setting its scale in the Transform Component to (0.2, 0.2, 0.2).
- Drag LauncherSphere to the Assets window to make it into a prefab, then delete it from the scene.
- Create a script to launch spheres:
- In the Assets window, right-click, then mouse over Create and choose C# Script. Name the new script Launcher.
- Add the Launcher code to your script:
Click to expand the Launcher code
using UnityEngine;

public class Launcher : MonoBehaviour
{
    public Rigidbody _prefabWithRigidbody;
    void Update()
    {
#if UNITY_EDITOR
        if(Input.GetMouseButtonDown(0))
#else
        if (Input.touchCount > 0)
#endif
        {
            // spawn in front of at the camera
            var pos = Camera.main.transform.position;
            var forw = Camera.main.transform.forward;
            var thing = Instantiate(_prefabWithRigidbody, pos+(forw*0.4f), Quaternion.identity);

            thing.AddForce(forw * 200.0f);
        }
    }
}
- Make a
GameObjectto run the script:- In the Hierarchy, right-click in your Scene, then choose Create Empty. Name it LauncherScript, then drag and drop the Launcher script onto it from the Assets directory.
- Select LauncherScript from the Hierarchy, then, in the Inspector, assign LauncherSphere as the Prefab variable.
- Build to device and test! You should be able to tap anywhere on screen and shoot a sphere that bounces off of surfaces.
Making the Mesh Invisible
The simplest way to make the mesh invisible is to tell Unity not to render it. Delete the Mesh Renderer from the prefab and Unity will no longer be able to draw it, but this also means the mesh cannot provide occlusion and shadows in the scene. To keep this functionality, Lightship provides a shader called InvisibleMeshWithShadows that will receive light and draw shadows without rendering the mesh directly.
To add an invisibility shader to the mesh:
- If you don't have a copy of the
InvisibleMeshWithShadowsshader in your project, download it from our Github repository here and add it to your project. - Right-click in the Assets window, then mouse over Create and select Material. Name it InvisibleShader.
- Add the
InvisibleMeshWithShadowsshader to InvisibleShader:- In the Assets window, select the Material.
- In the Inspector window, click the Shader dropdown, search for
InvisibleMeshWithShadows, and select it.
- Add InvisibleShader to the Mesh Renderer in the prefab:
- Select your MeshChunk object in the Hierarchy.
- In the Inspector window, find the Mesh Renderer component and click the Materials menu to expand it.
- Add InvisibleShader as the Material by clicking the circle and searching for InvisibleShader or dragging and dropping Invisible Shader to the element box.
Here, we've aligned the Directional Light in the scene to match the real world. Look into ARLightEstimation from AR Foundation to set up realistic lighting in your project.
Custom Mesh Texturing
While this how-to will not cover them, there are other ways to leverage mesh textures for AR development. Two examples follow:
- A custom mesh renderer (as used in the Meshing sample scenes) could display normals to see triangle facing directions while debugging.
- By default, the mesh renderer does not create a UV surface map, but using tri-planar projection when generating the mesh can create a UV map of the world space. The example shader can for mesh texturing can be found here

More Information
- For more details on how this works, see Meshing.