Sample Projects
We made the ARDK samples to show the quickest way to use each of our features. The sample has a menu and multiple small samples you can try out and look though to learn how to use our features. You can follow our How-tos to see how to add the features to your own apps.
In addition to these sample projects, we also offer Emoji Garden as a completed AR game that you can disassemble to learn about best practices for creating your own AR applications! Head to the Emoji Garden feature page to learn more about it and download the project.
Installing the Samples
- You can either download the sample directory manually or clone the samples repo in git.
- To clone the repo, use
git clone https://github.com/niantic-lightship/ardk-samples.gitwhere you want the git repository to live. Usegit pullperiodically to refresh the repository and download new samples when they are added. - To download the sample directory, navigate to https://github.com/niantic-lightship/ardk-samples. Use the Code button and select Download Zip. Open the zip file and save the contents it in your
Unitydirectory or wherever you store your Unity projects.
- To clone the repo, use
- Open the samples project in Unity.
- Navigate to the Project tab. Each sample contains a Unity scene which demonstrates one ARDK feature. These include:
Samples/Depth/Scenes/DepthDisplay.unitySamples/Depth/Scenes/DepthOcclusion.unitySamples/Semantics/Scenes/SemanticsDisplay.unitySamples/Depth/Scenes/DepthSemanticSuppression.unitySamples/Meshing/Scenes/NormalMeshes.unitySamples/NavigationMesh/Scenes/NavigationMesh.unitySamples/PersistentAR/Scenes/RemoteAuthoring.unitySamples/PersistentAR/Scenes/VPSLocalization.unitySamples/SharedAR/Scenes/SharedARVPS.unitySamples/SharedAR/Scenes/ImageTrackingColocalization.unitySamples/Scanning/Scenes/Recording.unitySamples/Meshing/Scenes/TexturedMesh.unity
- For some samples, including RemoteAuthoring, VPSLocalization, and SharedVPS, you will need to add a Lightship key to Unity.
Running the Samples in Unity 2022
Our sample project comes linked to Unity 2021.3.29f1, but you can update it to version 2022.3.16f1 if you would prefer to work in Unity 2022. To update the sample:
- In Unity Hub, under Installs, install 2022.3.10f1 if you do not have it already.
- Under Projects, find the ARDK sample project. Click on the Editor Version and change it to 2022.3.16f1. Then click the Open with 2022.3.16f1 button.
- When the Change Editor version? dialog comes up, click Change Version.
- When the Opening Project in Non-Matching Editor Installation dialog comes up, click Continue.
- Disable the custom base Gradle template:
- In the Unity top menu, click Edit, then Project Settings.
- In the left-hand Project Settings menu, select Player, then click the Android tab.
- Scroll down to Publishing Settings, then un-check the box labeled Custom Base Gradle Template.
- In the Window top menu, open the Package Manager. Select Visual Scripting from the package list, then, if you are using version 1.9.0 or earlier, click the Update button.
- If there are any errors, the Enter Safe Mode? dialog will pop up. Click Enter Safe Mode to fix the errors.
Samples
Each sample resides in its own folder. You will see a structure like this:
\NameOfSample
  \Scene
  \Materials
  \Prefabs
  \Shaders
This makes it easy to copy one sample into another project. Everything is in one place, and you can export it into a prefab and re-import it into your new project.
You may need to copy some shared materials and assets from the \Common folder.
Depth Display
The depth scene demonstrates how to get the depth buffer and display it as an overlay in the scene. Open DepthDisplay.unity in the Depth folder to try it out.
Occlusion
This scene demonstrates occlusion by moving a static cube in front of the camera. Because the cube does not move, you can walk around and inspect the occlusion quality directly. To open it, see Occlusion.unity in the Depth folder. This sample also demonstrates two advanced occlusion options available in Lightship, Occlusion Suppression and Occlusion Stabilization. These options reduce flicker and improve the visual quality of occlusions using input from either semantics or meshing. For more information on how these capabilities work, see the How-To sections for Occlusion Suppression and Occlusion Stabilization.
Semantics
This scene demonstrates semantics by applying a shader that colors anything recognized on-screen as part of a semantic channel. To open this sample, see SemanticsDisplay.unity in the Semantics folder.
To use this sample:
- Select a semantic channel from the drop down list.
- Look for the corresponding object(s) on your phone camera.
Meshing
This scene demonstrates how to use meshing to generate a physics mesh in your scene. It shows the mesh using a Normal shader, the colors represent Up, Right and Forward.
To open this sample, see NormalMeshes.unity in the Meshing folder.
Textured Mesh
This scene demonstrates how to texture a Lightship mesh. It works like the Meshing sample but uses an example tri-planar shader that demonstrates one way to do world space UV projection. The sample tiles three textures in the scene; one for the ground, the walls, and the ceiling.
To open this sample, see TexturedMesh.unity in the Meshing folder.
Navigation Mesh
This scene demonstrates using meshing to create a Navigation Mesh. As you move around we create and grow a navigation mesh that you can click on to tell an AI agent to move to that position. The agent can walk around corners and jump up on objects. To open the sample, see NavigationMesh.unity in the NavigationMesh folder.
To view this demonstration:
- Build the scene to your device, then point your phone at your surroundings and move around. The game pieces should show after a moment.
- Tap on a game piece to set a destination.
- The Player Cube will find a path along the navigation mesh to reach the selected destination.
Remote Authoring
This sample only works in portrait orientation.
This scene demonstrates target localization by targeting a VPS Anchor. To open this sample, see RemoteAuthoring.unity in the PersistentAR folder.
To use this sample:
Go to the Geospatial Browser.
Copy the Blob for a Default Anchor of your choice.
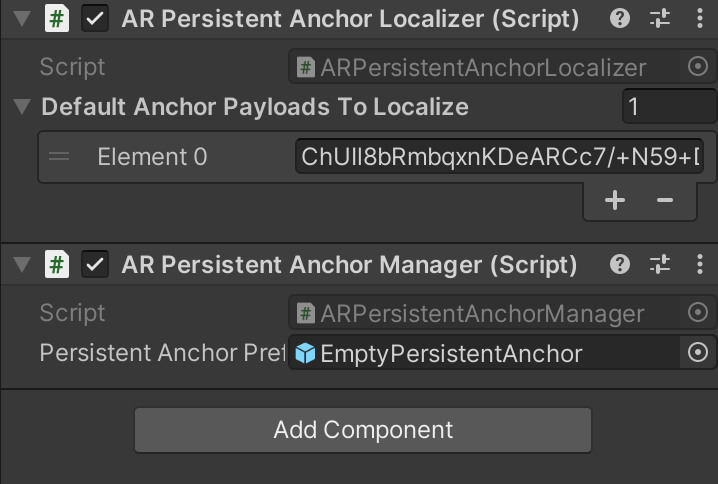
In the scene Hierarchy, navigate to XR Origin. In the Inspector window, add the Blob to the list of Default Anchor Payloads To Localize.
Build the sample to your device.
Physically visit the location you’ve chosen in GSB and localize to it.
A green cube will appear at the mesh origin indicated in the Geospatial Browser by the Coordinate Axis Marker.
Changing the Blob at Runtime
You can open the Geospatial Browser on your test device, copy the Blob of a different anchor, and paste it into the Payload text box when the app is running.
VPS Localization
This sample requires a Lightship API Key.
This scene shows a list of VPS locations in a radius, allows you to choose a Waypoint from the Coverage API as a localization target, then interfaces with your phone's map to guide you to it. To open this sample, see VPSLocalization.unity in the PersistentAR folder.
To use this sample:
- Build to device and open the app. Make sure to allow location permissions.
- To search from your current location, set a radius and tap Request Areas. To search from another location, fill in its latitude and longitude coordinates instead.
- Physically visit the location and tap the Localize button.
- Wait for the status to change to Tracking and a cube will appear at the mesh's origin.
Shared AR VPS
This sample requires a Lightship API Key.
This scene allows you to choose a Waypoint from the Coverage API and create a shared AR experience around it. To open this sample, see SharedARVPS.unity in the SharedAR folder.
To use this sample on mobile devices:
- Follow instructions for VPSLocalization to localize to an available location.
- Physically visit the location and tap the Localize button with 2-10 other phones. This process will localize everyone to the same location and automatically join everyone into the same room.
- Wait for the status to change to Tracking and every player in the session will see a name tag. The name tag will turn red to indicate that player has lost tracking. The stats UI can be hidden by tapping on it, but it will not return for that session.
To use this sample with Playback in the Unity editor:
- Set up playback of the scene at a location. See How to Set Up Playback.
- Provide a default anchor payload string from the Geospatial Browser to use with playback. See How to Use the Geospatial Browser.
- Copy the default anchor payload string into the In Editor Payload field in the Vps Colocalization Demo component.
- Start the VPS Colocalization scene. It should use the payload string to automatically start tracking.
- When the network UI comes up, choose whether to join as Host or Client.
Shared AR Image Tracking Colocalization
This sample requires a Lightship API Key.
This scene allows multiple users to join a shared room without a VPS location, using a static image as the origin point. To open this sample, see ImageTrackingColocalization.unity in the SharedAR folder.
To use this sample:
- Print the image in
Assets/Samples/SharedAR/IMG-2689.pngso that it is 9cm wide. - Place the image on a surface.
- Point the device camera at the image. Select Create New Room.
Recording
This scene allows you to scan a real-world location for playback in your editor. To open this sample, see Recording.unity in the Scanning folder. To learn how to use this sample, see How to Create Datasets for Playback.