How to Set Up a Shared AR Scene with Netcode
Shared AR is a set of AR and network features that allows you to create mulitplayer AR experiences. In this How-To, you will learn to set up network multiplayer, enable real-world tracking, and connect to the Lightship Network Server using Unity Netcode for GameObjects.
Prerequisites
- You will need a Unity project with Lightship AR enabled.
- You will need to install the Shared AR plugin.
- You will need an AR scene with ARSession and XROrigin.
- Familiarize with concepts and usage of Netcode for Gameobjects from Get started with NGO in the Unity documentation.
Add Components to your Scene
You will need to add these components to your Unity scene in order to use Shared AR:
Add a Network Manager object to the root of your scene.
- In the Hierarchy, select the scene title.
- From the main menu, select GameObject and select Create Empty
- Name the object NetworkManager.
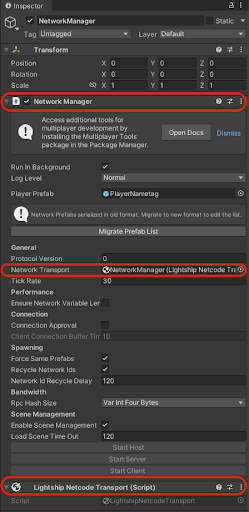
Add a NetworkManager component to the object.
In the Hierarchy, select the NetworkManager.
In the Inspector window, click Add Component.
Type "Network Manager" into the search box and select it to add.
Under Network Transport, click Select transport... and select LightshipNetcodeTransport. This will automatically add the Lightship Netcode Transport component.
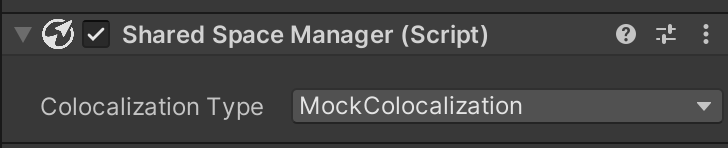
Add a SharedSpaceManager component to XROrigin
In your AR Scene in the Hierarchy, select
XR Origin.In the Inspector window, click Add Component.
Type "Shared Space Manager" into the search box and select it to add one to the
XR Origin.Set Colocalization Type in the Shared Space Manager to Mock Colocalization. Make sure to change this to the corresponding Colocalization Type when using VPS Colocalization or Image Tracking Colocalization.
Starting a Netcode Session with SharedSpaceManager
Using SharedSpaceManager, we will next set up the scene and code to let users connect to one another and begin a networked session.
To set up the UI and managers for SharedAR:
In the Hierarchy, right-click under your AR scene, then open the UI menu and select Button - TextMeshPro to add a button. Repeat this process, adding another button and a text field. The buttons will allow hosts and clients to join, while the text field is for connection status output. Name the buttons
JoinAsHostandJoinAsClient, then name the text fieldLocalizationStatusText.Still in the Hierarchy, right-click the root of your AR scene, then select Create Empty. Name the new object
NetworkDemo.In the Assets folder of the Project window, right-click, then open the Create menu and select C# Script. Name the new script
NetworkDemoManager.cs.- Create a new C# script in your project and name it to NetworkDemoManager.cs
- Open
NetworkDemoManager.csand add this code snippet to it to initialize the UI elements andSharedSpaceManager:
[SerializeField]
private Text _statusText;

[SerializeField]
private Button _joinAsHostButton;

[SerializeField]
private Button _joinAsClientButton;

[SerializeField]
private SharedSpaceManager _sharedSpaceManager;
Connect the fields in
NetworkDemoManager.cstoNetworkDemo:In your AR Scene in the Hierarchy, select the NetworkDemo component.
In the Inspector window, click Add Component.
Type "Network Demo Manager" into the search box and select it to add.
Drag and drop the text field, buttons, and the XR Origin that now contains a
SharedSpaceManagerfrom the Hierarchy into the corresponding fields in the Network Demo Manager Component. At this point, this is howNetworkDemoshould look: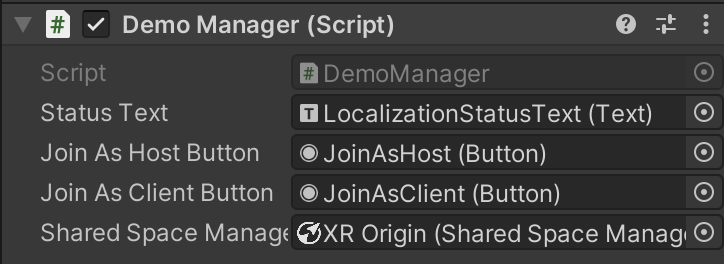
Creating a Room and Handling Events
Next, we will add code to the script to create a multiplayer room and handle shared AR events, such as incoming user connections. To get the Network Demo Manager ready for multiplayer:
Add a code snippet to
NetworkDemoManager.csthat will get it ready for connections to the Room:Create the tracking options for the Room by calling
ISharedSpaceTrackingOptions.CreateMockTrackingOptions().Instantiate the multiplayer Room by creating its room options using
ISharedSpaceRoomOptions.CreateLightshipRoomOptions().Add a handler for the
sharedSpaceManagerStateChangedevent to theSharedSpaceManager. Copy in this code snippet to add this functionality toNetworkDemoManager.cs:protected void Start()
{
// Set room to join
var mockTrackingArgs = ISharedSpaceTrackingOptions.CreateMockTrackingOptions();
var roomArgs = ISharedSpaceRoomOptions.CreateLightshipRoomOptions(
"ExampleRoom", // use fixed room name
32, // set capacity to max
"vps colocalization demo (mock mode)" // description
);
_sharedSpaceManager.StartSharedSpace(mockTrackingArgs, roomArgs);
}
Next, we will go over some important events and add event-handling code to the Network Demo Manager script:
When the tracking status changes,
SharedSpaceManager.sharedSpaceManagerStateChangedis invoked. Watching this event and waiting for a good tracking state before proceeding lets users focus on getting tracking working before the experience begins and reduces the chance that visual content moves inappropriately. In Mock Colocalization Mode, this event is invoked immediately.When a connection is established,
NetworkManager.OnClientConnectedCallbackis invoked. Here, we set a callback to the singleton version,NetworkManager.Singleton.OnClientConnectedCallback, so that the host catches incoming player connections. (If the player is a client, this event will instead fire when a host joins.) For this example, we also add text that notifies the user of new connections.To start a Netcode session as a host, call
NetworkManager.Singleton.StartHost. To instead start as a client, callNetworkManager.Singleton.StartClient. For this example, we add these events to their respective buttons, allowing users to join as hosts or clients as appropriate.protected void Start()
{
// UI event listeners
_joinAsHostButton.onClick.AddListener(OnJoinAsHostClicked);
_joinAsClientButton.onClick.AddListener(OnJoinAsClientClicked);
// Netcode connection event callback
NetworkManager.Singleton.OnClientConnectedCallback += OnClientConnectedCallback;
// Set SharedSpaceManager and start it
_sharedSpaceManager.sharedSpaceManagerStateChanged += OnColocalizationTrackingStateChanged;
// Set room to join
var mockTrackingArgs = ISharedSpaceTrackingOptions.CreateMockTrackingOptions();
var roomArgs = ISharedSpaceRoomOptions.CreateLightshipRoomOptions(
"ExampleRoom", // use fixed room name
32, // set capacity to max
"vps colocalization demo (mock mode)" // description
);
_sharedSpaceManager.StartSharedSpace(mockTrackingArgs, roomArgs);
}
private void OnColocalizationTrackingStateChanged(
SharedSpaceManager.SharedSpaceManagerStateChangeEventArgs args)
{
if (args.Tracking)
{
_joinAsHostButton.gameObject.SetActive(true);
_joinAsClientButton.gameObject.SetActive(true);
}
}
private void OnJoinAsHostClicked()
{
NetworkManager.Singleton.StartHost();
HideButtons();
}
private void OnJoinAsClientClicked()
{
NetworkManager.Singleton.StartClient();
HideButtons();
}
private void HideButtons()
{
_joinAsHostButton.gameObject.SetActive(false);
_joinAsClientButton.gameObject.SetActive(false);
}
private void OnClientConnectedCallback(ulong clientId)
{
Debug.Log($"Client connected: {clientId}");
}
Make sure one user is the Host and the rest are Clients.
Final Network Demo Manager Script
At this point, NetworkDemoManager.cs should look like this:
Click to reveal the finished Network Demo Manager code
using Niantic.Lightship.SharedAR.Colocalization;
using Unity.Netcode;
using UnityEngine;
using UnityEngine.UI;

public class NetworkDemoManager : MonoBehaviour
{
    [SerializeField]
    private Text _statusText;

    [SerializeField]
    private Button _joinAsHostButton;

    [SerializeField]
    private Button _joinAsClientButton;

    [SerializeField]
    private SharedSpaceManager _sharedSpaceManager;

    protected void Start()
    {
        // UI event listeners
        _joinAsHostButton.onClick.AddListener(OnJoinAsHostClicked);
        _joinAsClientButton.onClick.AddListener(OnJoinAsClientClicked);

        // Netcode connection event callback
        NetworkManager.Singleton.OnClientConnectedCallback += OnClientConnectedCallback;

        // Set SharedSpaceManager and start it
        _sharedSpaceManager.sharedSpaceManagerStateChanged += OnColocalizationTrackingStateChanged;
        // Set room to join
        var mockTrackingArgs = ISharedSpaceTrackingOptions.CreateMockTrackingOptions();
        var roomArgs = ISharedSpaceRoomOptions.CreateLightshipRoomOptions(
            "ExampleRoom", // use fixed room name
            32, // set capacity to max
            "shared ar demo (mock mode)" // description
        );
        _sharedSpaceManager.StartSharedSpace(mockTrackingArgs, roomArgs);
    }

    private void OnColocalizationTrackingStateChanged(
        SharedSpaceManager.SharedSpaceManagerStateChangeEventArgs args)
    {
        // Show Join UI
        if (args.Tracking)
        {
            _joinAsHostButton.gameObject.SetActive(true);
            _joinAsClientButton.gameObject.SetActive(true);
        }
    }
    private void OnJoinAsHostClicked()
    {
        NetworkManager.Singleton.StartHost();
        HideButtons();
    }

    private void OnJoinAsClientClicked()
    {
        NetworkManager.Singleton.StartClient();
        HideButtons();
    }

    private void HideButtons()
    {
        _joinAsHostButton.gameObject.SetActive(false);
        _joinAsClientButton.gameObject.SetActive(false);
    }

    private void OnClientConnectedCallback(ulong clientId)
    {
        _statusText.text = $"Connected: {clientId}";
    }
}
Next Steps
See How to use VPS Colocalization with Netcode for information on how to start AR Multiplayer using VPS Colocalization with Netcode.