How To Access and Display Depth Information as a Shader
This how-to covers accessing the depth buffer for use as a texutre. In this example, a shader takes in depth information and displays it on-screen as an overlay.
This how-to covers:
- Accessing the depth buffer and displaying it on screen using a shader.
- Getting the display transform from the camera to set rotation and aspect ratio.
- Passing the raw depth texture and the matrix to a shader.
- Calculating the correct sampling points on the depth texture using the display matrix.
- Converting the texture to a color scale mathematically as an example of what to do with depth information.

Prerequisites
You will need a Unity project with ARDK installed and a set-up basic AR scene. For more information, see Installing ARDK 3 and Setting up an AR Scene. Niantic also recommends that you set up Playback to be able to test in the Unity editor.
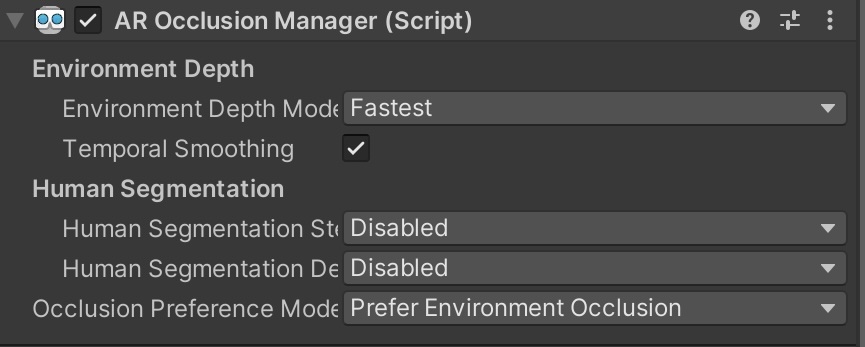
Adding the AR Occlusion Manager
In ARFoundation, the AR Occlusion Manager MonoBehaviour provides access to the depth buffer. To add an AR Occlusion Manager to your project:
Add an
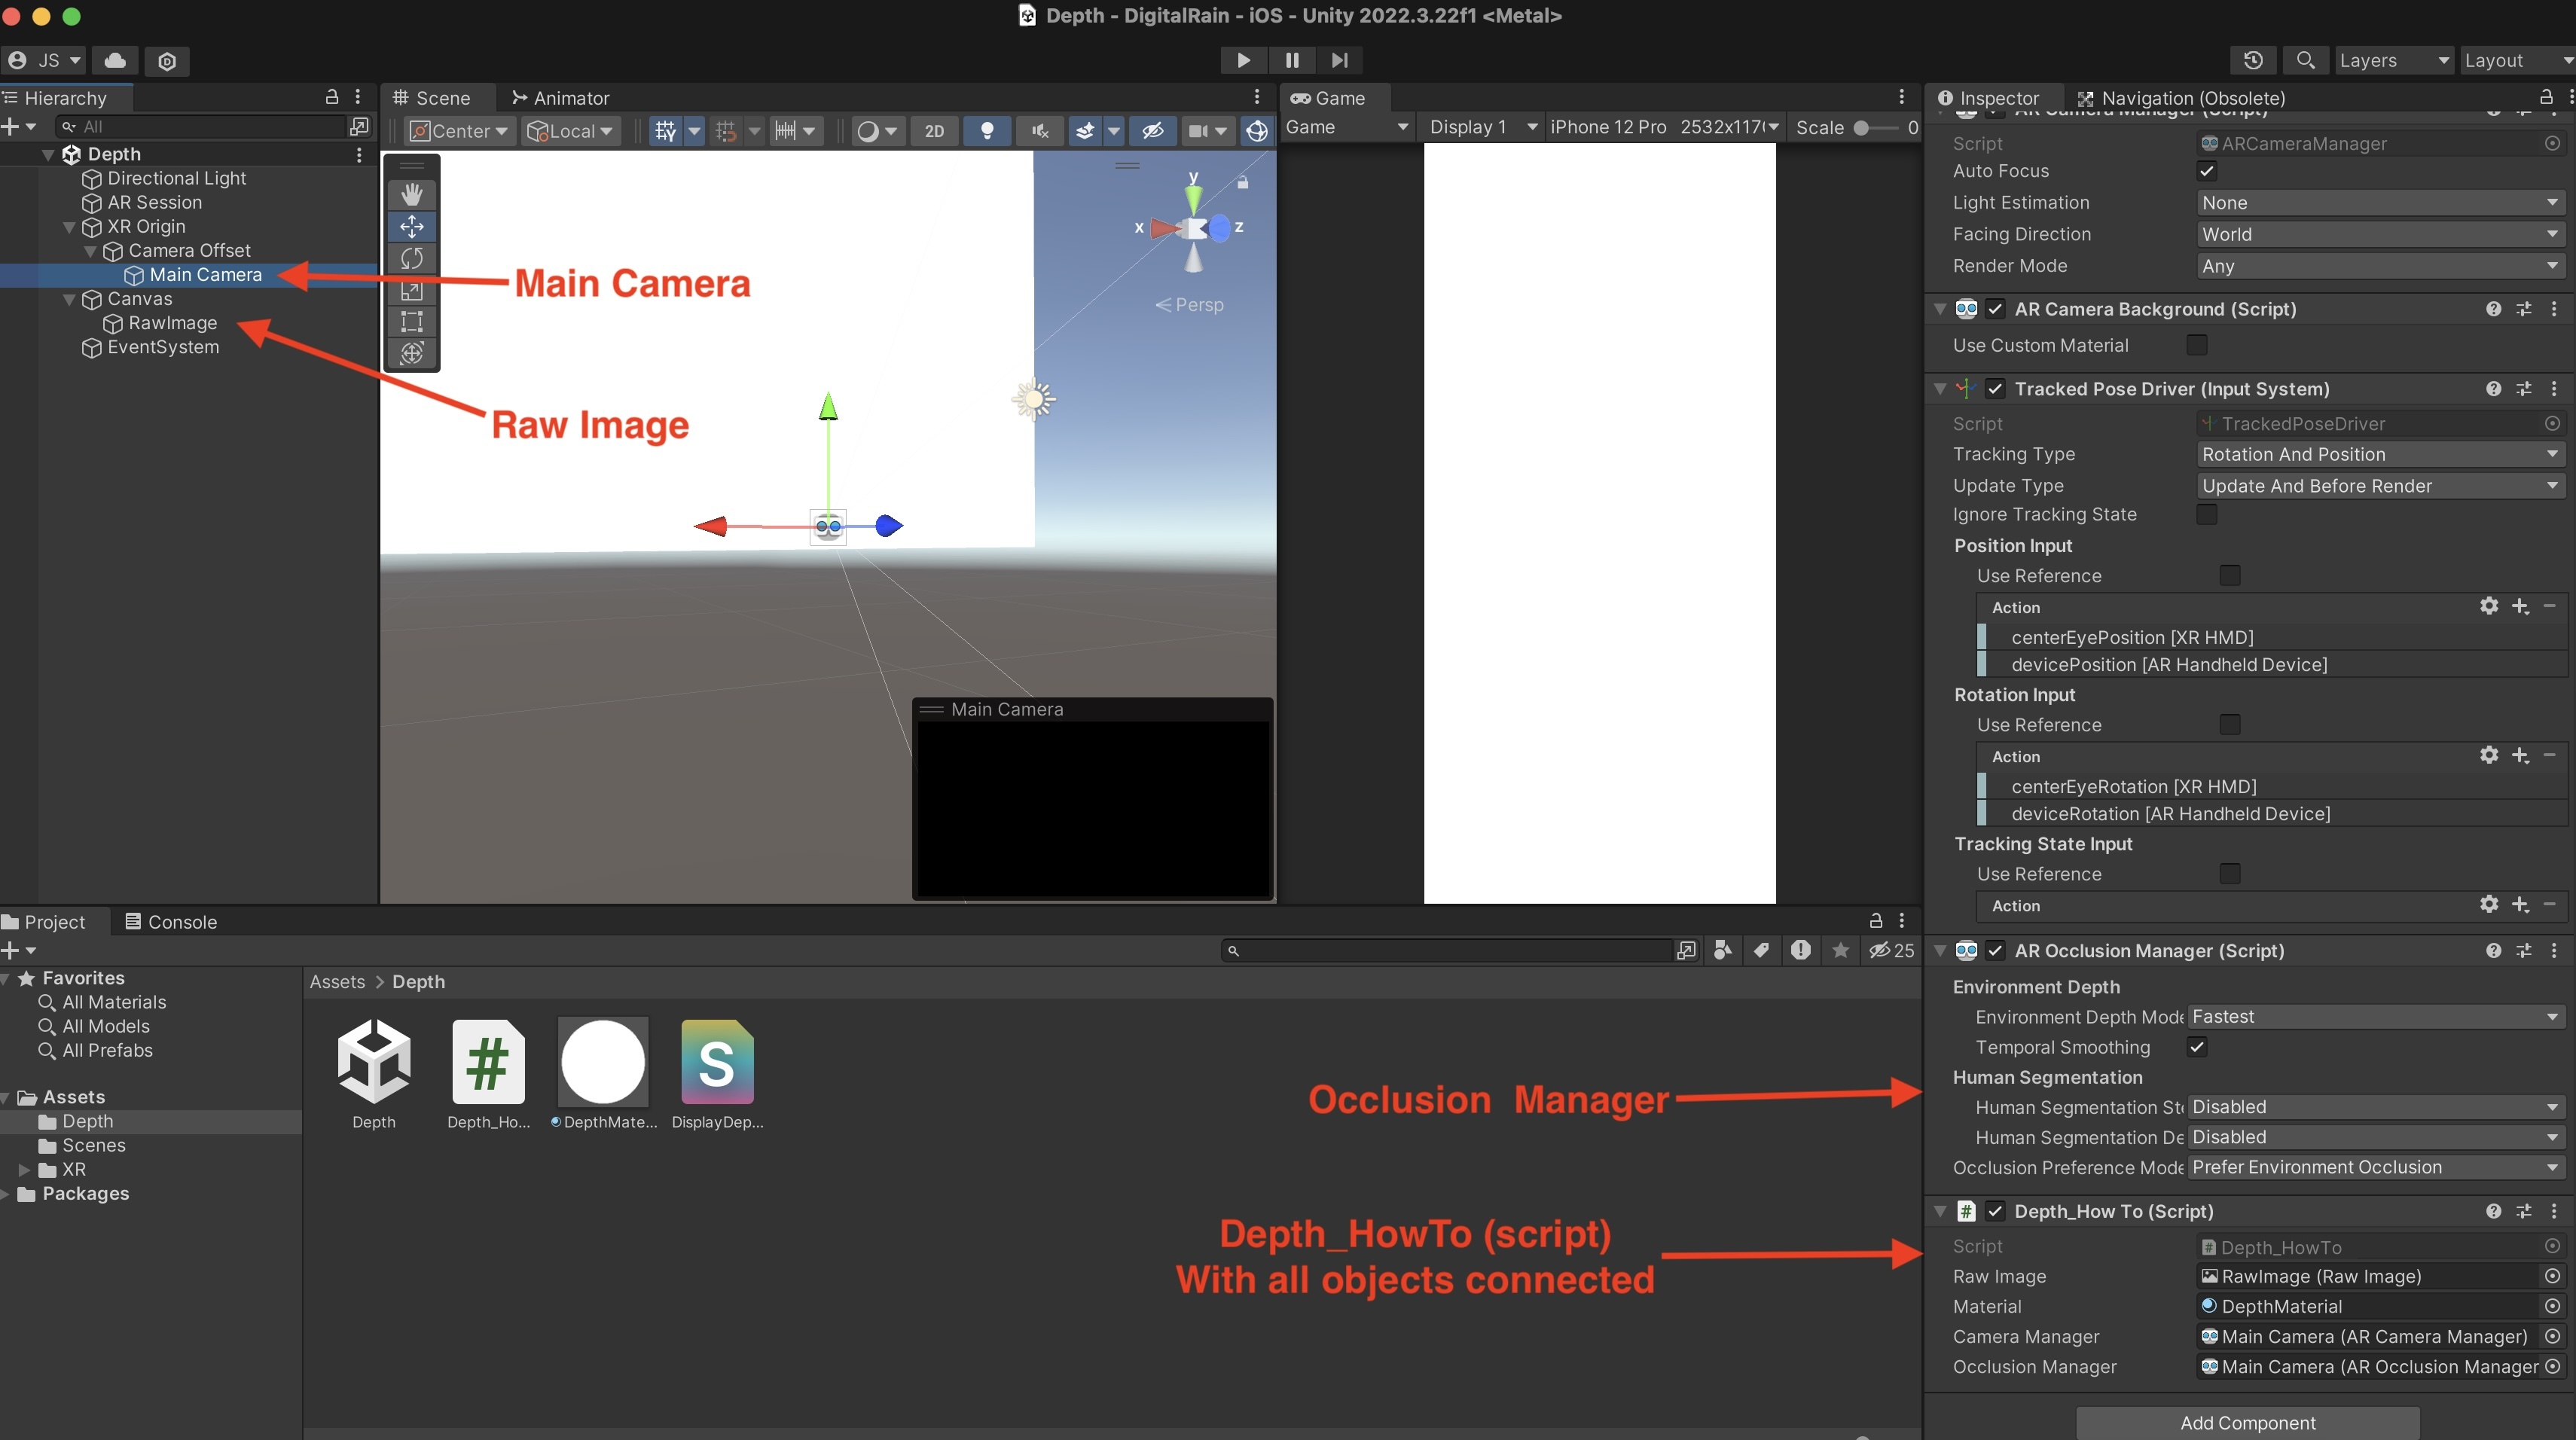
AROcclusionManagerto your Main CameraGameObject:- In the Hierarchy, expand the
XROriginand Camera Offset, then select the Main Camera object. Then, in the Inspector, click Add Component and add anAROcclusionManager.
- In the Hierarchy, expand the
Accessing the Depth Buffer From the Occlusion Manager
To access the depth buffer in code, you will need a script that polls the camera and the Occlusion Manager:
In the Project window, create a C# Script file in the Assets folder.
Name it
Depth_HowTo.Open
Depth_HowTo.csin a file editor, then add the code from the snippet after these steps.Once the script is ready, select the Main Camera from the Hierarchy, then add it as a Component in the Inspector. Click the circle next to the Camera Manager field, then select the Main Camera. Do the same for the Occlusion Manager field.

Click to reveal the Depth How-to code
    using UnityEngine;
    using UnityEngine.XR.ARFoundation;

    public class Depth_HowTo : MonoBehaviour
    {
        public ARCameraManager _cameraManager;
        public AROcclusionManager _occlusionManager;
        private Matrix4x4 _displayMat = Matrix4x4.identity;

        void OnEnable()
        {
            _cameraManager.frameReceived += OnCameraFrameUpdate;
        }

        private void OnDisable()
        {
            _cameraManager.frameReceived -= OnCameraFrameUpdate;
        }

        void Update()
        {
            if (!_occlusionManager.subsystem.running)
            {
                return;
            }
            var depth = _occlusionManager.environmentDepthTexture;
            //do something with texture
        }

        private void OnCameraFrameUpdate(ARCameraFrameEventArgs args)
        {
            if (!_occlusionManager.subsystem.running)
            {
                return;
            }
            _displayMat = args.displayMatrix?? Matrix4x4.identity;

            #if UNITY_ANDROID && !UNITY_EDITOR
                _displayMat = _displayMat.transpose;
            #endif
        }
    }
Script Walkthrough
- The script takes in an
ARCameraManagerandAROcclusionManager. - By subscribing to the
frameReceivedevent, the script gets the camera's display transform and updates the camera on every frame.- The display transform is used to sample the depth texture. See the Depth feature page for more information.)
- The depth is then read from the
AROcclusionManagerin theUpdatemethod.
Adding a Raw Image to Display the Depth Buffer
By adding a raw image to the scene and attaching a material to it that transforms the depth buffer to align it with the screen, we can display live depth information.
To set up a live depth display:
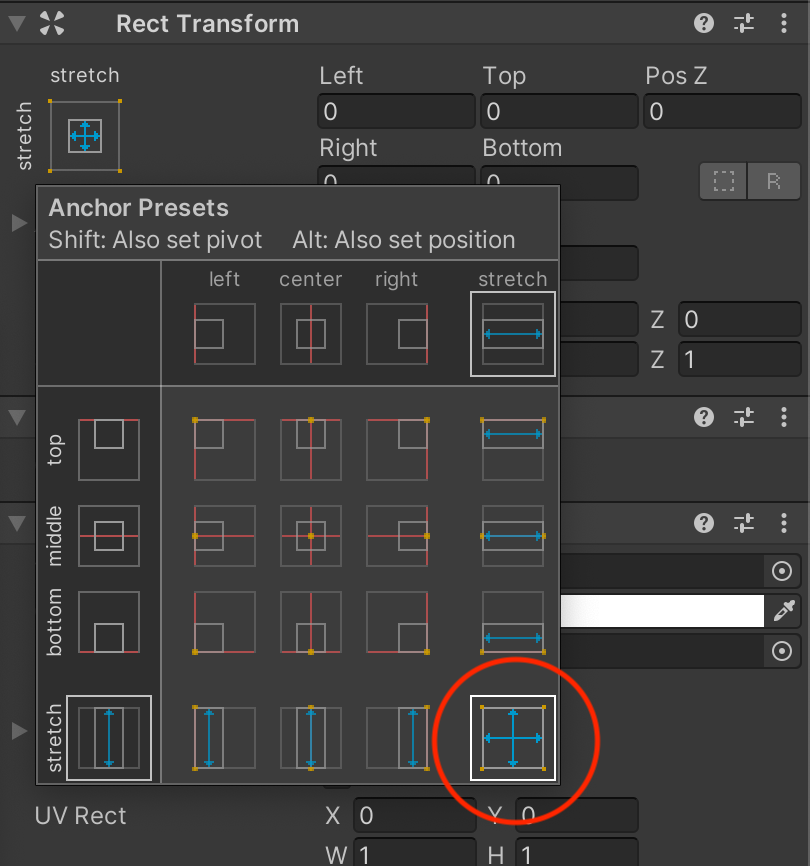
Right-click in the Hierarchy, then open the UI menu and select Raw Image.
Using the image transform tools, center the Raw Image and stretch it across the screen to make it visible later (see image below).
- Set all parameters (Left, Top, Z, Right, Bottom) to 0.
Adding a Material and Shader
To create a material and shader:
- In the Assets window, right-click, then mouse over Create and select Material. Name it DepthMaterial.
- Repeat this process, but open the Shader menu and select Unlit Shader. Name the new shader DisplayDepth.
- Drag the shader onto the material to connect them.
- Add the code from DisplayDepth Shader Code to the DisplayDepth shader.
DisplayDepth Shader Code
The depth display is a standard full-screen shader that uses vert/frag sections. In the vert section of the shader, we multiply the UVs by the display transform to sample the texture. This provides the transform that aligns the depth to the screen.
Click to reveal the DepthDisplay shader
Shader "Unlit/DisplayDepth"
{
    Properties
    {
        _MainTex ("_MainTex", 2D) = "white" {}
        _DepthTex ("_DepthTex", 2D) = "green" {}
    }
    SubShader
    {
        Tags {"Queue"="Transparent" "IgnoreProjector"="True" "RenderType"="Transparent"}
        Blend SrcAlpha OneMinusSrcAlpha
        // No culling or depth
        Cull Off ZWrite Off ZTest Always
        Pass
        {
            CGPROGRAM
            #pragma vertex vert
            #pragma fragment frag

            #include "UnityCG.cginc"

            struct appdata
            {
                float4 vertex : POSITION;
                float2 uv : TEXCOORD0;
            };

            struct v2f
            {
                float2 uv : TEXCOORD0;
                float2 texcoord : TEXCOORD1;
                float4 vertex : SV_POSITION;

            };

            float4x4 _DisplayMat;

            v2f vert (appdata v)
            {
                v2f o;
                o.vertex = UnityObjectToClipPos(v.vertex);
                o.uv = v.uv;

                #if !UNITY_UV_STARTS_AT_TOP
                o.uv.y = 1-o.uv.y;
                #endif

                //we need to adjust our image to the correct rotation and aspect.
                o.texcoord = mul(float3(o.uv, 1.0f), _DisplayMat).xy;
                return o;
            }

            sampler2D _MainTex;
            sampler2D _DepthTex;

            fixed4 frag (v2f i) : SV_Target
            {
                float depth = tex2D(_DepthTex, i.texcoord).r;

                const float MAX_VIEW_DISP = 4.0f;
                const float scaledDisparity = 1.0f / depth;
                const float normDisparity = scaledDisparity / MAX_VIEW_DISP;

                return float4(normDisparity,normDisparity,normDisparity,1.0f);
            }
            ENDCG
        }
    }
}
Passing the Depth to the Raw Image
To pass depth information to the raw image in the script:
Update the script to take in a
RawImage andMaterial`.Set the depth texture and display transform for that
Material.Add
SetTextureandSetMatrixto the script to pass depth and transform information to the shader.Connect the
MaterialandRawImageto the script in Unity.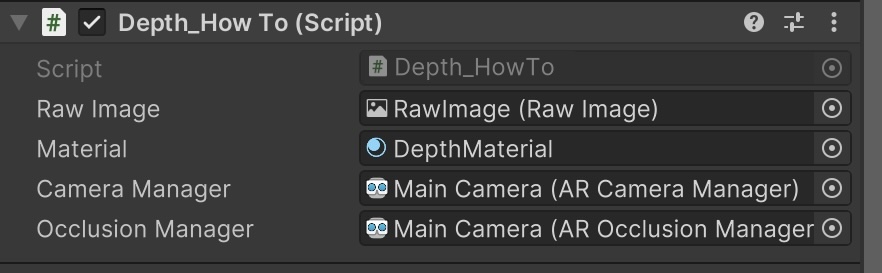
Click to reveal the updated DepthDisplay shader code
using UnityEngine.UI;

public class Depth_HowTo : MonoBehaviour
{
    public RawImage _rawImage;

    public Material _material;
...
    void Update()
    {
        if (!_occlusionManager.subsystem.running)
        {
            return;
        }

        //add our material to the raw image
        _rawImage.material = _material;

        //set our variables in our shader
        //NOTE: Updating the depth texture needs to happen in the Update() function
        _rawImage.material.SetTexture("_DepthTex", _occlusionManager.environmentDepthTexture);
        _rawImage.material.SetMatrix("_DisplayMat",_displayMat);
    }

}
Testing the Setup and Building to Device
To connect all the pieces and test it out:
- In the Inspector, verify that the Main Camera has an Occlusion Manager and the
DepthScript(withMaterialandRawImageconfigured) attached to it. You should now be able to test using Playback in the Unity Editor. You can also open Build Settings and click Build and Run to build to a device and try it out.