How To Add Navigation Mesh
Navigation Mesh allows characters (known as Agents) to navigate the AR scene using point-and-click touch inputs.
Prerequisites
You will need a Unity project with Lightship AR and Lightship Meshing enabled. For more information, see Installing ARDK 3.0 and How to Mesh: Adding Physics.
You will also need a Unity GameObject with the AR Mesh Manager and Lightship Meshing Extension Components. For more information, follow the Section 1 steps under Creating the Mesh.
Before starting this tutorial, verify that your scene is generating a mesh like this image. Then you can change the shader on your prefab to make the mesh invisible and start following this guide to add navigation.
Adding the Navigation Mesh Manager
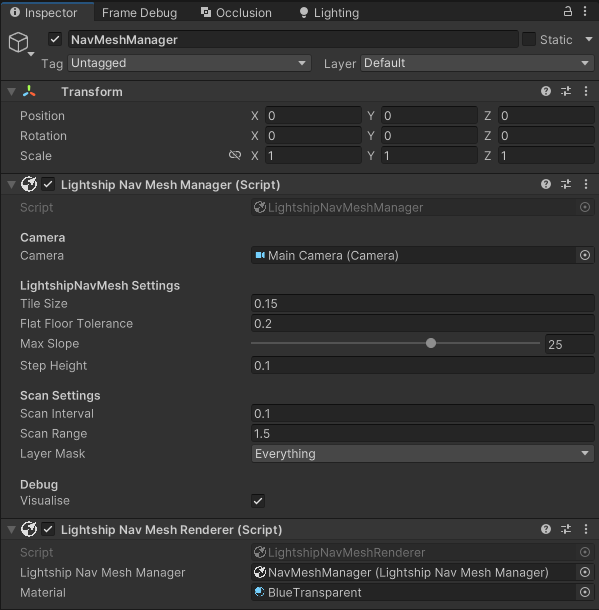
To add a LightshipNavMeshManager:
- Create an empty
GameObject.- In the Hierarchy, select the root of the scene.
- From the main menu, select GameObject, then Create Empty.
- Name it NavMeshManager.
- Add a
LightshipNavMeshManagercomponent to the NavMeshManager object.- In the Inspector window, click Add Component.
- Type "LightshipNavMeshManager" in the search window, then select it.
- Add the Main Camera to the Component. This is the center of where the manager scans for valid paths on the mesh.
- If you want to see the LightshipNavMesh, add a
LightshipNavMeshRenderercomponent to NavMeshManager as well. This will render the LightshipNavMesh on-screen when the camera moves.- In the Inspector window, click Add Component again.
- This time, search for "LightshipNavMeshRenderer" instead, then select it.
- Add the
LightshipNavMeshManagerto the Component. - Create a material to be used for rendering the Navigation Mesh, and add it to the Component.
You can also add the LightshipNavMeshManager prefab from the NavMesh sample project. For more information, see Sample Projects.
Now, if you press play in the editor, you should be able to see a grid of tiles being generated. Next, you will add an Agent that can move around on the Navigation Mesh.
You can increase the Scan Range in the LightshipNavMeshManager to create a larger grid of tiles around the camera.
Adding an Agent to the LightshipNavMesh
To test out the LightshipNavMesh, we need to add an Agent to the scene to move around on it. The NavMesh sample project contains an Agent prefab that you can use for testing, but you may want to create your own instead.
To create an Agent prefab:
- Add an object to the scene to act as an Agent:
- In the Hierarchy, select the root of the scene.
- Right-click, then select Create Empty. Name the new Empty
TestAgent.
- Add a
LightshipNavMeshAgentandLightshipNavMeshAgentPathRenderercomponent to the new Agent.- In the Hierarchy, select
TestAgent. - In the Inspector window, click Add Component. Search for "LightshipNavMeshAgent", then select it to add the component.
- In the Hierarchy, select
- Add a
LightshipNavMeshAgentPathRenderercomponent to show the path the Agent can take in the scene.- In the Inspector window, click Add Component, then search for "LightshipNavMeshAgentPathRenderer" and select it to add the component.
- Set the
LightshipNavMeshAgentand the Material properties.
- Add a cube to represent the Agent:
- In the Hierarchy, right-click on
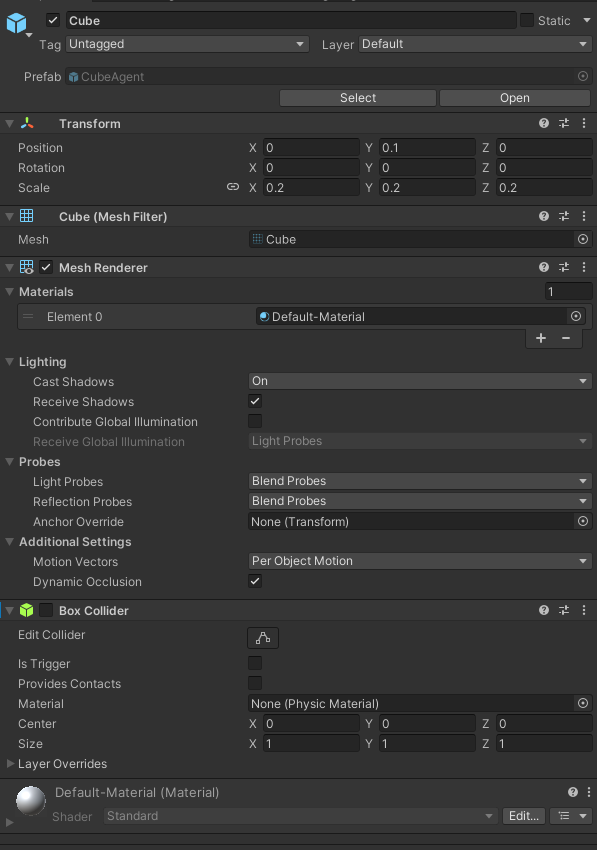
TestAgent, then hover over 3D Object. For this example, choose Cube to add a basic cube as the testing Agent. - In the Inspector, under the Transform window, shrink the cube by setting its Scale to (0.2, 0.2, 0.2).
- Change its Position to (0, 0.1, 0), so the bottom of the cube is sitting on (0, 0, 0).
- Uncheck the box next to Box Collider to disable it. This will prevent the Cube Agent from colliding with the generated mesh.
- In the Hierarchy, right-click on
- Drag the Agent to the Assets window to make a prefab, then remove it from the scene.

Create a Script to Control the Agent
To add a control script to the Agent:
Create a script Asset to manage user input to control the agent.
- In the Assets window, right-click in empty space, then hover over Create and select C# Script.
- Name the new script
NavMeshHowTo.
Open the script in your code editor.
Set up code to Handle Touch Inputs:
- Create a private Method named "HandleTouch".
- In editor, we'll use "Input.MouseDown" to detect mouse clicks.
- For phone, the "Input.GetTouch"
private void HandleTouch()
{
    // in the editor we want to use mouse clicks, on phones we want touches.
    #if UNITY_EDITOR
        if (Input.GetMouseButtonDown(0) || Input.GetMouseButtonDown(1) || Input.GetMouseButtonDown(2))
    #else
        //if there is no touch or touch selects UI element
        if (Input.touchCount <= 0)
            return;
        var touch = Input.GetTouch(0);

        // only count touches that just began
        if (touch.phase == UnityEngine.TouchPhase.Began)
    #endif
        {
            // do something with touches
        }
}
Convert touch points from the screen to 3D Coordinates
Add a Camera field to the top of script:
[SerializeField]
private Camera _camera;note[SerializeField]allows private properties to be available in the Inspector window.This will use Unity's
Camera.ScreenPointToRayfunction. Call the method in "HandleTouch" to create a ray pointing from the camera.#if UNITY_EDITOR
Ray ray = _camera.ScreenPointToRay(Input.mousePosition);
#else
Ray ray = _camera.ScreenPointToRay(touch.position);
#endifCheck if the Ray can hit the mesh using "Physics.Raycast" and get the resulting point.
{
// do something with touches
RaycastHit hit;
if (Physics.Raycast(ray, out hit))
{
// use the 3D point to guide the Agent
}
}
Guide your Agent using the 3D points from touches
- We'll need to instantiate an Agent from the prefab created earlier.
- Add a
LightshipNavMeshAgentfield to the top of class for the agent prefab:[SerializeField]
private LightshipNavMeshAgent _agentPrefab; - Add a private
LightshipNavMeshAgentfield under the Agent Prefab to be used as the instance of the Agent:private LightshipNavMeshAgent _agentInstance; - The Agent Instance will be a specific occurrence of the Agent Prefab in the scene. The Prefab is merely used as a blueprint to create an Instance.
- If the Agent does not exist yet, it will be created at the hit point. Otherwise, make its new destination on the
NavMeshthe hit point.// do something with touches
RaycastHit hit;
if (Physics.Raycast(ray, out hit))
{
// use the 3D point to guide the Agent
if (_creature == null )
{
_creature = Instantiate(_agentPrefab);
_creature.transform.position = hit.point;
}
else
{
_agent.SetDestination(hit.point);
}
}
Add the "HandleTouch" method to the Update method, so the script checks for touches every frame.
void Update()
{
HandleTouch();
}Attach the script to the NavMeshManager.
- Select your NavMeshManager GameObject in the Hierarchy, then click "Add Component" in the Inspector window.
- Search for "NavMeshHowTo", then select it to add the controller script to the prefab.
- Make sure to set the properties for Camera and Agent Prefab

Now you should be able to spawn and direct the cube to any tile on the Navigation Mesh.
Let's make the NavMesh visuals optional to get a cleaner view. In the
NavMeshHowToscript:Add a field to the
LightshipNavMeshManagerto get a reference to its renderer component.[SerializeField]
private LightshipNavMeshManager _navmeshManager;Create a new method named "SetVisualization" that gets the NavMeshRenderer Components and sets their state.
public void SetVisualisation(bool isVisualizationOn)
{
//turn off the rendering for the navmesh
_navmeshManager.GetComponent<LightshipNavMeshRenderer>().enabled = isVisualizationOn;
if (_agentInstance != null)
{
//turn off the path rendering on any agent
_agentInstance.GetComponent<LightshipNavMeshAgentPathRenderer>().enabled = isVisualizationOn;
}
}Call this method through a UI Button or in a script.
Click here to show the final NavMeshHowTo script
using UnityEngine;
using Niantic.Lightship.AR.NavigationMesh;
/// SUMMARY:
/// LightshipNavMeshSample
/// This sample shows how to use LightshipNavMesh to add user driven point and click navigation.
/// When you first touch the screen, it will place your agent prefab.
/// Tapping a location moves the agent to that location.
/// The toggle button shows/hides the navigation mesh and path.
/// It assumes the _agentPrefab has LightshipNavMeshAgent on it.
/// If you have written your own agent type, either swap yours in or inherit from it.
///
public class NavMeshHowTo : MonoBehaviour
{
[SerializeField]
private Camera _camera;
[SerializeField]
private LightshipNavMeshManager _navmeshManager;
[SerializeField]
private LightshipNavMeshAgent _agentPrefab;
private LightshipNavMeshAgent _agentInstance;
void Update()
{
HandleTouch();
}
public void SetVisualization(bool isVisualizationOn)
{
//turn off the rendering for the navmesh
_navmeshManager.GetComponent<LightshipNavMeshRenderer>().enabled = isVisualizationOn;
if (_agentInstance != null)
{
//turn off the path rendering on the active agent
_agentInstance.GetComponent<LightshipNavMeshAgentPathRenderer>().enabled = isVisualizationOn;
}
}
private void HandleTouch()
{
//in the editor we want to use mouse clicks, on phones we want touches.
#if UNITY_EDITOR
if (Input.GetMouseButtonDown(0) || Input.GetMouseButtonDown(1) || Input.GetMouseButtonDown(2))
#else
var touch = Input.GetTouch(0);
//if there is no touch or touch selects UI element
if (Input.touchCount <= 0)
return;
if (touch.phase == UnityEngine.TouchPhase.Began)
#endif
{
#if UNITY_EDITOR
    Ray ray = _camera.ScreenPointToRay(Input.mousePosition);
#else
    Ray ray = _camera.ScreenPointToRay(touch.position);
#endif
//project the touch point from screen space into 3d and pass that to your agent as a destination
RaycastHit hit;
if (Physics.Raycast(ray, out hit))
{
if (_agentInstance == null )
{
_agentInstance = Instantiate(_agentPrefab);
_agentInstance.transform.position = hit.point;
}
else
{
_agentInstance.SetDestination(hit.point);
}
}
}
}
}