How to Place Content in Real-World Locations Using Location AR
This how-to covers:
- Importing a real-world location from the Geospatial Browser (GSB) into Unity;
- Placing content in a real-world location;
- Testing placed content, either using a mockup or on location.
Prerequisites
- You will need a Unity project with ARDK installed and a set-up basic AR scene. For more information, see Setup ARDK 3 and Setting up an AR Scene.
- You will need a valid API Key.
Adding a Real-World Location to Unity
To add an AR location to Unity:
- Go to the Geospatial Browser and find the location you want to build content for. The data will download as a .zip file; do not unzip it. For more information on downloading location data, see Downloading Meshes.
- Drag and drop the downloaded zip file into the Assets directory in the Project window. Once the import process completes, it will create two assets, a Mesh
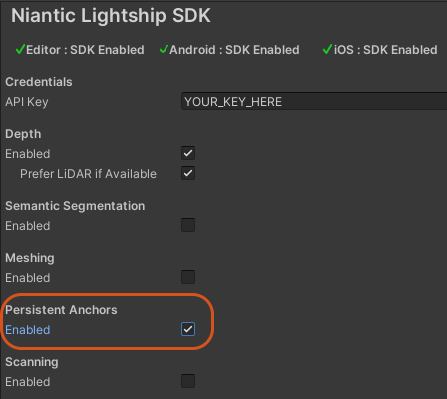
.prefabfile and a Manifest.assetfile. - Turn on Persistent Anchors in Lightship Settings:
- Click the Lightship top menu, then select Settings.
- In the Inspector window, check the Enabled box next to Persistent Anchors.
- Add an AR Location Manager component to the
XROrigin:- Select the
XROriginin the Hierarchy, then, in the Inspector window, click Add Component and search for ARLocationManager. - In the ARLocationManager Component, click Add AR Location to create a new
ARLocation.
- Select the
- In the Hierarchy, select the
ARLocationto show its Component in the Inspector. Drag and drop the Manifest from the Assets directory to the AR Location Manifest field in the Component.- This will change the name of the manifest; rename it back to
ARLocation.
- This will change the name of the manifest; rename it back to
Adding Real-World AR Content
When adding your AR content, remember the following:
- Add your AR content as a child of the manifest (
ARLocation). For example, to add a Cube to a location:- In the Hierarchy, right-click the
ARLocation, then mouse over 3D Object and select Cube. - In the Inspector, set the cube's Scale to
0.5and its position to0,0,2.
- In the Hierarchy, right-click the
- Make sure to enable auto-tracking:
- In the Hierarchy, select the XROrigin, then, in the Inspector window, check the Auto-Track box in the ARLocationManager Component.
Testing Real-World AR Content
The most accurate way to test real-world AR content is by building your Unity app to a device and physically visiting the location to test it out. Because this is not always possible, Lightship also provides Mock Mode, giving developers the ability to create a mock localization of the scene that allows non-AR GameObjects to run through their Behaviors.
Other AR Subsystems (including ARSession, Camera, Meshing, etc) will not work in Mock Mode. It is strictly for testing localizations.
To enter Mock Mode and test AR content:
- If you have enabled Playback, disable it.
- Enter Play Mode. Lightship will add a Mock Camera asset to your scene (as a child of Main Camera) that allows movement with the WASD keys and zooming with the scroll wheel. This will also create a mock localization that allows GameObjects to run through their Behaviours.
You can also test localizations using Playback. See How to Setup Playback.
Swapping Locations Using Code
Using a script to control content localization instead of the Auto-Track feature allows applications to dynamically swap which location is in use.
To localize dynamically using a script:
- Grab a reference to the ARLocationManager and each ARLocation you intend to use.
- Call SetARLocations(currentLocation) on the ARLocationManager to select the localization for that location to target.
- Call StartTracking() on the ARLocationManager to localize and track the selected location.
- To switch locations:
- Call StopTracking on the ARLocationManager.
- Call SetARLocations(newLocation) on the ARLocationManager again with your new location.
- Call StartTracking() on the ARLocationManager again to restart tracking.