How to Debug Shared AR
If you've gone through the steps in How to Use Shared AR and you need help debugging, there are three techniques you can use:
- Debugging on multiple Unity Editor instances with Playback and ParrelSync
- Debugging between Unity Editor and devices
- Debugging on devices
Prerequisites
This page assumes you have completed How to Use Shared AR.
Using Playback and ParrelSync
ParrelSync is a Unity editor extension that allows users to test multiplayer gameplay without building the project by having another Unity editor window opened and mirror the changes from the original project.
- Follow the Installation instructions on the project website to set up ParrelSync.
- Follow the steps in How to Setup Playback.
- When you call SharedSpaceManager.StartTracking(), use the same payload string in both instances.
- Run the project in Play mode on multiple editors, and all the instances should join the session and be co-localized.
Debugging between the Unity Editor and devices
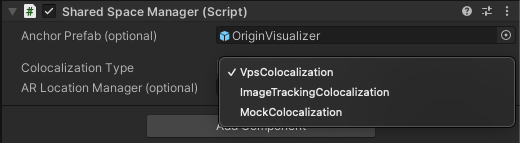
ARDK supports a "Mock Colocalization" mode to test and debug between the Unity Editor and your devices. This mode only tests networking.
Select XR Origin in the Hierarchy. In the Inspector window, find the Shared Space Manager component, select Colocalization Type and choose MockColocalization.
In your script, test for the
MockColocalizationsetting and setup the room with your own payload value. For example:if (_sharedSpaceManager.GetColocalizationType() ==
SharedSpaceManager.ColocalizationType.MockColocalization)
{
// Set room to connect
var mockTrackingArgs = ISharedSpaceTrackingOptions.CreateMockTrackingOptions();
var roomArgs = ISharedSpaceRoomOptions.CreateLightshipRoomOptions(
_roomNamePrefix + "SkippingVpsRoom",
32,
"vps colocalization demo (mock mode)"
);
_sharedSpaceManager.StartSharedSpace(mockTrackingArgs, roomArgs);
}When you start the scene, the app should go straight to your UI for selecting Host or Client, both on the device and in the editor.
Debugging on Devices
See Sample Projects for instructions on how to download and install the Shared AR sample.
Using a Persistent Anchor
Place a cube in the scene in a persistent location to anchor the scene. Place your network spawned objects relative to the position of this anchor. If the persistent anchor location or rotation is different between devices, you will know those devices are out of sync. If the anchor is in the right place (and orientation) but the networked objects aren't, you will know the devices are in sync but the network objects aren't being placed in sync.
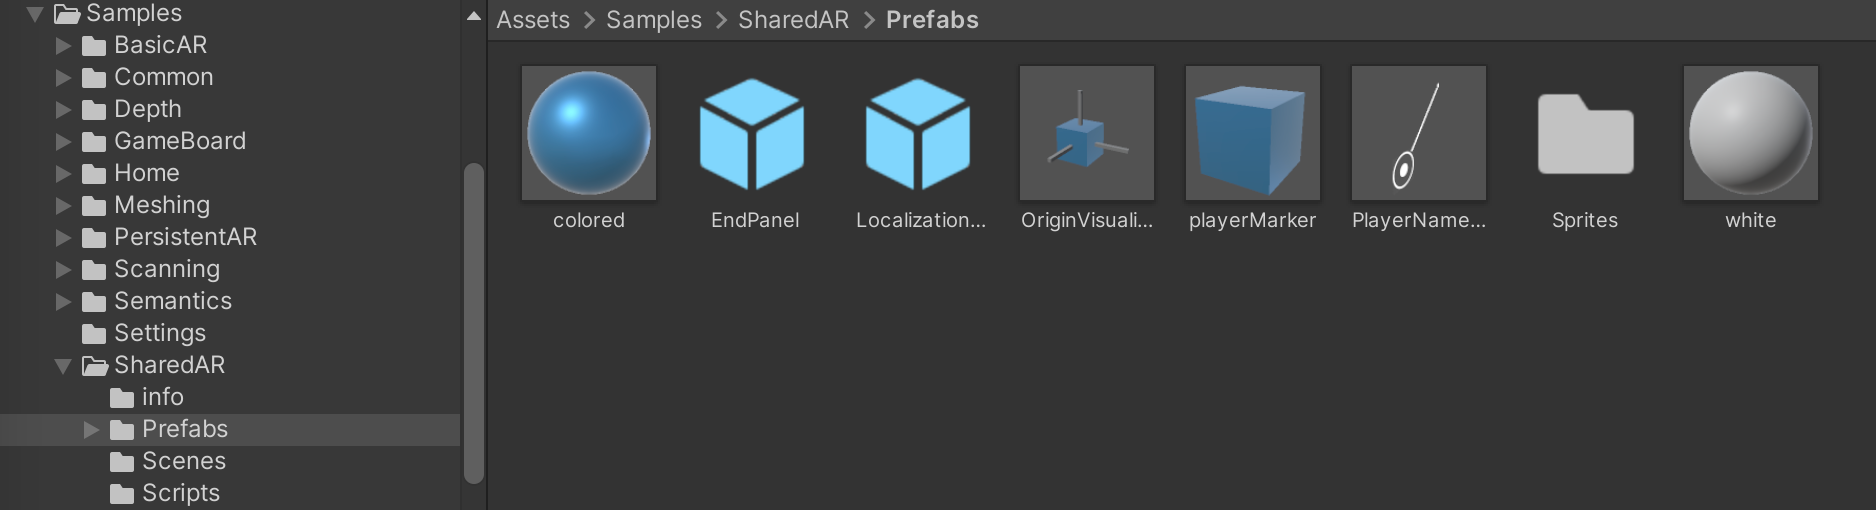
Using a cube as an anchor makes it easier to detect any rotation of the anchor. You can find a prefab called OriginVisualizer in the Shared AR sample under Assets/Samples/SharedAR/Prefabs.
Networking Statistics
The SharedAR package has a LightshipNetcodeTransportStatsUI prefab that provides a UI panel with networking statistics such as RTT to host, the amount of data sent, and the number of messages. The prefab is located under Packages/Niantic Lightship Shared AR Client Plugin/Assets/Prefabs.
To enable LightshipNetcodeTransportStatsUI:
Add the prefab to your Canvas object. You can start a Canvas by going to the main menu, GameObject > UI > Canvas if you don't have one.
Go to Lightship Netcode Transport Stats Display in the Inspector window for the prefab.
- Make sure the Lightship Netcode Transport is set to NetworkManager (Lightship Netcode Transport).
- Use the Text property to point to a different text object if you wish.
- Use the Bg Image property to select a new background image object. Use the Image component to modify the current image.
- Use the Button property to select a new button object. Use the Button component to modify the current button.
- To change the sample rate, update Sample Rate in Seconds. The default is 1 sample per second. Higher sample rates can degrade network performance.
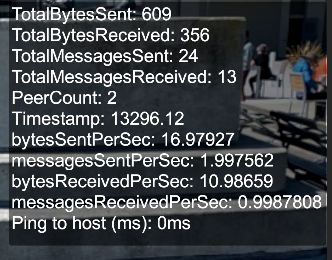
- Check/uncheck Verbose Text to change the level of detail in the networking panel. Here's what regular and verbose text looks like:
Regular Text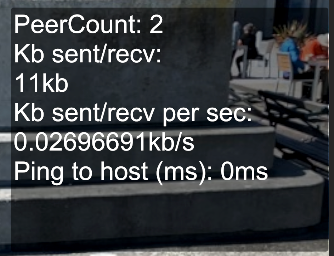 Verbose Text