Occlusion

Occlusion gives depth to virtual objects, allowing them to appear behind or in front of objects in the real world. Virtual content will appear to be physically present in the scene, blocking view of objects dynamically as the user moves their device through the space.
Here's an example of occlusion as our mascots walk behind a tree:

What's New?

In ARDK 3.0, Lightship extends the AR Foundation XROcclusion and XRMeshing subsystems with Niantic's improved algorithms, seamlessly providing developers with a better experience while preserving the easy workflow of ARFoundation. Lightship also provides an implementation that allows for swapping between dynamic and mesh-based occlusion depending on the needs of your application. This implementation works on any device or platform, regardless of lidar capability!

Types of Occlusion

The AROcclusionManager and ARMeshManager provide three modes of occlusion support:

  1. Instant Dynamic Occlusion:
  • The default occlusion mode offered by AROcclusionManager.
  • Good at capturing fast-moving objects, like people or pets.
  • Just-in-time occlusion will not always line up with meshing and may over/under-occlude meshed objects.
  • To increase performance, occlusion can be disabled on meshes that do not need it.
  • To use instant occlusion, add an AROcclusionManager to your scene. The AROcclusionManager
  1. Mesh Occlusion (Stable, Slow Occlusion):
  • Mesh-based occlusion is more stable and produces cleaner results than Instant Dynamic Occlusion, but updates less frequently.
  • Mesh-based occlusion averages a range of depth measurements, making it more accurate for static regions of the environment.
  • Because it updates less frequently, dynamic agents (like people and pets) may occlude less reliably.
  • To use mesh-based occlusion:
    • Add an ARMeshManager to your scene and make the mesh geometries invisible by either disabling the component or by using a shader. Adding an ARMeshManager Component changes the scale of the game object, so make sure to add the component to a child object of the Main Camera to avoid scale discrepancies.
    • Add an AROcclusionManager to your scene with the Occlusion Preference Mode set to No Occlusion. This component is required to generate the mesh, but will not be used for occlusions.
    A disabled ARMeshManager component
  1. Instant Depth + Mesh-Blended Occlusion:
  • Occlusion Stabilization has the advantages of both modes. It combines the fast response time of instant occlusion with the stable averaging effect of meshing.
  • A depth map is produced from the ARMeshManager environment mesh, rendered to a texture, and combined with the AROcclusionManager instant depth features in a way that avoids flicker and Z-fighting.
  • To use this mode, add a Lightship Occlusion Extension to your scene and enable Occlusion Stabilization.

Lightship Occlusion Extension

The Lightship Occlusion Extension improves the visual quality of Lightship occlusions by providing added options and functionality. Using a combination of depth and semantic information, the extension allows you to define regions where AR objects will not be occluded, as well as adding options to refine the occlusion mode based on your needs.

The Lightship Occlusion Extension

The extension has the following options:

  • Optimal Occlusion Settings
    • The Optimal Occlusion mode determines how the depth buffer transforms between frames to provide occlusions. It has three modes:
      • Closest Occludee samples objects from the whole screen and uses the depth value that is closest to the camera. This mode creates the most convincing occlusions when there is a variety of CG objects of similar size and importance on screen.
      • Specified Game Object samples the distance to a particular CG asset, providing best-quality occlusions for that specific object.
      • Static samples the distance to the closest object in the entire depth texture. As the name implies, this mode is best used for objects that will not move.
  • Principal Occludee
    • The Principal Occludee determines which object to focus on when using the Specified Game Object occlusion mode. Setting this variable has no effect in Closest Occluder mode.
  • Occlusion Suppression
    • Occlusion Suppression enables a user to reserve depth values to the far depth plane for specific semantic channels. This is useful for preventing noisy depth outputs from incorrectly occluding your model, such as occlusion flickering when objects are moving around on the ground. Enabling this option reveals three more options:
    • Semantic Segmentation Manager
    • Suppression Channels
      • The set of channels in the semantic buffer to use for suppression. Add the name of each channel as a separate name in the list. We recommend adding ground and sky as a useful catch-all for many occlusion issues.
Example of occlusion suppression turned offExample of occlusion suppression turned off

Occlusion suppression turned off

Example of occlusion suppression turned onExample of occlusion suppression turned on

Occlusion suppression turned on. The ground is not present in the depth map and does not occlude the cube.

  • Occlusion Stabilization
    • Occlusion Stabilization smoothes the variance in the instantaneous depth buffer by combining it with a depth field rendered from the persistent mesh objects in the scene. This creates higher quality occlusions with persistent parts of the scene.
    • Mesh Manager: To use Occlusion Stabilization, attach a mesh manager here. See How to Set Up Real World Occlusion for details.
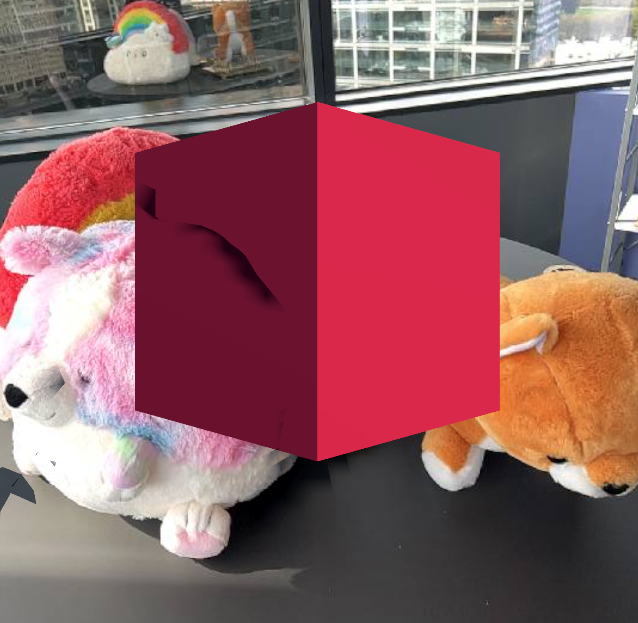
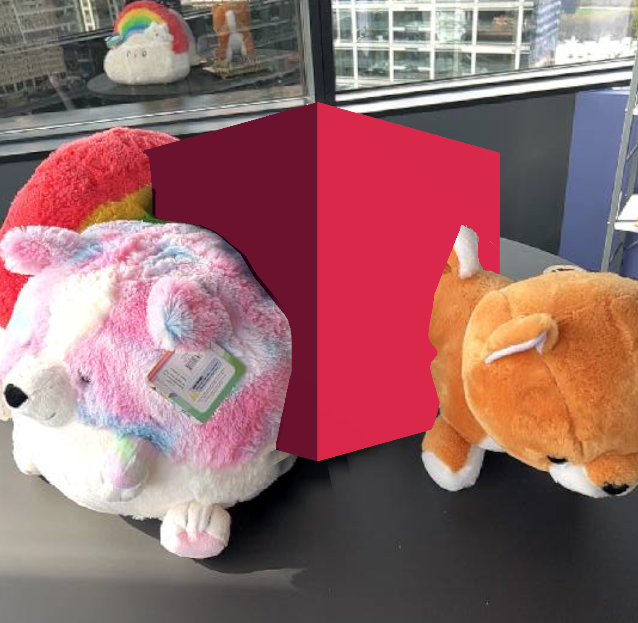
Example of occlusion stabilization turned offExample of occlusion stabilization turned off

Left: Occlusion Stabilization turned off. Right: Occlusion Stabilization turned on. Note the persistence across frames.

  • Use Custom Background Material: If you want to write your own background shader using Lightship depth, semantics, and mesh depth input, you can attach a custom render material here.
  • Prefer Smooth Edges
    • When enabled, this feature samples the depth texture with a bilinear filter to smooth out edges on occluded objects.
    • To enable smooth edges, either Occlusion Suppression or Occlusion Stabilization must also be enabled.
Example without smooth edgesExample with smooth edges

Left: No edge smoothing. Right: Edge smoothing turned on.

Known Limitations

In scenes that use both an AROcclusionManager and ARMeshManager, some Z-fighting can occur where the mesh distance and depth buffer are close but not equal, resulting in flickering. If you experience this, turn on Occlusion Stabilization to mitigate it.

More Information

For details on how to use this feature, see How to Setup Real-World Occlusion.