深度を使って画面上の地点を現実世界の位置に変換する
Lightshipの深度マップ出力を使用す�ると、平面やメッシュを使用せずにARシーン内にオブジェクトを動的に配置できます。 この入門ガイドでは、画面上の位置を選択し、深度出力を使用して3D空間にオブジェクトを配置する手順を説明します。

前提条件
Lightship ARを有効にしたUnityのプロジェクトが必要です。 詳細については、 ARDK 3 のインストール をご覧ください。
初めて深度を使うのであれば、 Accessing and Displaying Depth Information は、深度のより単純な使用例を提供しており始めやすいです。
手順
メインシーンがAR対応でない場合は、次のように設定します。
-
Main Camera を削除します。
-
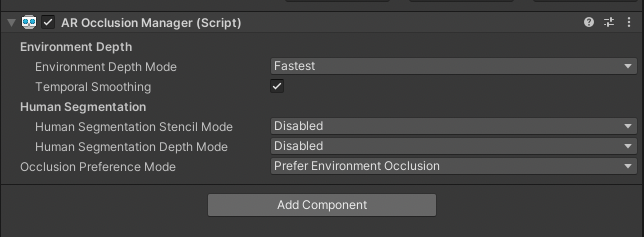
ARSession と XROrigin をHierarchyに追加し、 AR Occlusion Manager コンポーネントを XROrigin に追加します。 高精度なオクルージョンを望む場合は、 How to Set Up Real-World Occlusion(現実世界のオクルージョンを設定する) の
LightshipOcclusionExtensionの使用方法をご覧ください。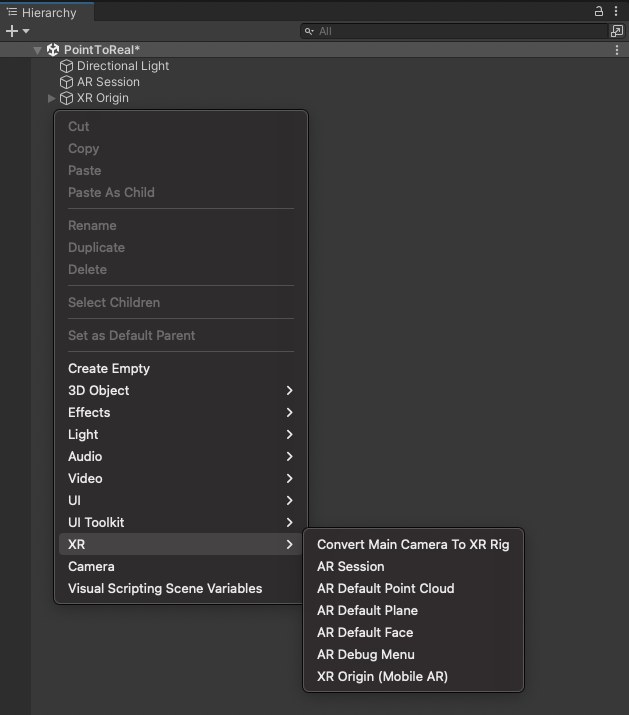
-
深度のピッキングとプレハブの配置を処理するスクリプトを作成します。
Depth_ScreenToWorldPositionという名前を付けます。 -
更新時に深度画像を取得する
-
AROcclusionManagerのシリアライズされたフィールドと、XRCpuImageのプライベートフィールドを追加します。[SerializeField]
private AROcclusionManager _occlusionManager;
private XRCpuImage? _depthimage; -
UpdateImageという新しいメソッドを作成する:XROcclusionSubsystemが有効かつ実行中であることを確認します。_occlusionManager.TryAcquireEnvironmentDepthCpuImageを呼び出して、最新の深度画像をAROcclusionManagerから取得します。- 古い深度画像を破棄し、新しい値をキャッシュします。
private void UpdateImage()
{
    if (!_occlusionManager.subsystem.running)
    {
        return;
    }

    if (_occlusionManager.TryAcquireEnvironmentDepthCpuImage(out var image))
    {
        // 古い画像を処分する
        _depthImage?.Dispose();

        // 新しい画像をキャッシュする
        _depthImage = image;
    }.
} -
Updateコールバック内でUpdateImageメソッドを呼び出す:private void Update()
{
UpdateImage();
-
}.
1. ディスプレイマトリクスを計算する: 深度画像は、機械学習モデルから表面化されたときにセンサーの方向を向いているため、現在の画面の向きに対してサンプリングする必要があります。 ディスプレイ変換は、スクリーン空間から画像座標系に変換するマッピングを提供する。 GPUテクスチャの代わりに`XRCpuImageを使って`、`Sample(Vector2 uv, Matrix4x4 transform)`メソッドをCPUで使えるようにしています。
1. プライベートな`Matrix4x4と` `ScreenOrientation`フィールドを追加する。
```cs
private Matrix4x4 _displayMatrix;
private ScreenOrientation? _latestScreenOrientation;
UpdateDisplayMatrixという新しいメソッドを作成する。- スクリプトに有効な
XRCpuImageがキャッシュされているか確認する。 - 画面の向きが変わったかどうかをテストして、マトリックスの再計算が必要かどうかをチェックする。
CameraMath.CalculateDisplayMatrixを呼び出して、スクリーン座標を画像座標に変換する行列を計算する。
private void UpdateDisplayMatrix()
{
// 有効な深度画像があることを確認する
if (_depthImage is {valid: true})
{
// 画面の向きが変更された場合にのみ、表示行列を再計算する必要がある
if (!_latestScreenOrientation.HasValue ||
_latestScreenOrientation.Value != XRDisplayContext.GetScreenOrientation())
{
_latestScreenOrientation = XRDisplayContext.GetScreenOrientation();
_displayMatrix = CameraMath.CalculateDisplayMatrix(
_depthImage.Value.width,
_depthImage.Value.height,
Screen.width,
Screen.height,
_latestScreenOrientation.Value,
invertVertically: true);
}.
}
}
Updateコールバック内でUpdateDisplayMatrixメソッドを呼び出す:
private void Update()
{
...
UpdateDisplayMatrix();
}.
-
以下の手順で、タップ入力を処理するコードを設定します。
- 「HandleTouch」というプライベートメソッドを作成します。
- エディターでは、「Input.MouseDown」を使用してマウスクリックを検出します。
- スマートフォンでは、「Input.GetTouch」を使用してタップを検出します。
- 次に、デバイスから��、2D screenPosition座標を取得します。
private void HandleTouch()
{
// エディターではマウスクリック、スマートフォンではタップを使用
#if UNITY_EDITOR
if (Input.GetMouseButtonDown(0) || Input.GetMouseButtonDown(1) || Input.GetMouseButtonDown(2))
{
var screenPosition = new Vector2(Input.mousePosition.x, Input.mousePosition.y);
#else
//タップがない場合、またはタップでUI要素を選択している場合
if (Input.touchCount <= 0)
return;
var touch = Input.GetTouch(0);
// タップが始まった瞬間のみカウントする
if (touch.phase == UnityEngine.TouchPhase.Began)
{
var screenPosition = touch.position;
#endif
// タップで何かのアクションを行う
}
}
} -
深度を使ってタップポイントを3D座標に変換します。
-
HandleTouchメソッド内で、タップが検出された際に有効な深度画像があるかどうかを確認します。
// タップで何かのアクションを行う
if (_depthImage.HasValue)
{
// 1. 視線深度��をサンプリングする
// 2. ワールド座標を取得する
// 3. 深度マップ上にオブジェクトをスポーンする
} -
screenPositionで深度画像をサンプリングして、z値を取得します。
// 1. サンプル目の深さ
var uv = new Vector2(screenPosition.x / Screen.width, screenPosition.y / Screen.height);
var eyeDepth = (float) _depthImage.Value.Sample(uv, _displayMatrix); -
スクリプトの先頭に、
Cameraフィールドを追加します。[SerializeField]
private Camera _camera; -
これで、Unityの
Camera.ScreenToWorldPoint関数が使用されるようになります。 「HandleTouch」メソッド内でこの関数を呼び出し、screenPositionとeyeDepthをworldPositionsに変換します。// 2. ワールド座標を取得
var worldPosition =
_camera.ScreenToWorldPoint(new Vector3(screenPosition.x, screenPosition.y, eyeDepth)); -
ワールド空間のこの位置にGameObjectをスポーンします。
-
スクリプトの先頭に
GameObjectフィール�ドを追加します。[SerializeField]
private GameObject _prefabToSpawn; -
このプレハブのコピーをこの位置にインスタンス化します。
// 3. 深度マップ上にオブジェクトをスポーンする
Instantiate(_prefabToSpawn, worldPosition, Quaternion.identity);
-
-
HandleTouchをUpdateメソッドの最後に追加します。private void HandleTouch()
{
// エディターではマウスクリック、スマートフォンではタップを使用
#if UNITY_EDITOR
if (Input.GetMouseButtonDown(0) || Input.GetMouseButtonDown(1) || Input.GetMouseButtonDown(2))
{
var screenPosition = new Vector2(Input.mousePosition.x, Input.mousePosition.y);
#else
//タップがない場合、またはタップでUI要素を選択している場合
if (Input.touchCount <= 0)
return;
var touch = Input.GetTouch(0);
// タップが始まった瞬間のみカウントする
if (touch.phase == UnityEngine.TouchPhase.Began)
{
var screenPosition = touch.position;
#endif
// タップで何かのアクションを行う
if (_depthImage.HasValue)
{
// 視線深度をサンプリングする
var uv = new Vector2(screenPosition.x / Screen.width, screenPosition.y / Screen.height);
var eyeDepth = (float) _depthImage.Value.Sample(uv, _displayMatrix);
// ワールド座標を取得する
var worldPosition =
_camera.ScreenToWorldPoint(new Vector3(screenPosition.x, screenPosition.y, eyeDepth));
//深度マップ上にオブジェクトをスポーンする
Instantiate(_prefabToSpawn, worldPosition, Quaternion.identity);
}
}
} -
Depth_ScreenToWorldPositionスクリプトを、XROriginのコンポーネントとして、 ** Hierarchy **に追加します:- Hierarchy ウィンドウで、
XROriginを選択し、 Inspectorで、 Add Component をクリックします。 Depth_ScreenToWorldPositionスクリプトを検索し、選択します。
- Hierarchy ウィンドウで、
-
シーンにスポーンするオブジェクトとして使用するため、 Cube を作成します:
- Hierarchyで右クリックし、 Create メニューで、 3D Object にマウスオーバーし、 Cubeを選択します。
- 新しい Cube オブジェクトを Hierarchy から Assets ウィンドウにドラッグしてプレハブを作成し、 Hierarchyから削除します。 ( Assets ウィンドウの Cube は残るはずです)。
-
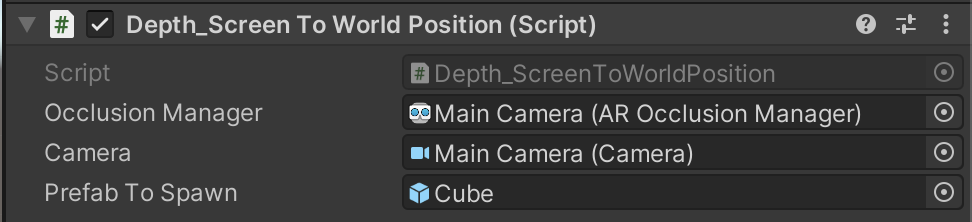
Depth_ScreenToWorldPositionスクリプトのフィールドを割り当てます:- Hierarchy ウィンドウで、
XROriginを選択し、 Inspector ウィンドウで、Depth_ScreenToWorldPositionComponent を展開します。 XROriginを AROcclusionManager フィールドに割��り当てます。- メインカメラ を カメラ フィールドに割り当てます。
- Main Camera を ARCameraManager フィールドに割り当てます。
- 新しい Cube プレハブを Prefab to Spawn フィールドに割り当てます。
- Hierarchy ウィンドウで、
-
Playback を使用してエディター内でシーンを実行するか、 Build Settings を開き、Build and Run をクリックしてデバイスにビルドします。
-
正常に動作しない場合は、上記の手順を再度確認し、以下のスクリプトと比較してください。
クリックしてDepth_ScreenToWorldPositionスクリプトを表示
using Niantic.Lightship.AR.Utilities;
using UnityEngine;
using UnityEngine.XR.ARFoundation;
using UnityEngine.XR.ARSubsystem; public class Depth_ScreenToWorld Position : MonoBehavour.ARSubsystems;
public class Depth_ScreenToWorldPosition : MonoBehaviour
{
[SerializeField]
private AROcclusionManager _occlusionManager;
[SerializeField]
private Camera _camera;
[SerializeField]
private GameObject _prefabToSpawn;
private Matrix4x4 _displayMatrix;
private XRCpuImage? _depthImage;
private ScreenOrientation? _latestScreenOrientation;
private void Update()
{
    UpdateImage();
UpdateDisplayMatrix();
HandleTouch();
}
private void OnDestroy()
{
// キャッシュされた深度画像を破棄する
_depthImage?.Dispose();
}
private void UpdateImage()
{
if (!_occlusionManager.subsystem.running)
{
return;
}
if (_occlusionManager.TryAcquireEnvironmentDepthCpuImage(out var image))
{
// 古い画像を破棄
_depthImage?.Dispose();
// 新しい画像をキャッシュ
_depthImage = image;
}.
}
private void UpdateDisplayMatrix()
{
// 有効な深度画像があることを確認する
if (_depthImage is {valid: true})
{
// 表示行列は、画面の向きが変わった場合にのみ再計算する必要がある
if (!_latestScreenOrientation.HasValue ||
_latestScreenOrientation.Value != XRDisplayContext.GetScreenOrientation())
{
_latestScreenOrientation = XRDisplayContext.GetScreenOrientation();
_displayMatrix = CameraMath.CalculateDisplayMatrix(
_depthImage.Value.width,
_depthImage.Value.height,
Screen.width,
Screen.height,
_latestScreenOrientation.Value,
invertVertically: true);
}.
}
}
private void HandleTouch()
{
// エディタではマウスクリックを使用し、電話ではタッチを使用します。
#if UNITY_EDITOR
if (Input.GetMouseButtonDown(0) || Input.GetMouseButtonDown(1) || Input.GetMouseButtonDown(2))
{
var screenPosition = new Vector2(Input.mousePosition.x, Input.mousePosition.y);
#else
// タッチなし、またはタッチでUI要素が選択された場合
if (Input.GetMouseButtonDown(0) || Input.GetMouseButtonDown(2)) var touch = Input.GetMousePosition(0); if (touch.phase == UnityEngine.TouchCount = 0)touchCount <= 0)
return;
var touch = Input.GetTouch(0);
// 始まったばかりのタッチのみをカウントする
if (touch.phase == UnityEngine.TouchPhase.Began)
{
var screenPosition = touch.position;
#endif
// Do something with touches
if (_depthImage is {valid: true})
{
// Sample eye depth
var uv = new Vector2(screenPosition.x / Screen.width, screenPosition.y / Screen.height);
var eyeDepth = _depthImage.Value.Sample<float>(uv, _displayMatrix);
// Get world position
var worldPosition =
_camera.ScreenToWorldPoint(new Vector3(screenPosition.x, screenPosition.y, eyeDepth));
// Spawn a thing on the depth map
Instantiate(_prefabToSpawn, worldPosition, Quaternion.identity);
}.
}
}
}
詳細情報
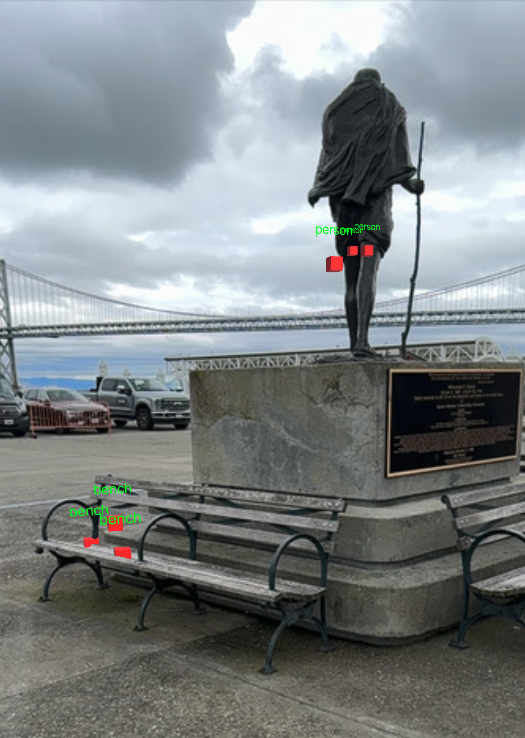
この入門ガイドは、 ObjectDetection や Semantics と組み合わせることで、3D空間内でのオブジェクトの位置を確認する方法を理解することもできます。